
AWS Marketplace
Guide on step-by-step process of deploying anynode – The Software SBC in your AWS environment, leveraging the flexibility and scalability that AWS offers.
In this section, we will walk you through the step-by-step process of deploying anynode – The Software SBC in your AWS environment, leveraging the flexibility and scalability that AWS offers.
Advantages of using anynode on AWS:
-
Scalability: AWS allows you to scale your anynode deployment according to your changing business needs. Whether you are a small business or an enterprise, AWS provides the resources to accommodate your growth seamlessly.
-
Flexibility: With AWS, you have the flexibility to choose the instance type, storage, and network configurations that best suit your requirements. anynode's compatibility with various AWS services enhances your ability to tailor the solution to your specific needs.
-
High Availability: Leverage AWS's global infrastructure to ensure high availability and reliability of your anynode SBC deployment. Distribute your resources across multiple availability zones to minimize downtime and enhance fault tolerance.
-
Security: AWS offers a comprehensive set of security features, and by deploying anynode on the AWS Marketplace, you benefit from a secure and compliant environment. Utilize AWS security groups, network ACLs, and encryption options to safeguard your communication infrastructure.
-
Cost-Efficiency: AWS's pay-as-you-go pricing model allows you to optimize costs by paying only for the resources you consume.
Let's embark on this journey together and unlock the full capabilities of anynode in the Amazon AWS Marketplace.
Please note: The menus and terminologies at AWS are subject to change at any time.
This is a “Bring your own license” offering. You need to buy an anynode license or use your anynode subscription license.
Navigate to the AWS Marketplace.
Sign in using your existing credentials or create a new account by selecting the "Create a new account" option.
The detailed steps for setting up an account with AWS are not covered here. Please refer to the AWS Buyers Guide, Step 1: "Creating an AWS account", for the necessary guidance.
Search for anynode - The Software SBC (VM). You will get a product overview with pricing information.
anynode is available on AWS Marketplace exclusively for the Linux/Unix operating system.
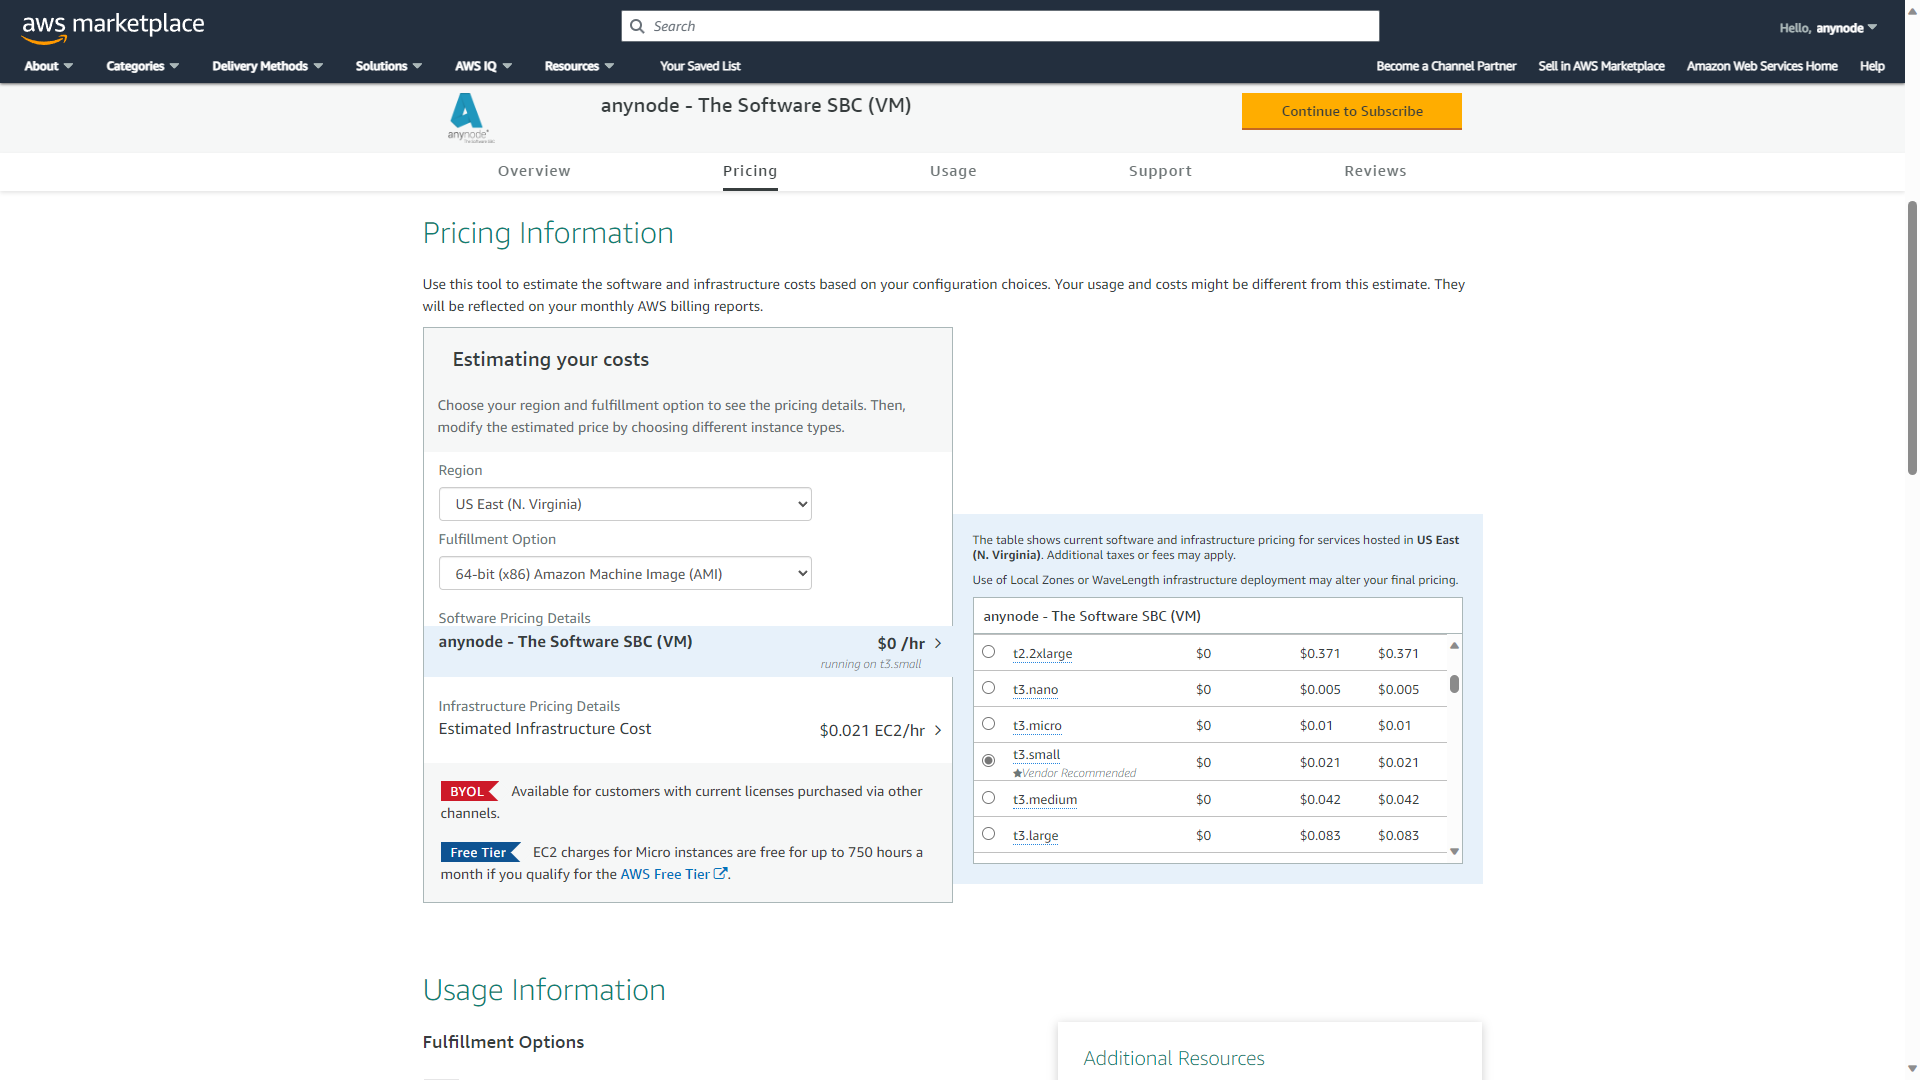
Take advantage of the opportunity to preview the anticipated costs before the actual deployment. Choose your region and fulfillment option to see the pricing details.
Selecting a specific region enables users to deploy anynode in close geographical proximity, reducing latency and complying with legal requirements. Additionally, certain services or products may have different prices in various regions.
An Amazon Machine Image (AMI) contains the information necessary to launch an instance, which is a virtual server in the cloud. Then, modify the estimated price by choosing different instance types. Consider our recommendation for t3.small. The T3 instance family is designed to provide a balance of compute, memory, and network resources suitable for a variety of general-purpose workloads. Pay attention to the "Vendor Recommended" label. Our recommendation is always pre-selected. When hovering over the various instance details with the mouse, you will receive additional information, such as CPU size.
Click on the button.
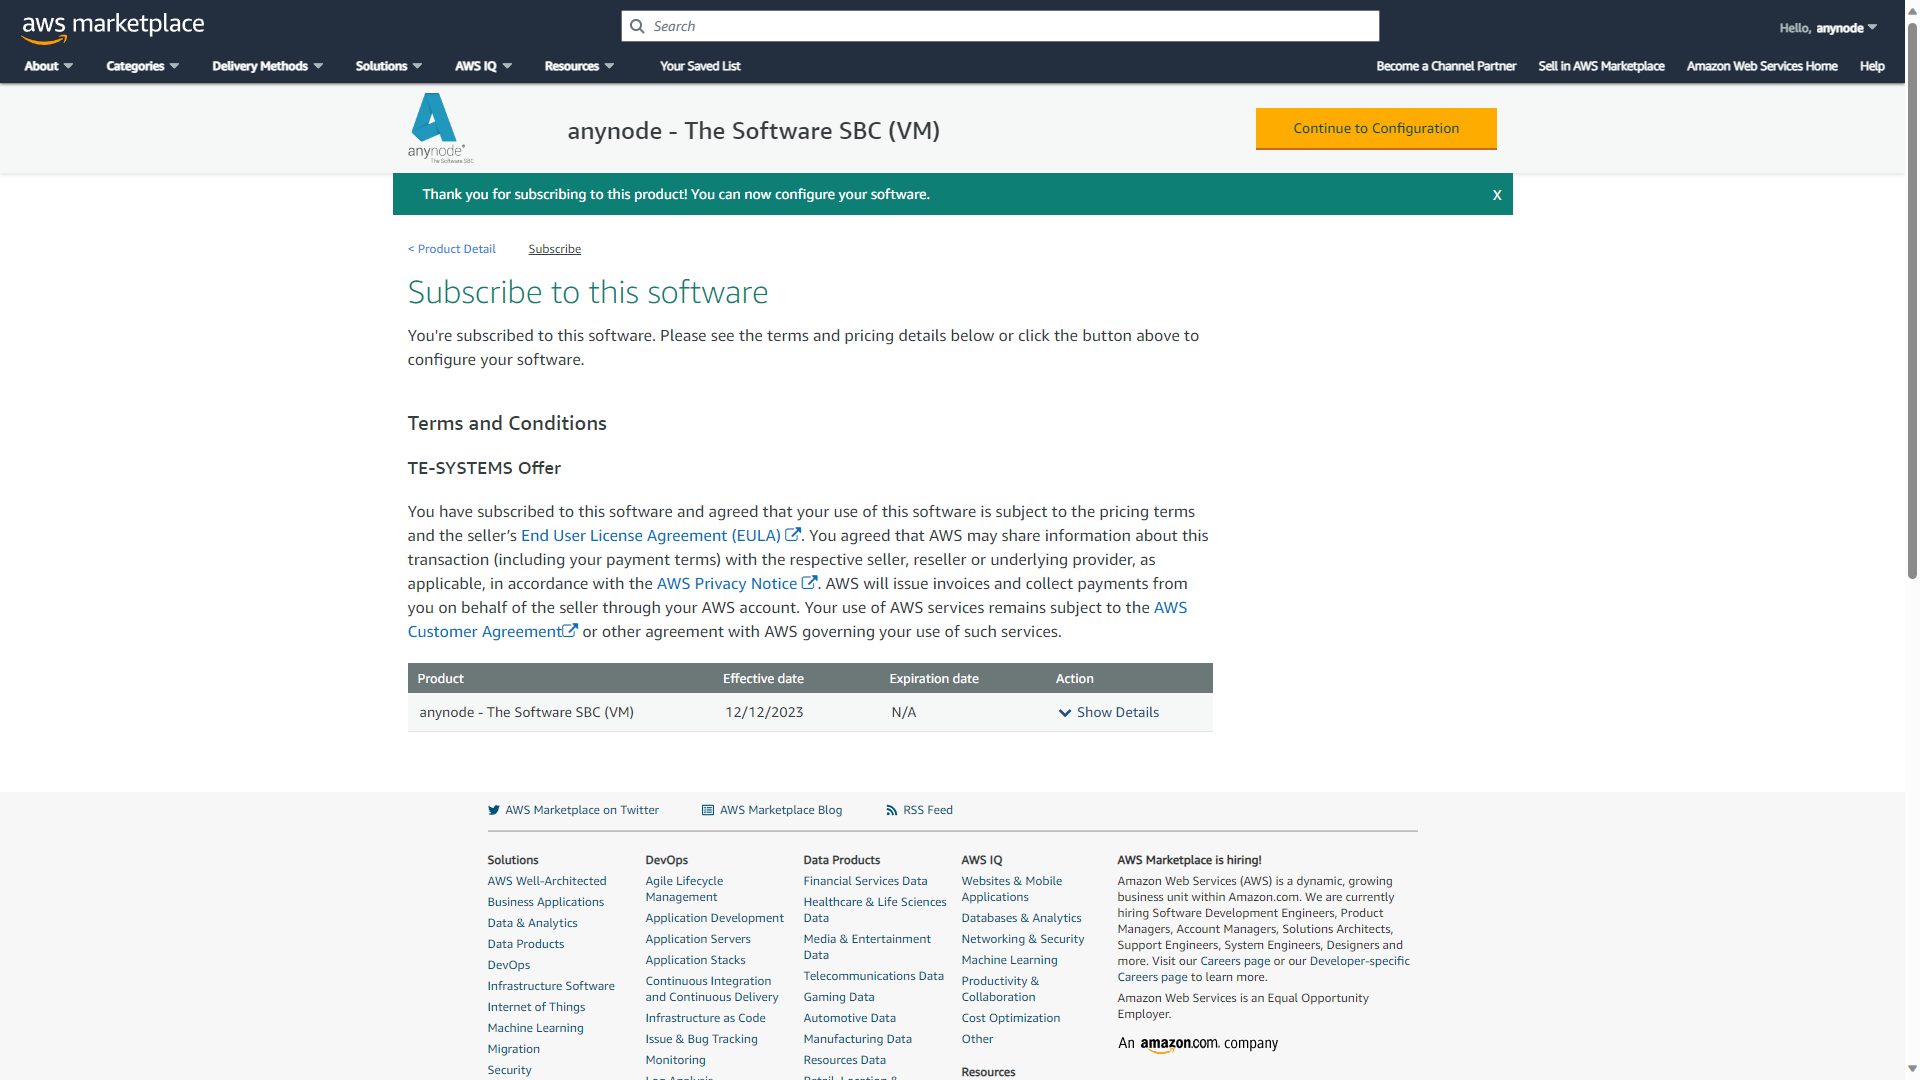
Your subscription to anynode is pending now and may take a few minutes. Take the opportunity to read the terms and conditions for this TE-SYSTEMS offer. You will be notified when the subscription is complete.
Click on the button.
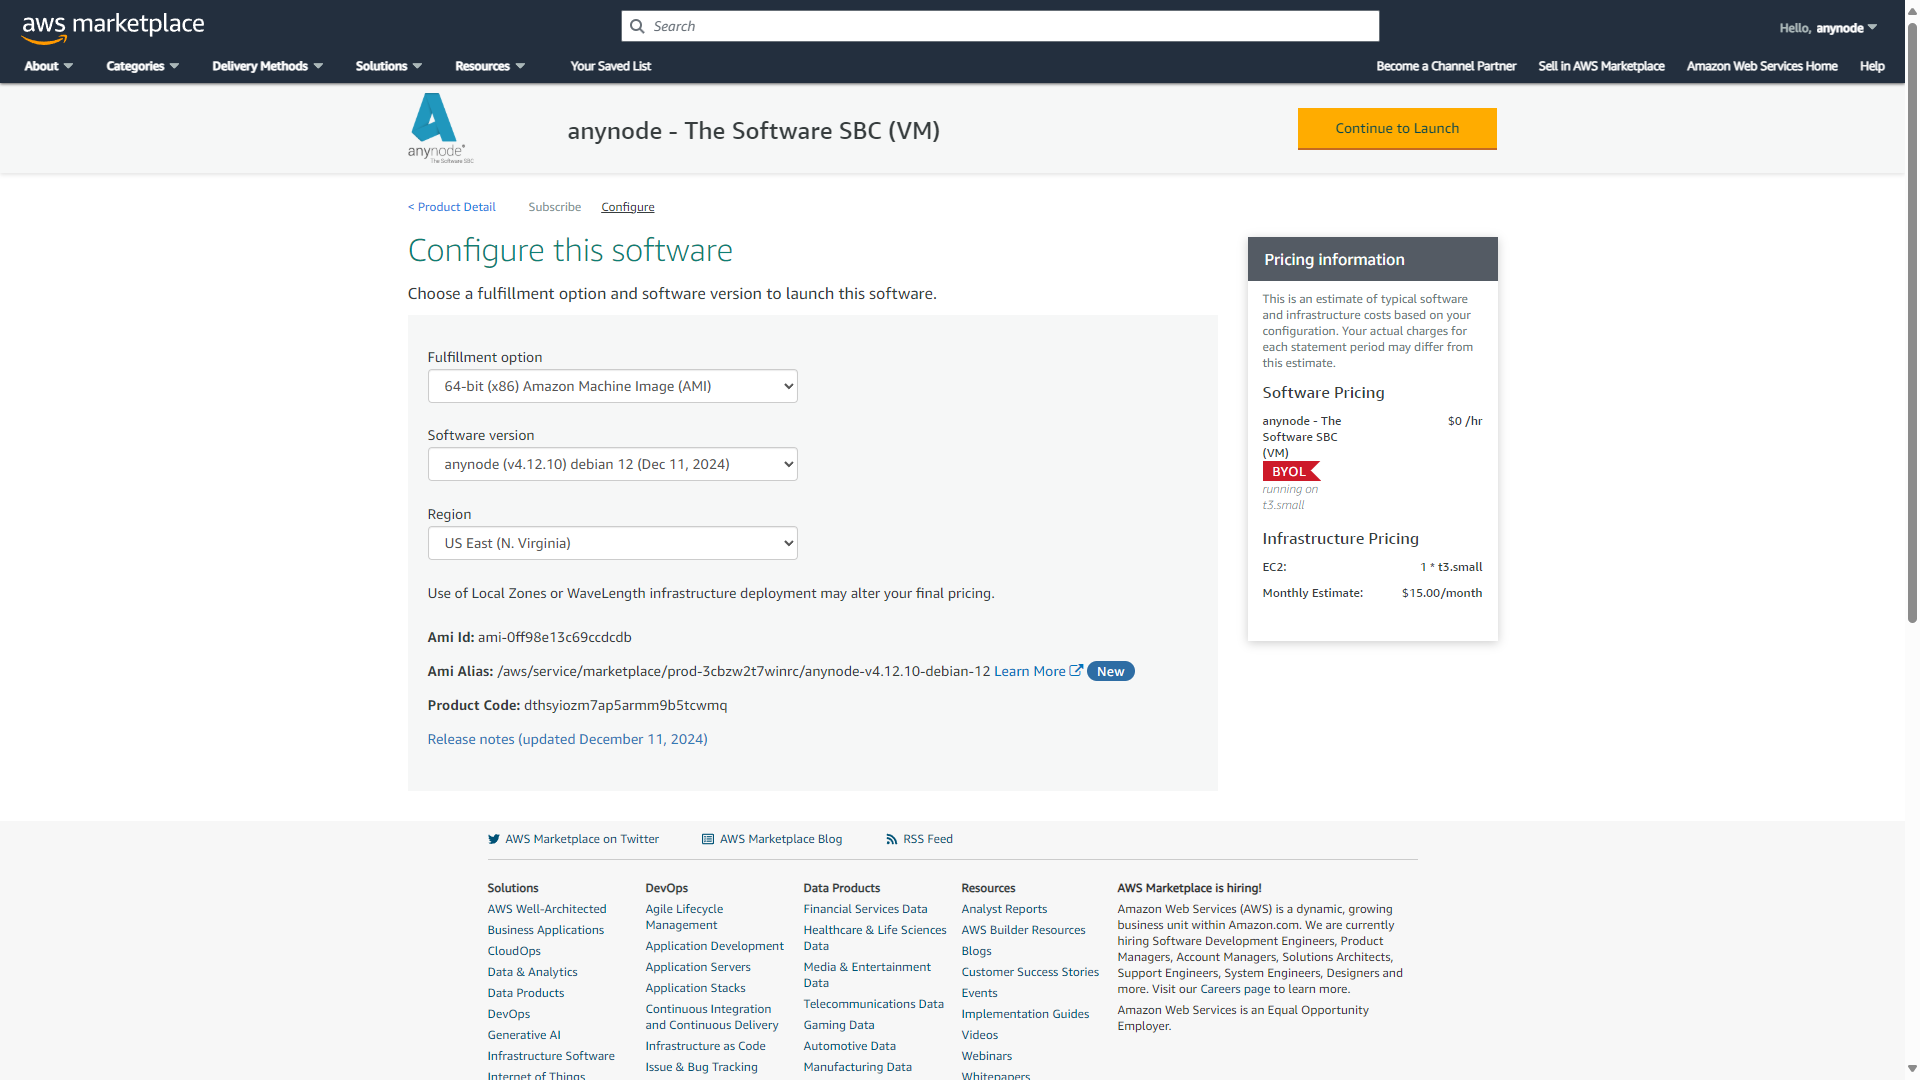
At this point, you have the option to change the region once again.
Choose a fulfillment option and software version. The newest version of anynode is preselected.
Click on the button.
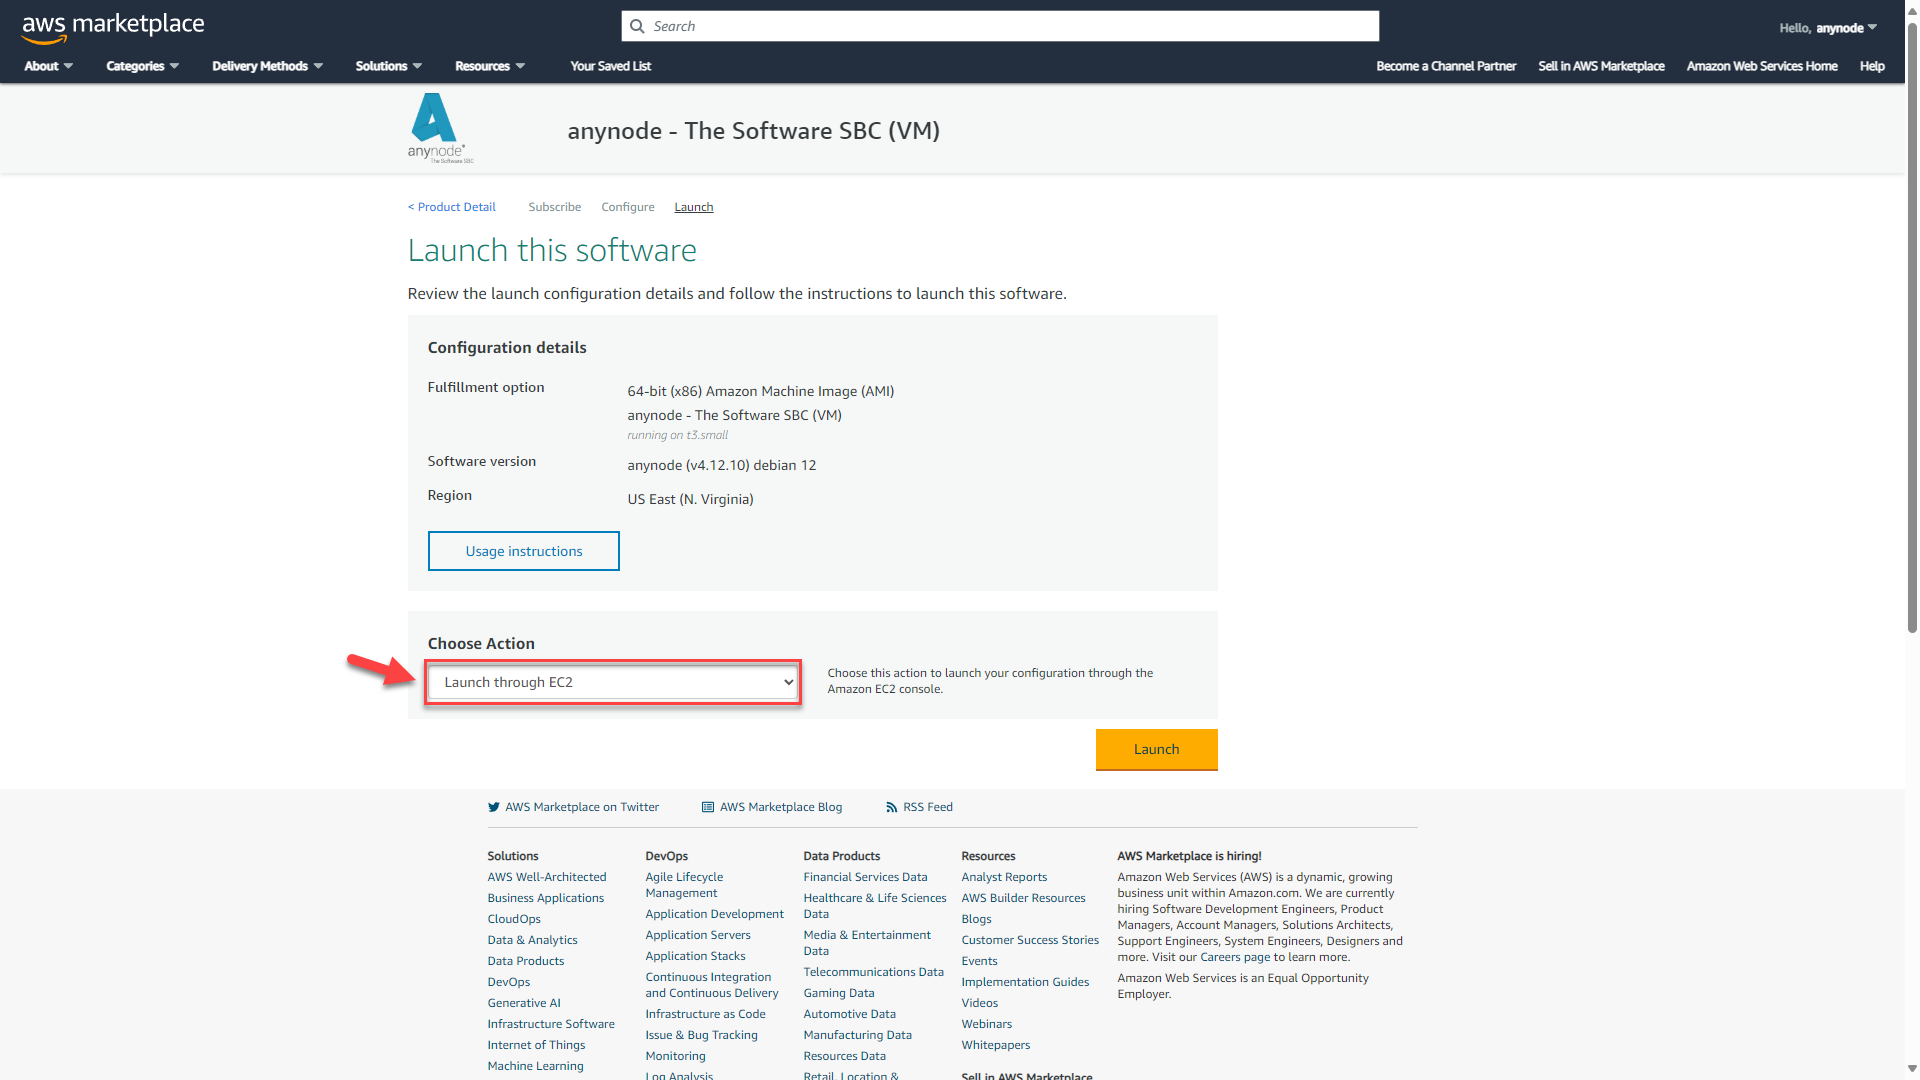
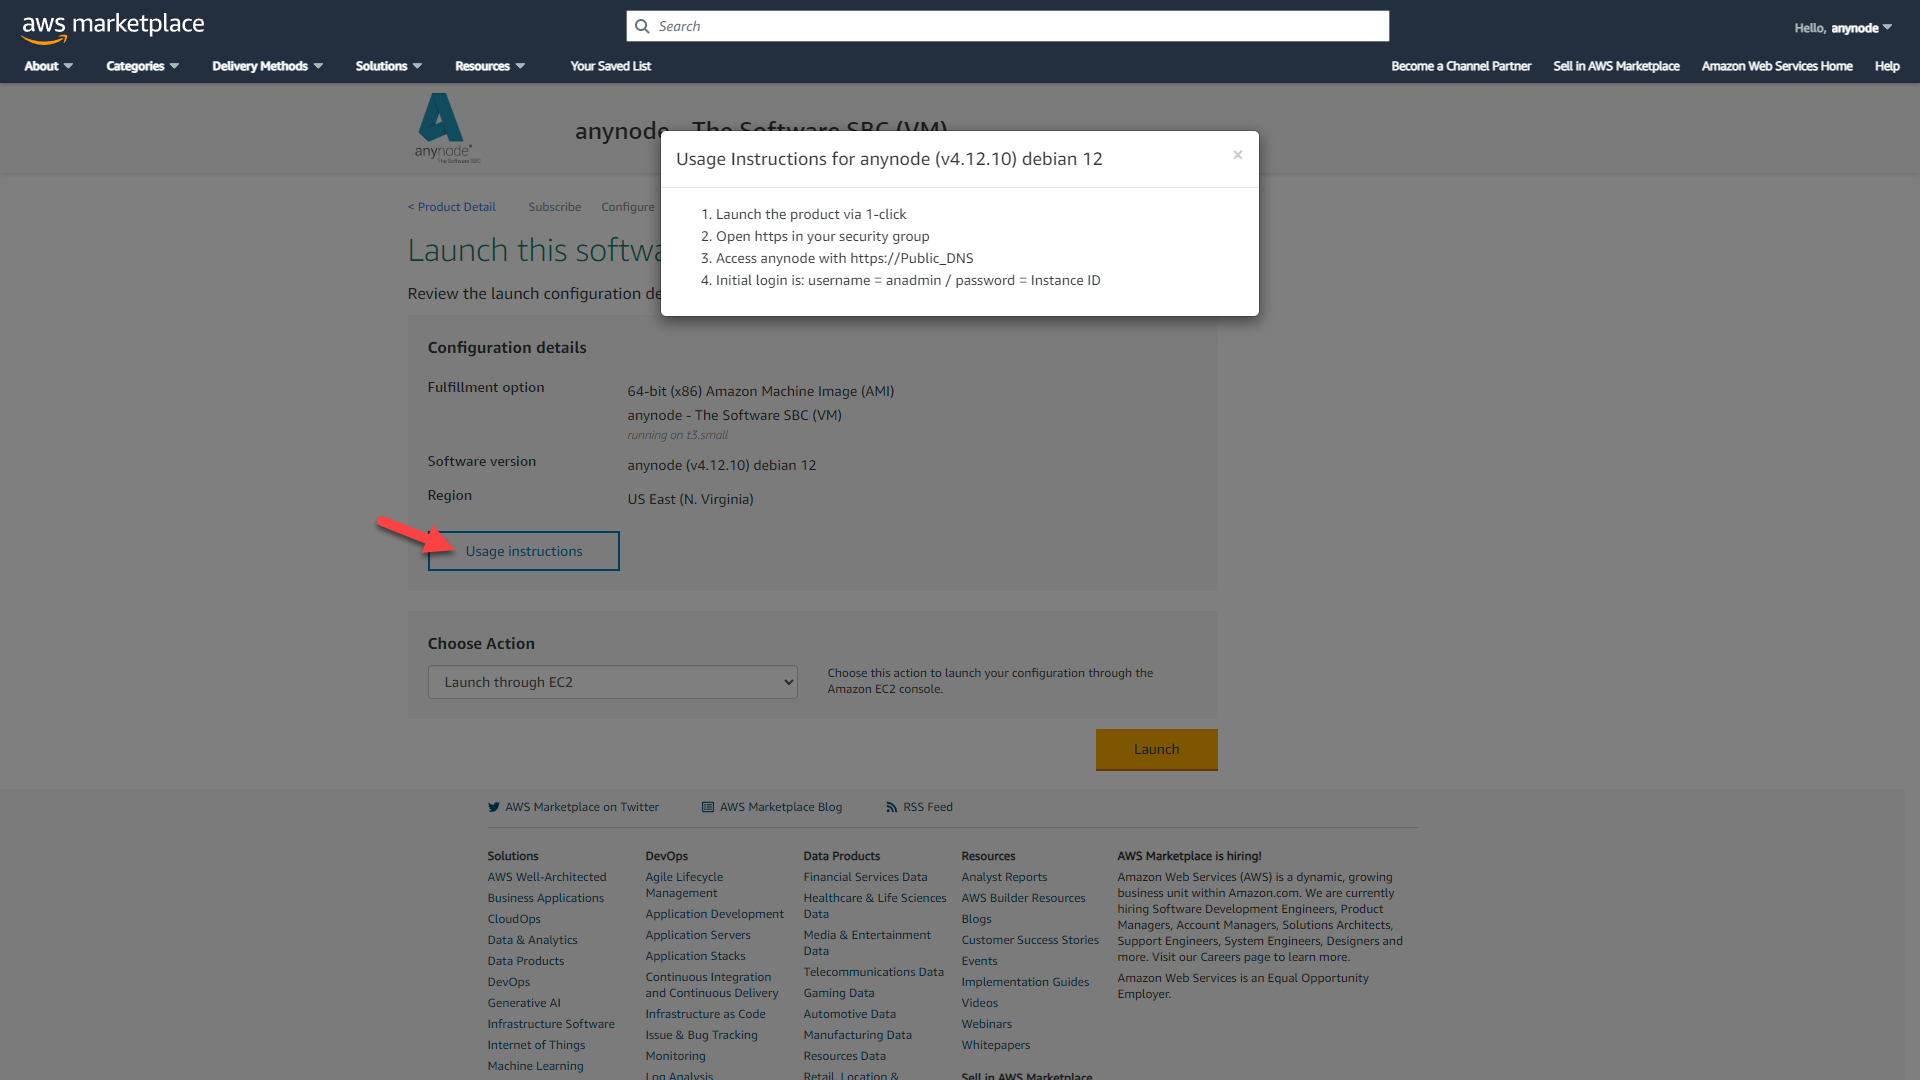
Review the launch configuration details.
Choose Launch through EC2 in the Choose Action dropdown.
By clicking on the button, you will receive helpful information for accessing the anynode frontend later. However, we will mention this again later.
Click on the button.
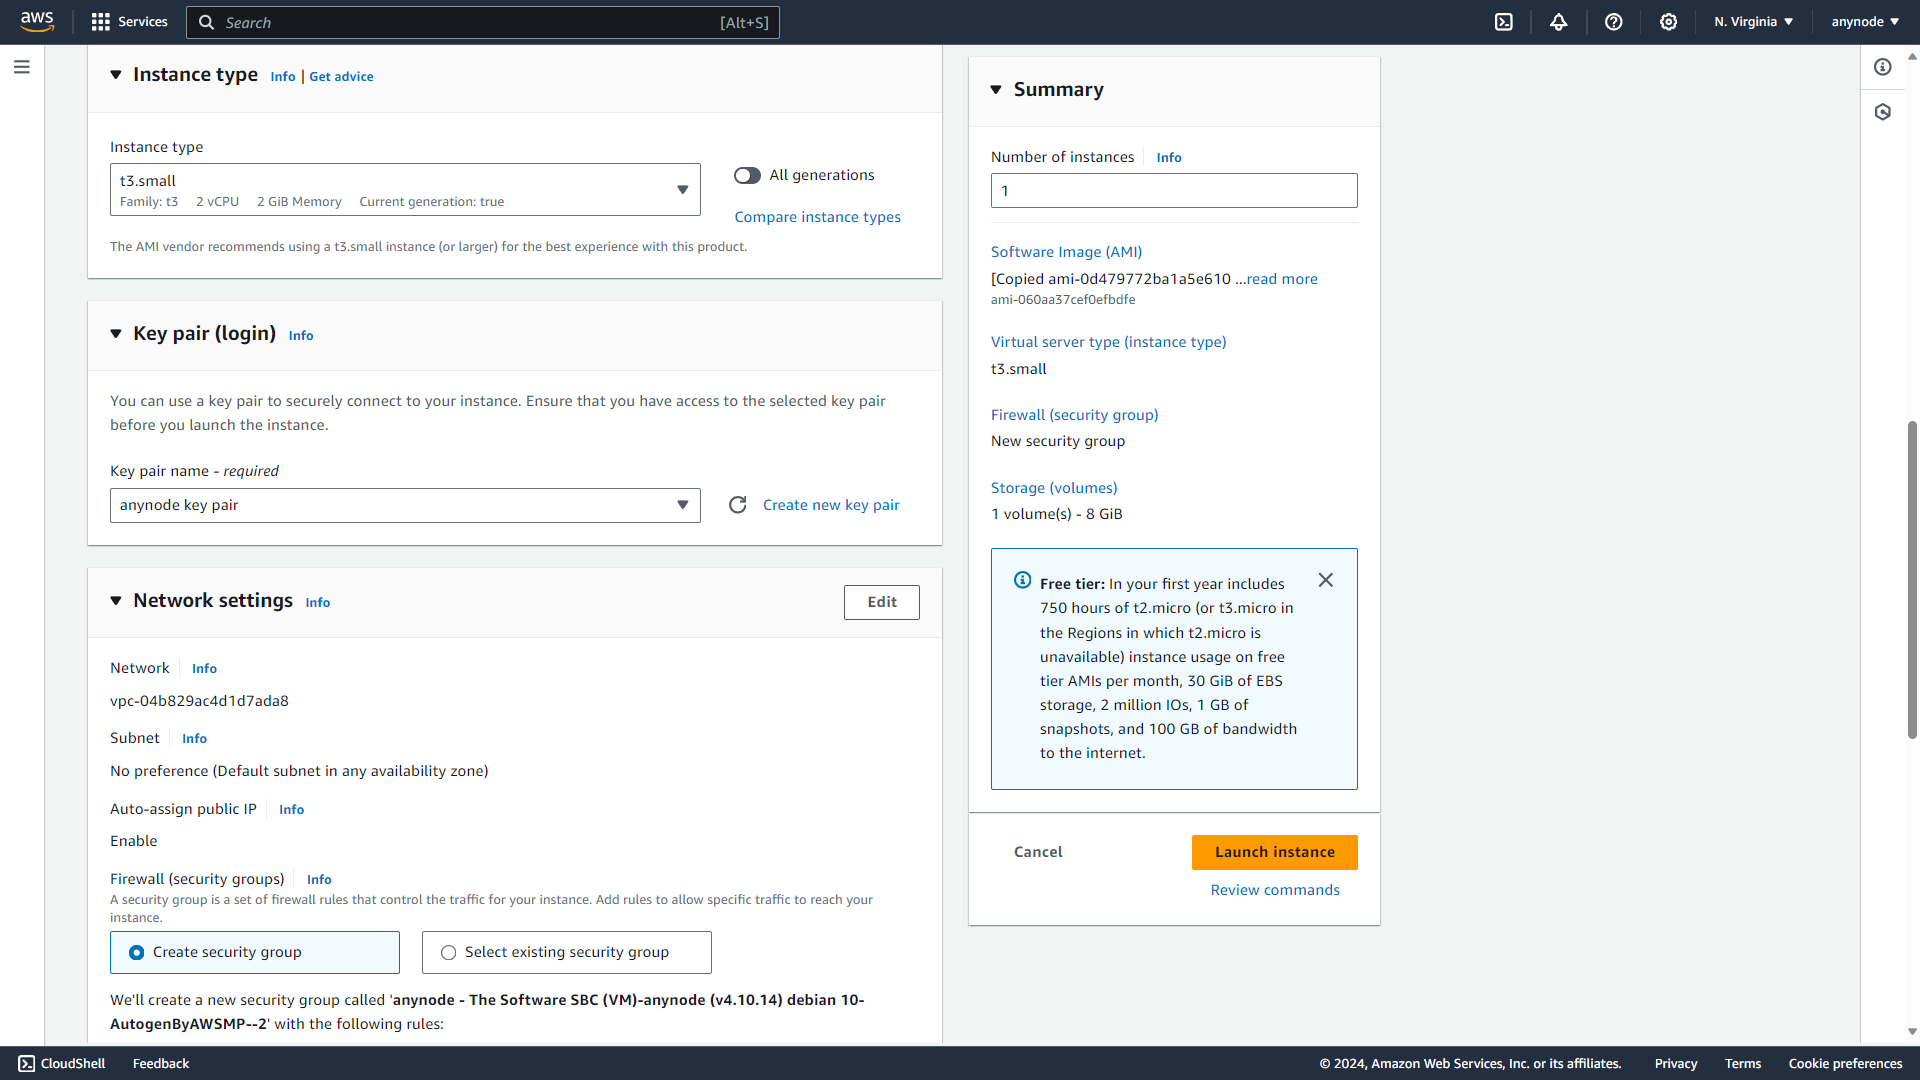
Choose a name for your instance.
Scroll down to Instance type. We recommend using a t3.small instance (or larger) for the best experience with anynode. The recommendation is already pre-selected.
Go to Key pair (login).
Choose your key pair or create a new one to securely connect to your instance.
Scroll down to Network settings.
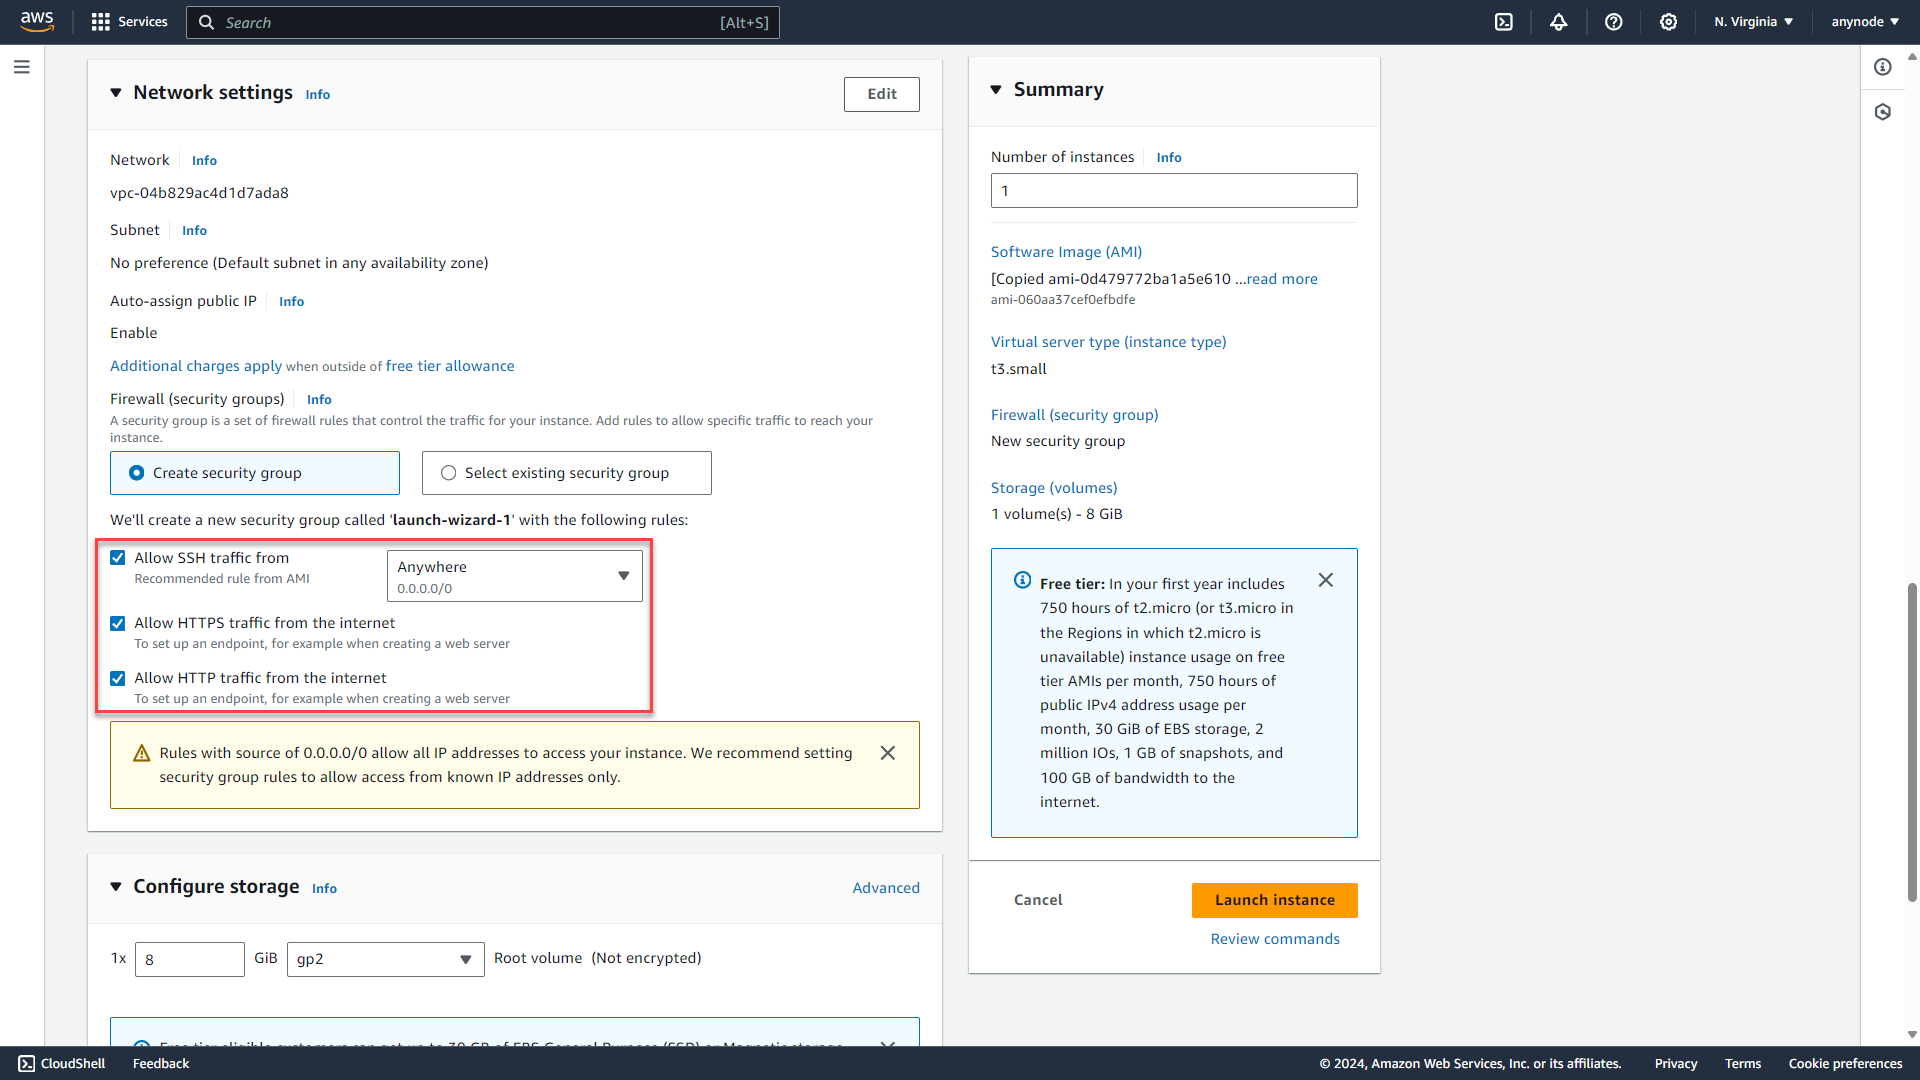
We would like to point out that the specific settings in the network settings depend on your individual security requirements. In our example, we allow SSH from all IP addresses. Additionally, we allow HTTPS and HTTP here as examples. For further information refer to the documentation provided online by AWS.
By allowing HTTPS traffic from the Internet, you enable external access to the anynode frontend. It ensures that anynode can properly receive HTTPS requests and responses over the Internet.
To use a Certificate Issuance Provider like "Let's Encrypt" in anynode, external access to anynode is necessary. In such a scenario, it's essential to allow "Allow HTTP traffic from the Internet."
By enabling HTTP traffic from the Internet, you enable vital communication from the certificate issuance provider to the anynode instance. This ensures the successful issuance, renewal, and validation of SSL/TLS certificates for your deployment. Certificate Issuance Providers employ various validation methods to verify control over a domain before issuing an SSL/TLS certificate. One common validation method is the HTTP-01 Challenge:
The certificate authority (CA) prompts the applicant to place a specific file or code on the domain's webserver. The CA then attempts to access this resource via HTTP to complete domain validation.
The HTTP-01 challenge requires port 80 to be open in your firewall, allowing the certificate issuance provider to reach your system when needed. Port 80 should not be used by any other program on the anynode machine with the selected interface IP address. The port will only be opened when a challenge is initiated for certificate renewal or new certificate issuance. Afterward, the port will be closed again.
Click on the button.
Wait a few seconds and do not close your browser.
You will receive confirmation of the successfully initiated launch of your instance.
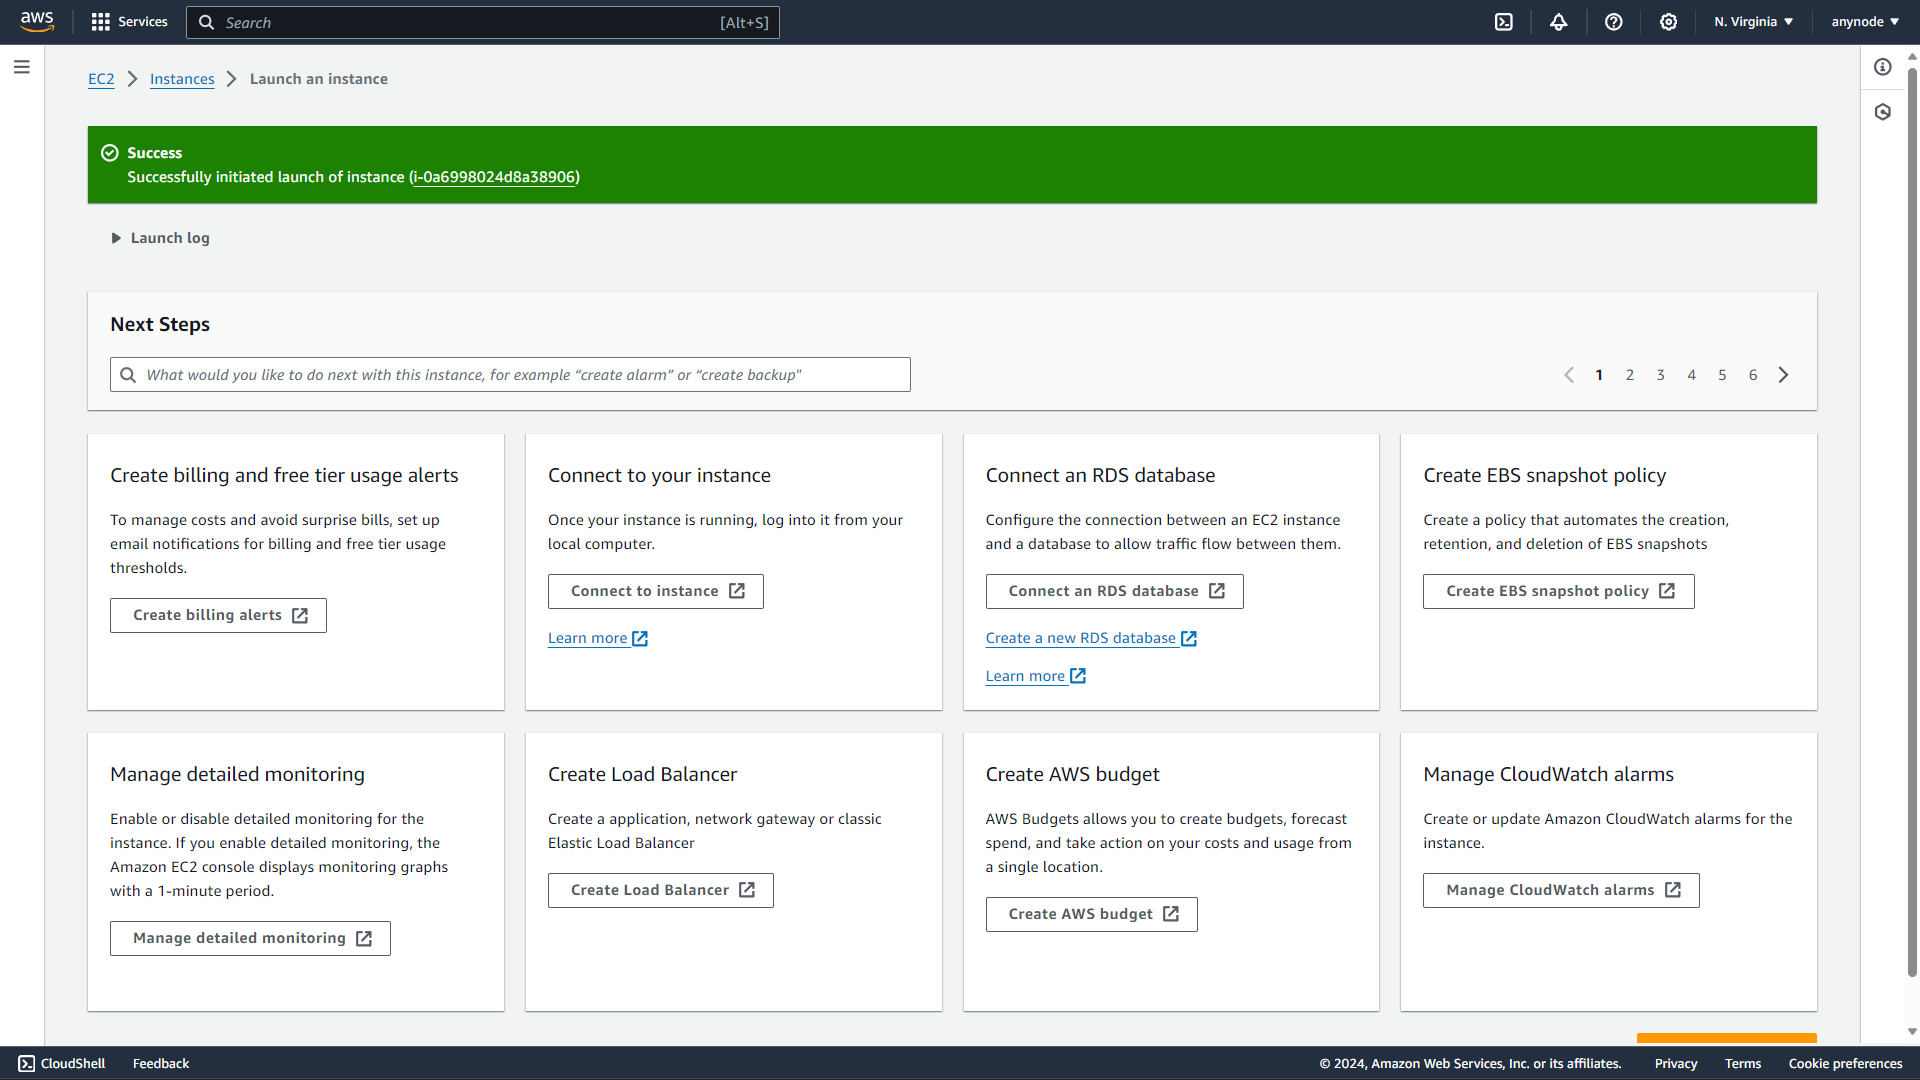
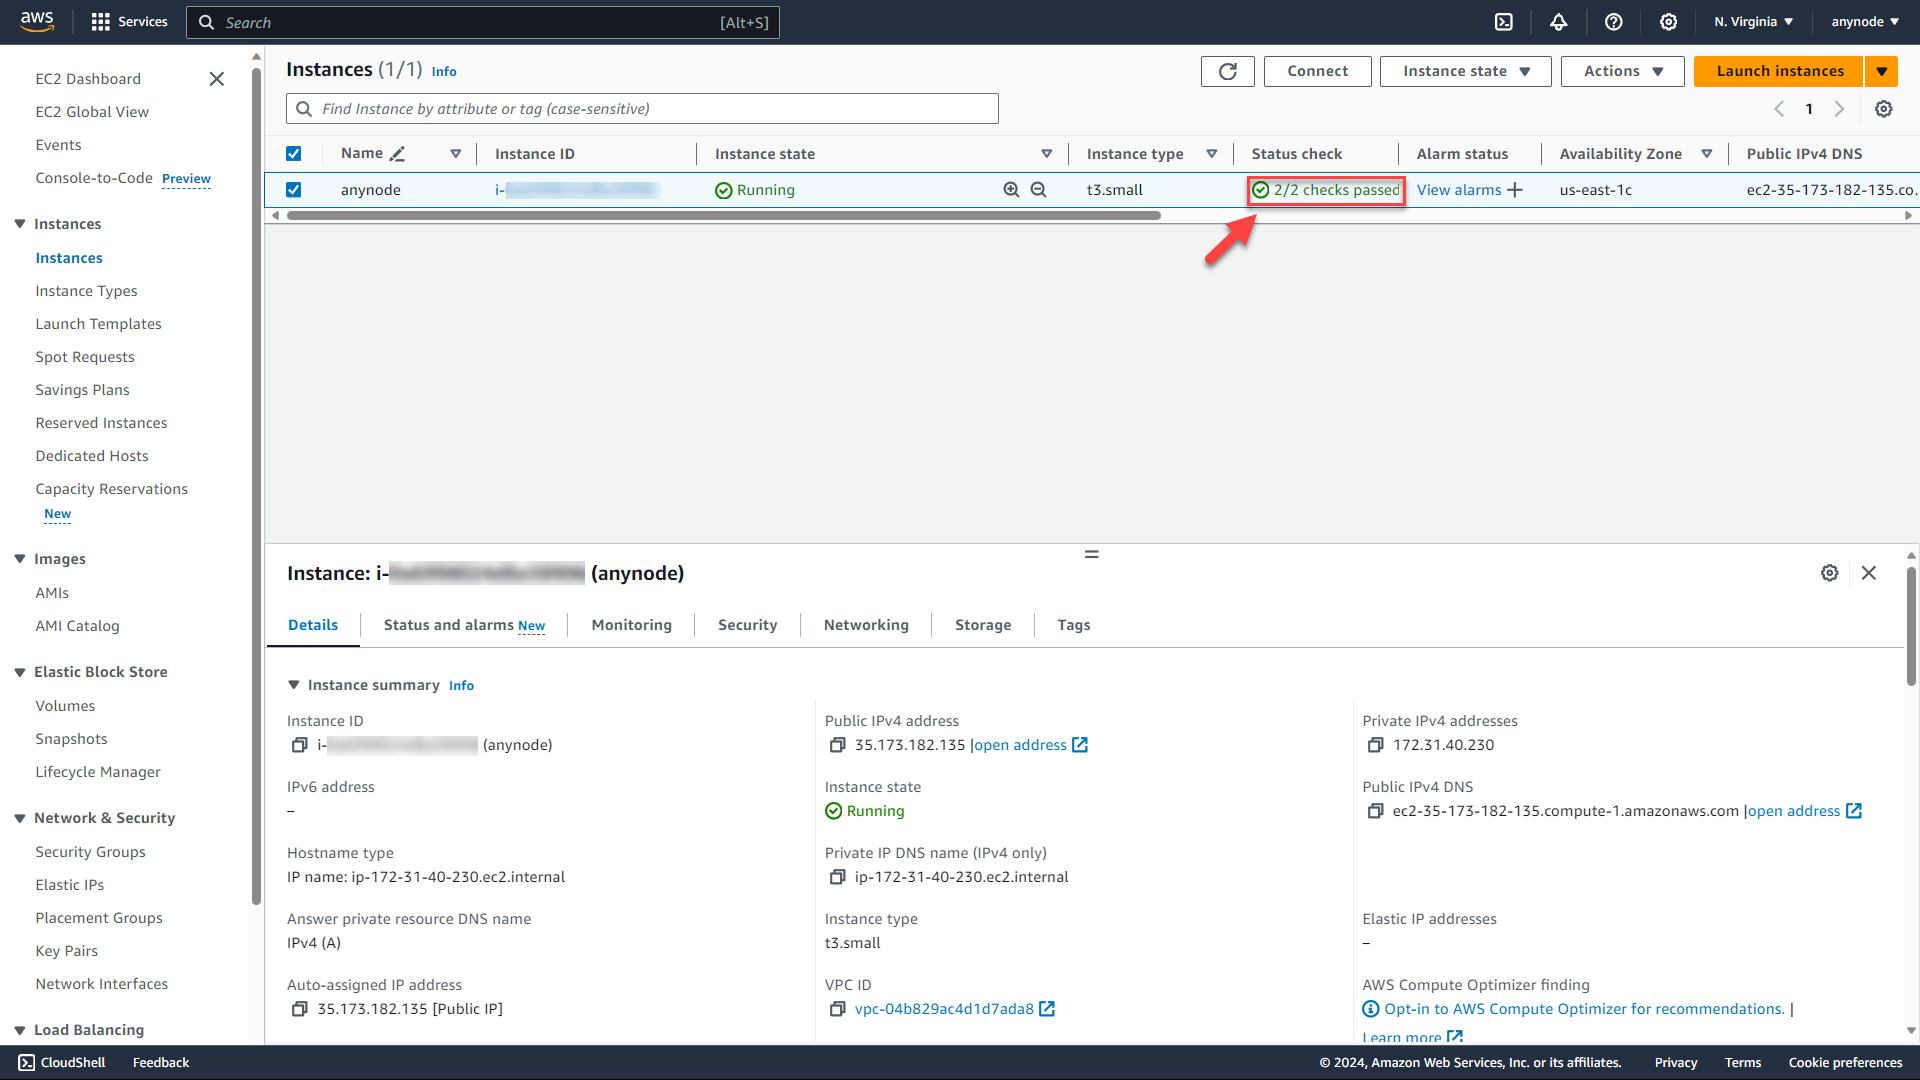
Click on Instances in the upper left corner.
Check the status of your instance. It should be green. This may take a few minutes. Use the button if necessary.
Congratulations! You have successfully provisioned your instance with anynode on AWS and can now access the anynode frontend.
Access to the anynode Frontend
For successful access to the anynode frontend, we'd like to remind you of the Usage Instructions provided earlier on the Launch this software page.
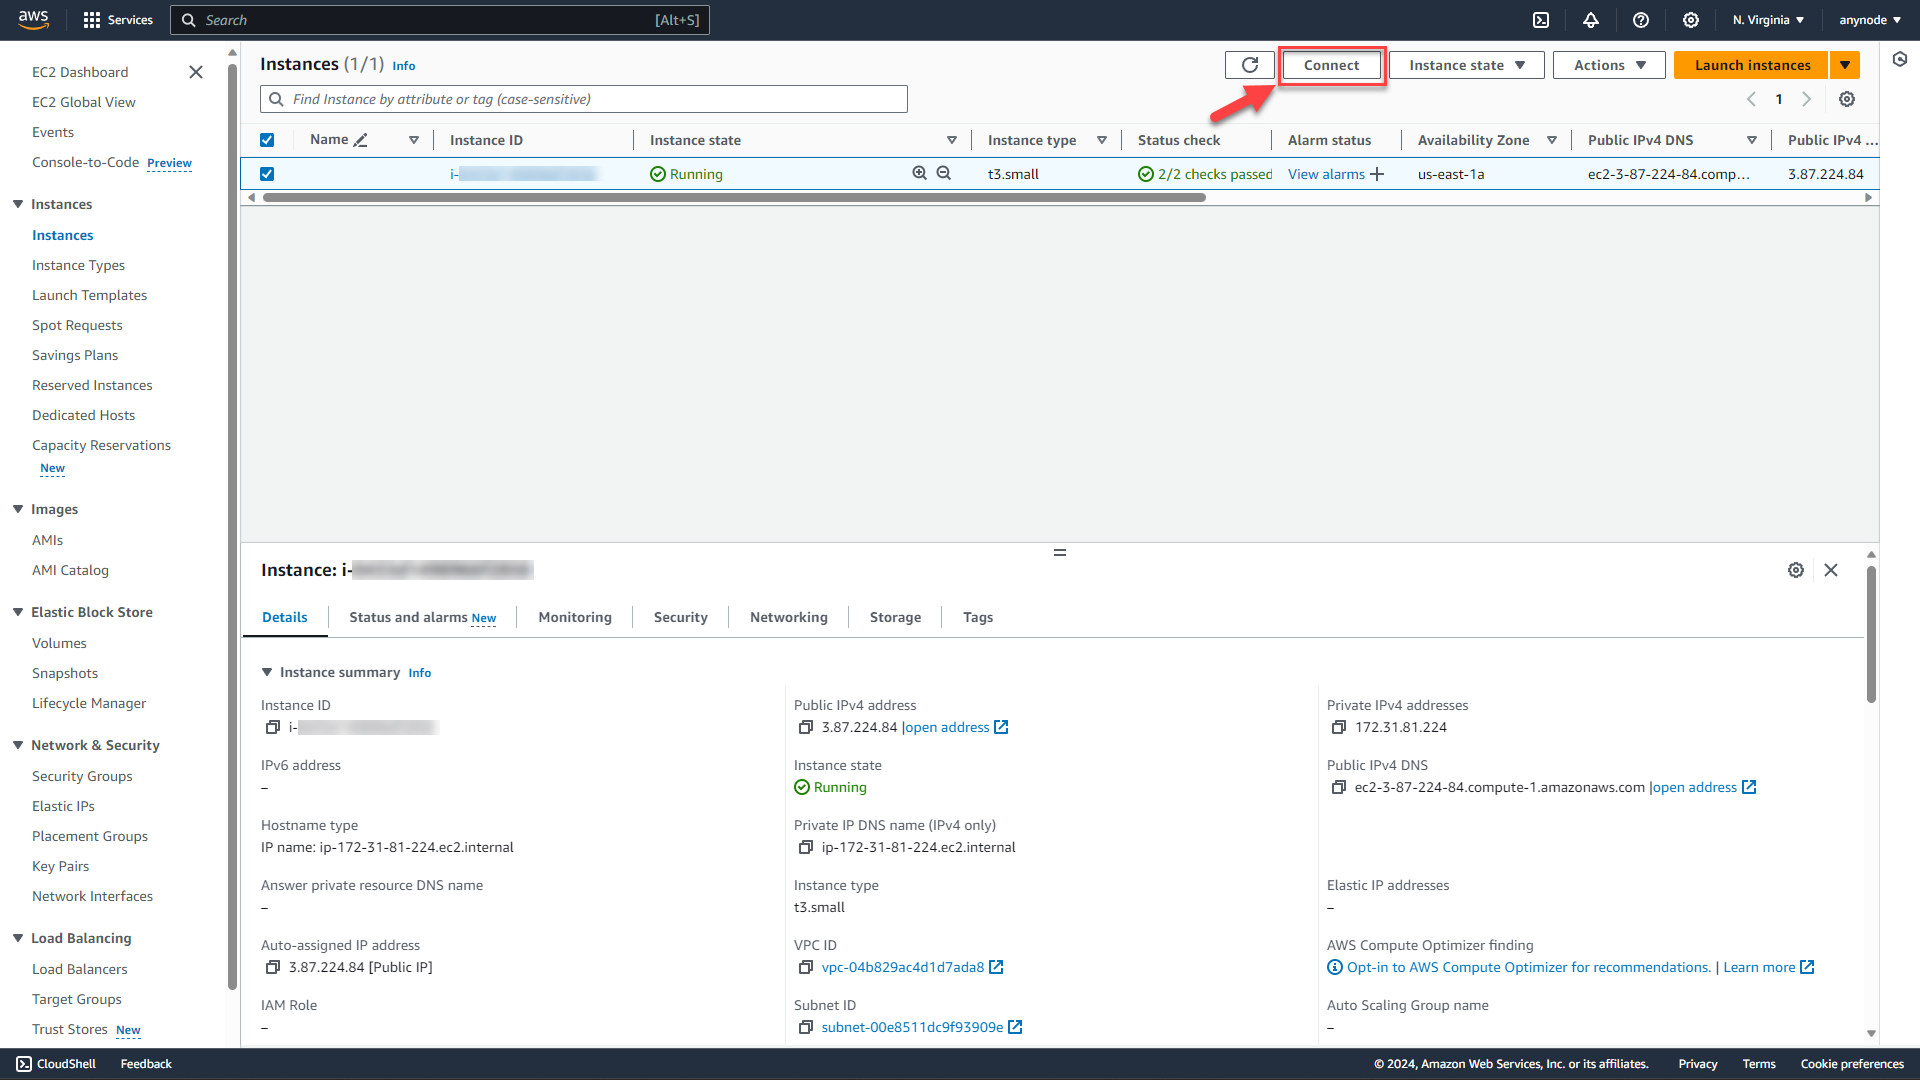
In your EC2 Console, click on Instances in the left menu bar. Navigate to your anynode instance and click on the Instance ID.
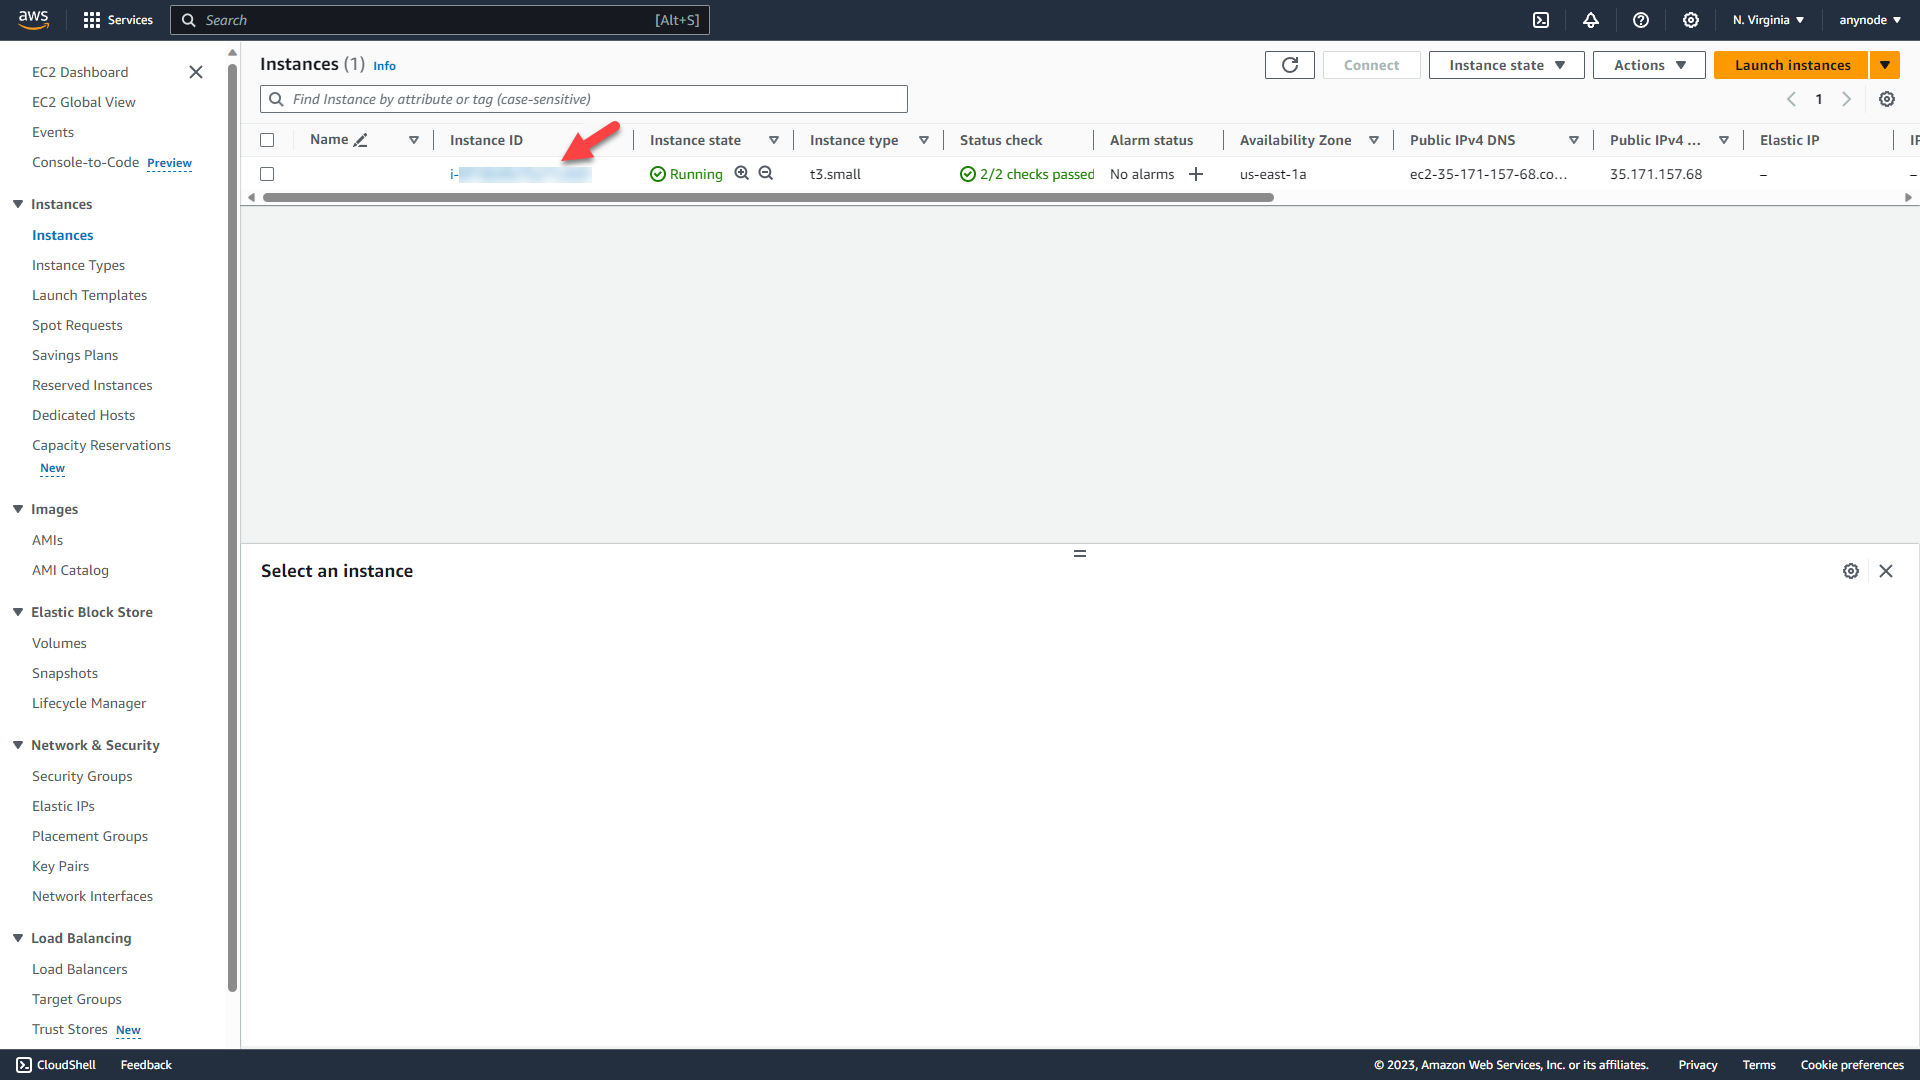
You will get your anynode instance details.
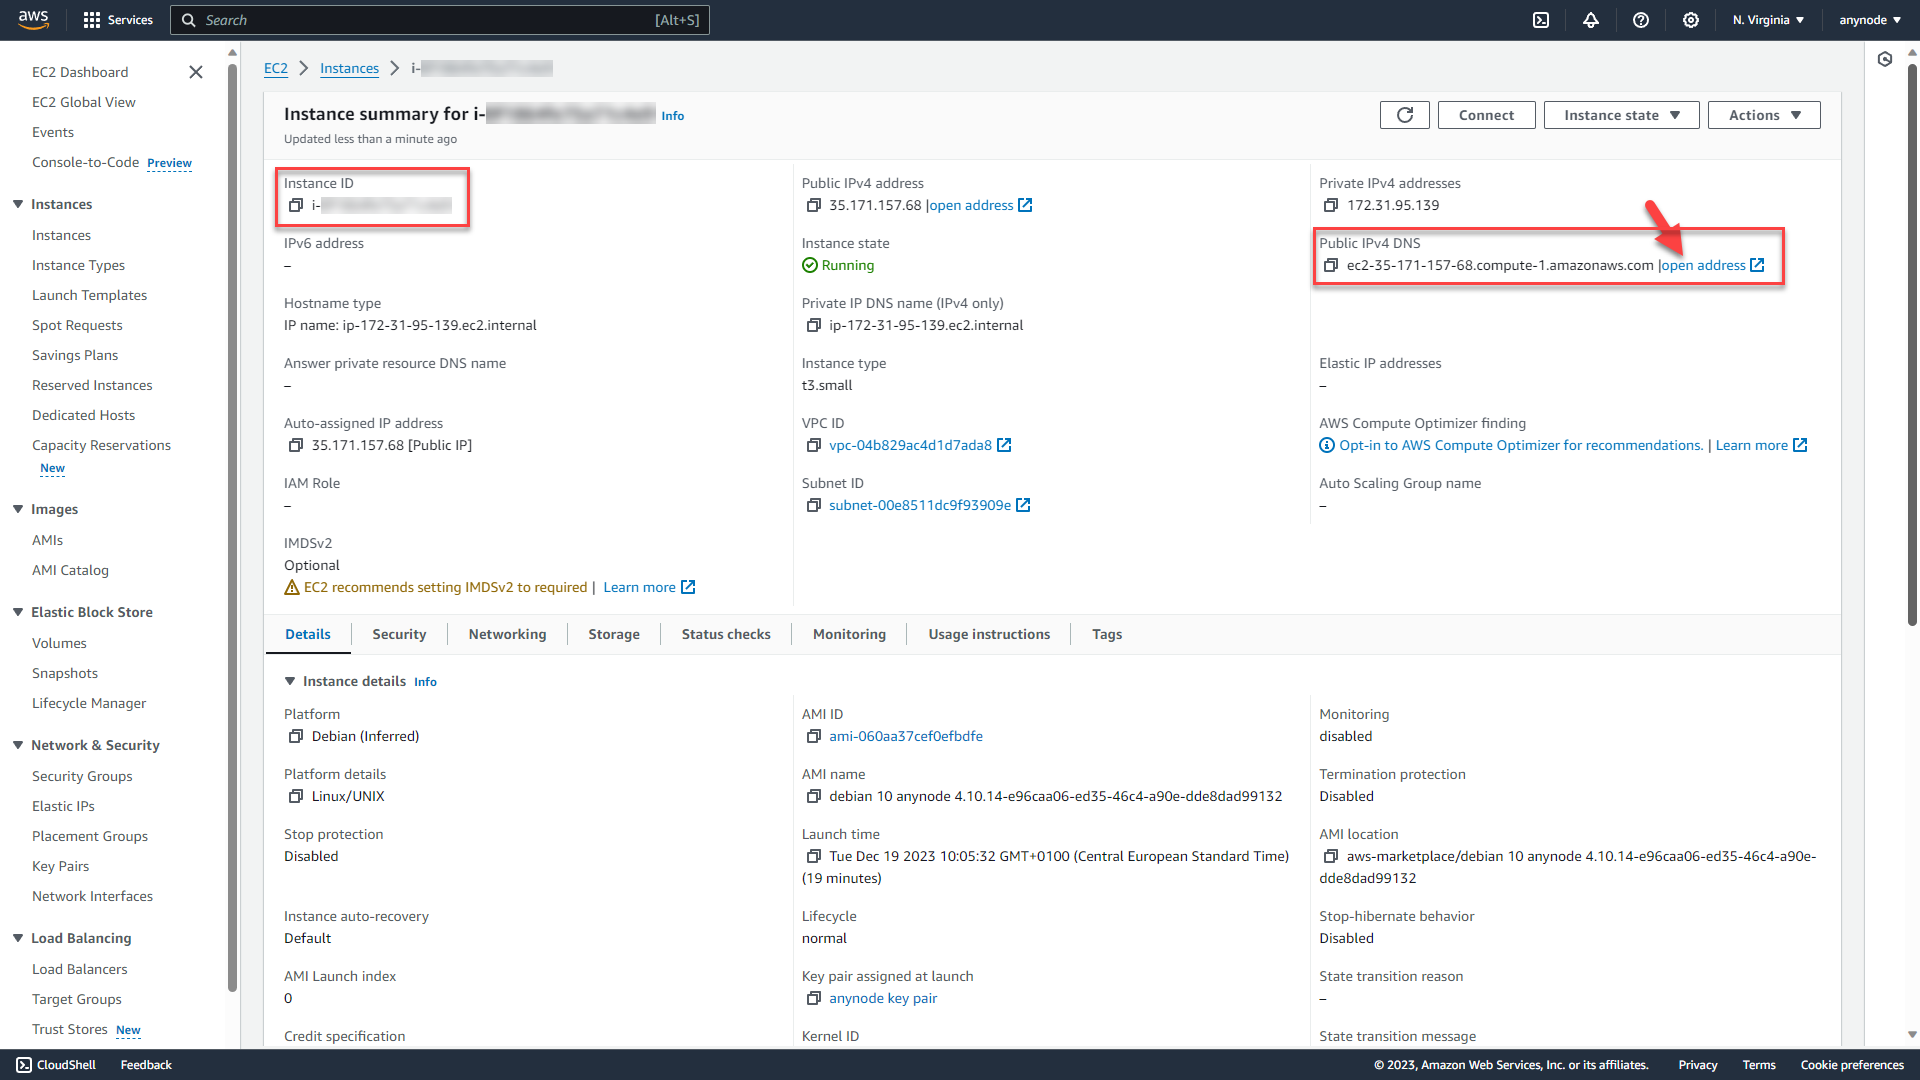
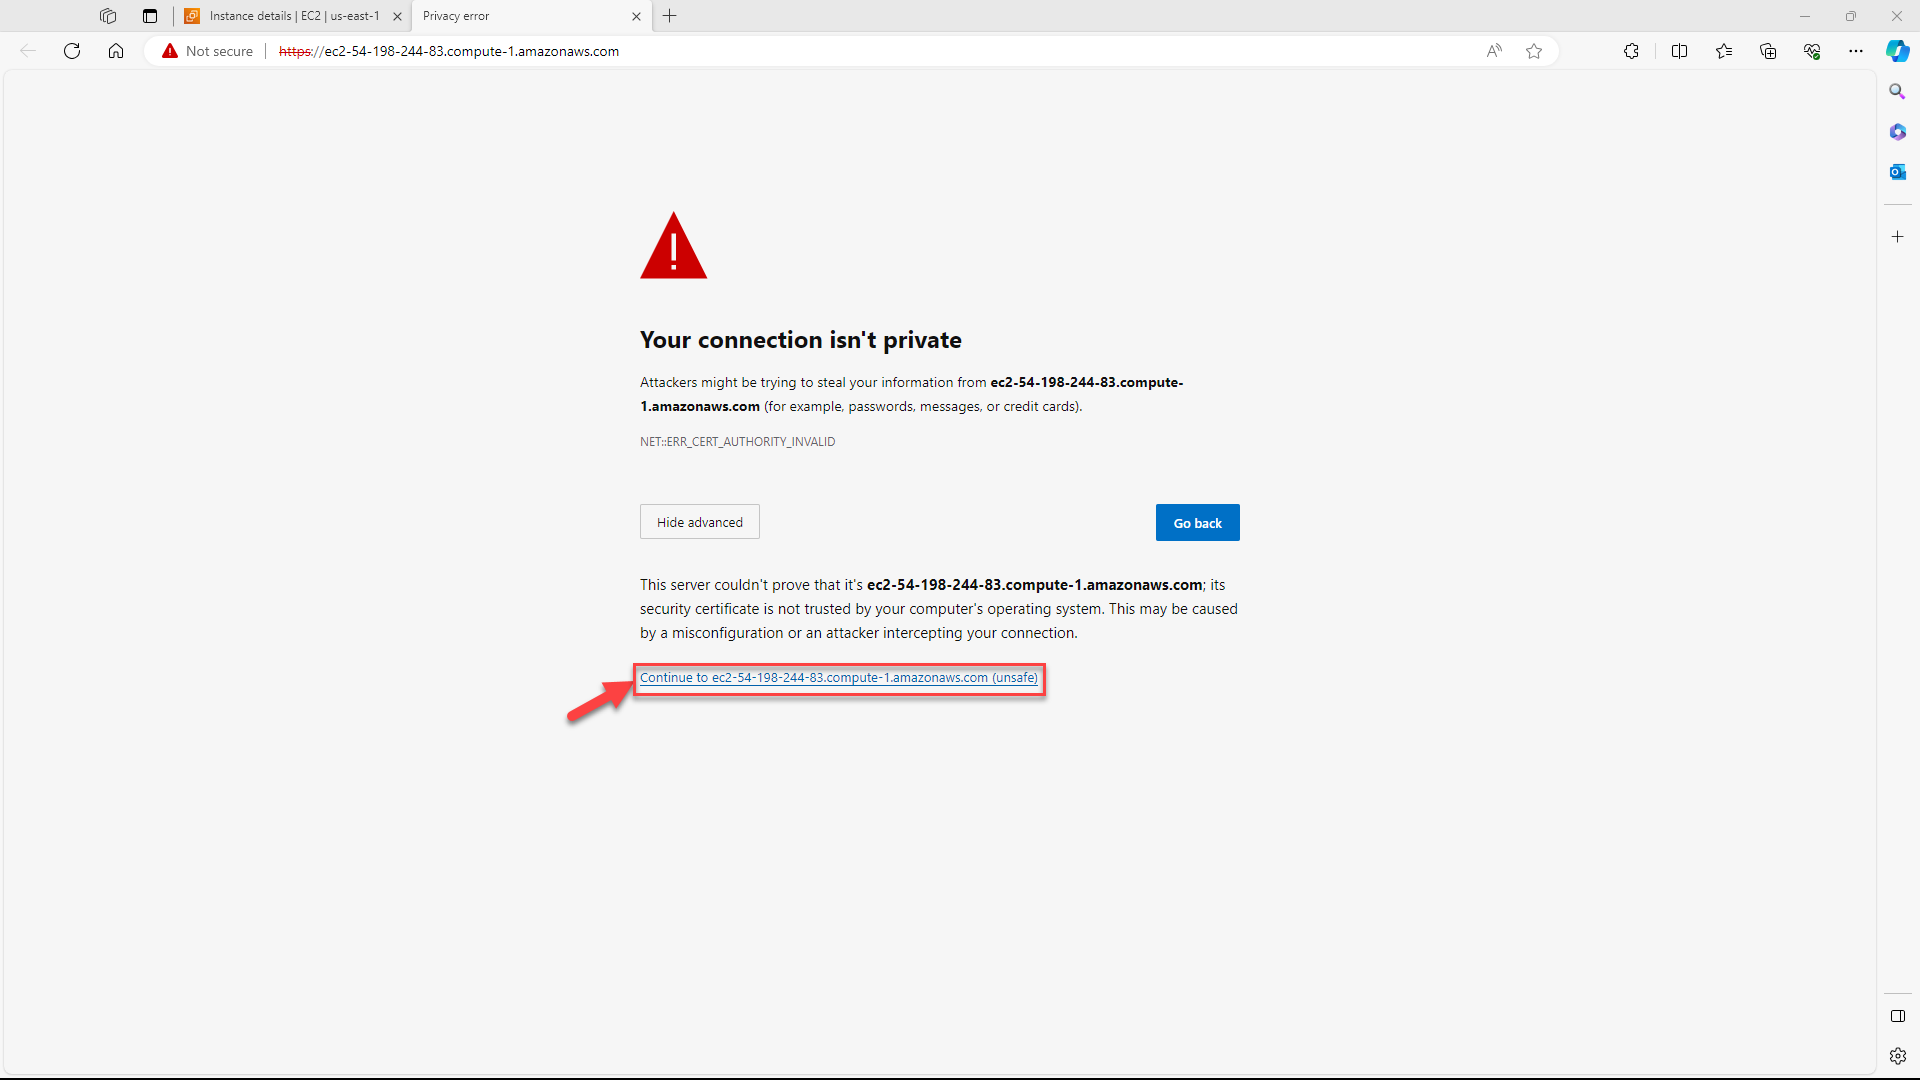
You can now access the anynode frontend via the internal IP address. The device you wish to access the anynode frontend from must be within the internal network. If the device is not within the internal network, you can also access it via the public IPv4 DNS domain name. However, this must be allowed in the firewall rules and should only be permitted for specific IP addresses. In our example, we will show the access via the public IPv4 DNS domain name.
Copy your Instance ID and navigate to Public IPv4 DNS.
Click on open address to access the anynode frontend.
Upon the initial launch of anynode in the browser after deployment, you will encounter a message with the HTTPS crossed out. This happens because the common self-signed certificate in anynode does not match the hostname you are visiting. Despite the crossed-out HTTPS, the connection remains secure. This persistent message is due to the browser not trusting the self-signed certificate from anynode. Ignore these messages initially and proceed to set up the password for accessing the anynode frontend. We will address this issue shortly.
Depending on your browser, click on the button.
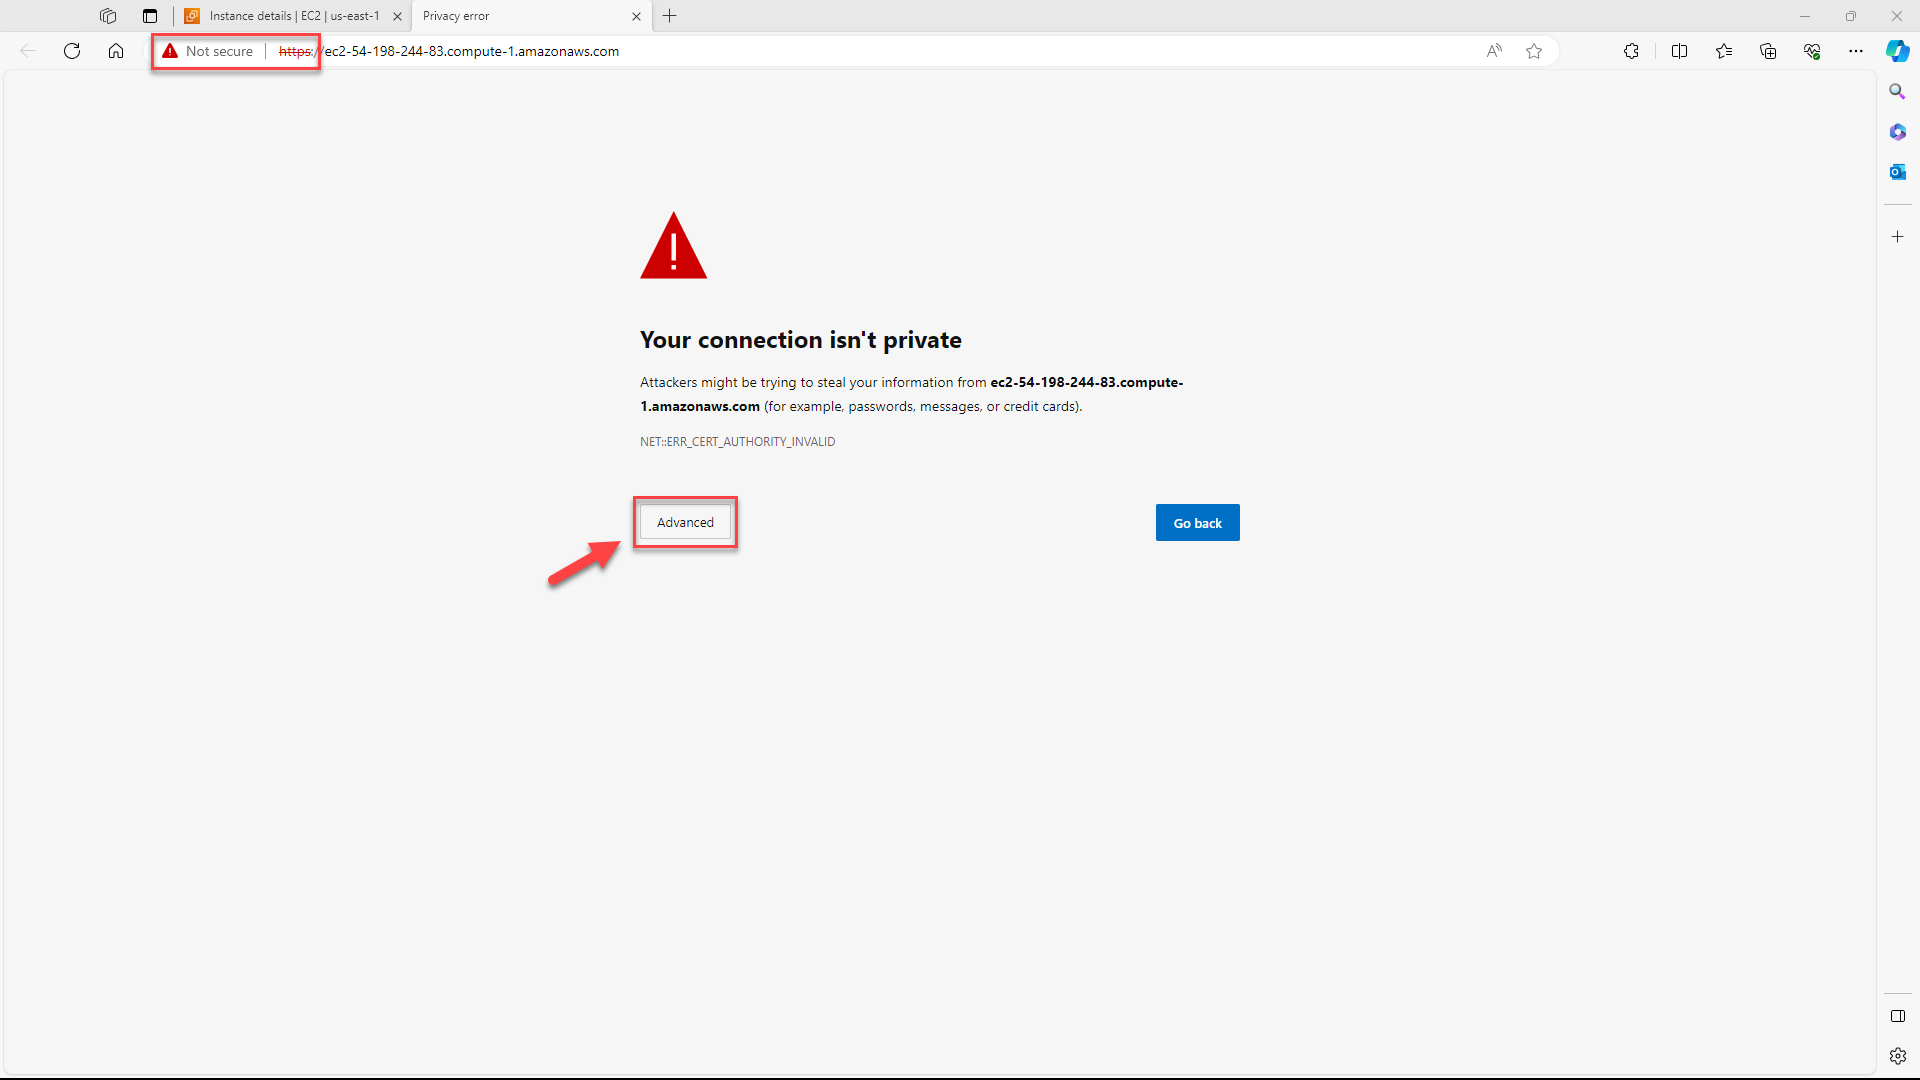
Click Continue to your public IPv4 DNS name.
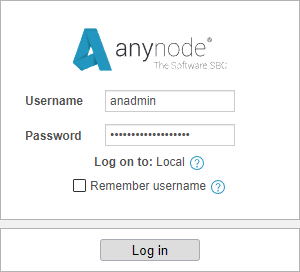
When you start anynode for the first time after the deployment, you must use the initial credentials for the default administrator account.
The default username for the administrator account is always anadmin.
The default password is your AWS instance ID. Copy your AWS instance ID from your instance details and paste it into your password field.
Click on the button.
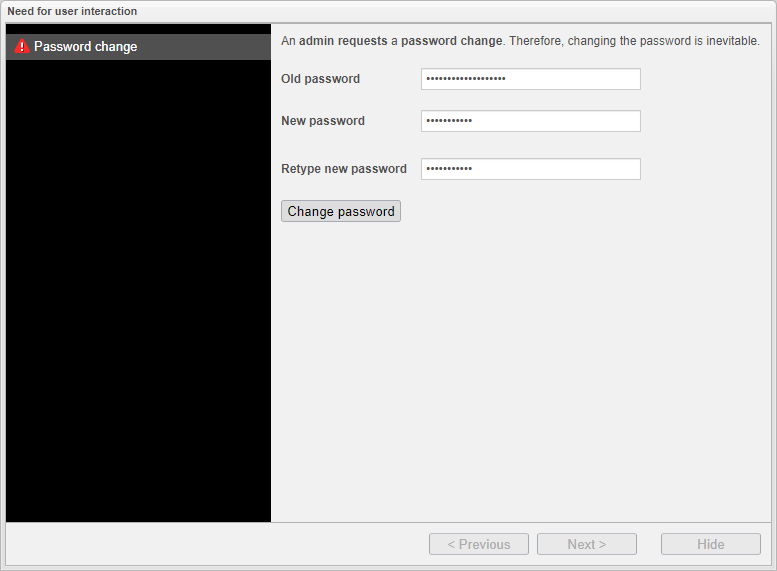
Afterward, change the password to your needs.
The anynode frontend password must contain a minimum of 8 characters and should not include number sequences like 1234 for security reasons. The wizard will inform you during input whether the password is valid.
Click on the button.
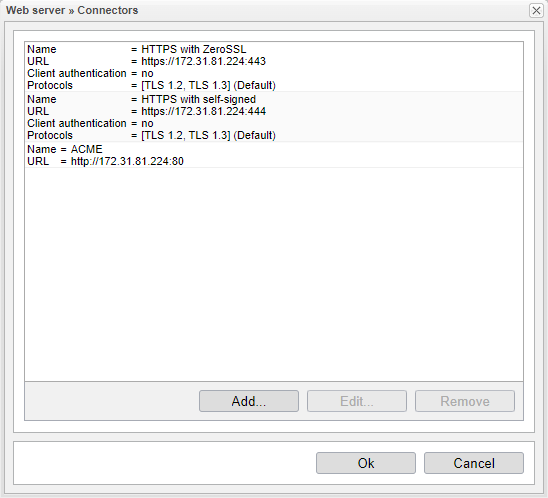
You can now replace the certificate of the pre-configured HTTPS connector with your own certificate or request a certificate through the ACME functionality in anynode from a certificate issuance provider such as Let's Encrypt or ZeroSSL.
For further steps, refer to our guide on Let's Encrypt & Co. with ACME and anynode – The Software SBC.
Please note that a certificate for the public IPv4 DNS name from AWS can only be issued by the AWS Certificate Manager, as this DNS name is owned by AWS.
Subsequently, check the secure connection to your anynode frontend. In our example, the new DNS name assigned is
Access to the VM using AWS CloudShell
If accessing the anynode frontend via the browser is not feasible or if you need to reset the anynode frontend password, you can use AWS CloudShell, freely available software such as PuTTY or other methods to access the VM. This allows you to perform updates, restart anynode services, or check the system status as needed.
The built-in AWS Console for accessing the VM eliminates the need to install additional software.
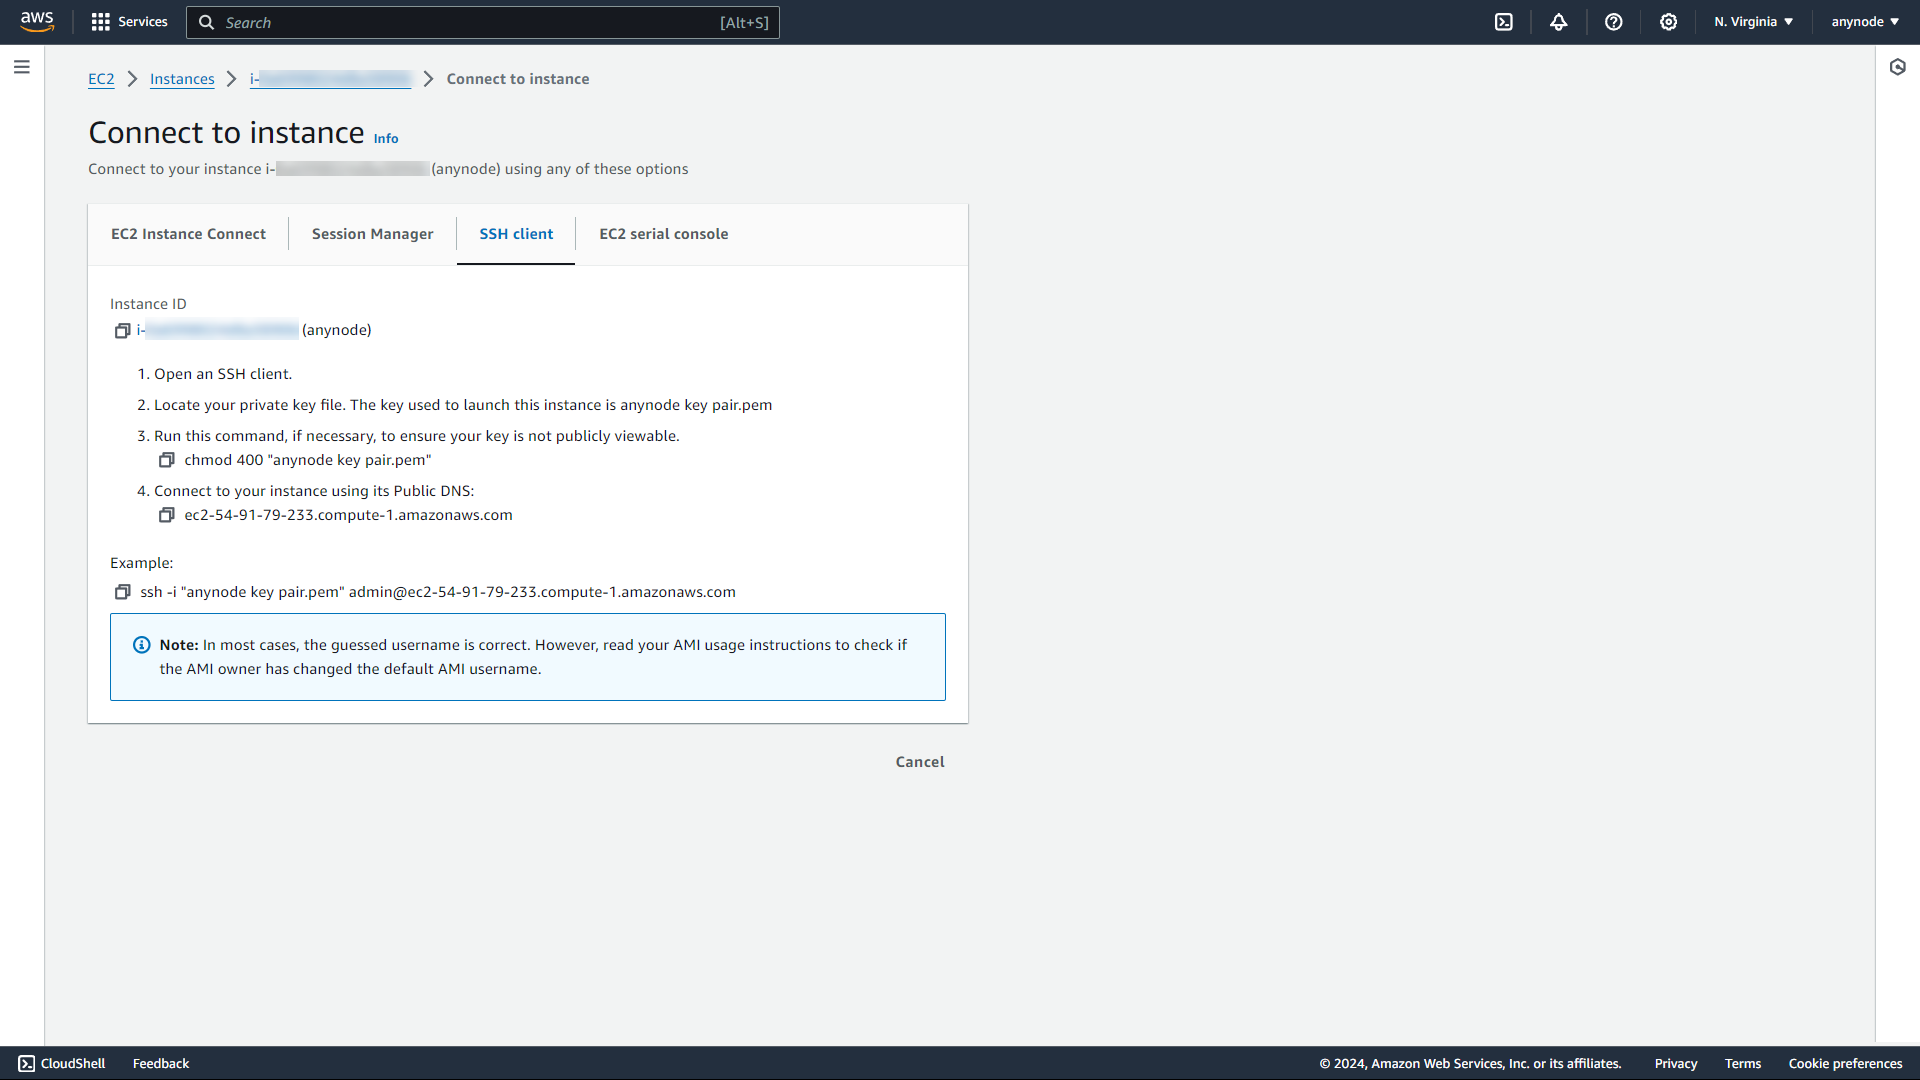
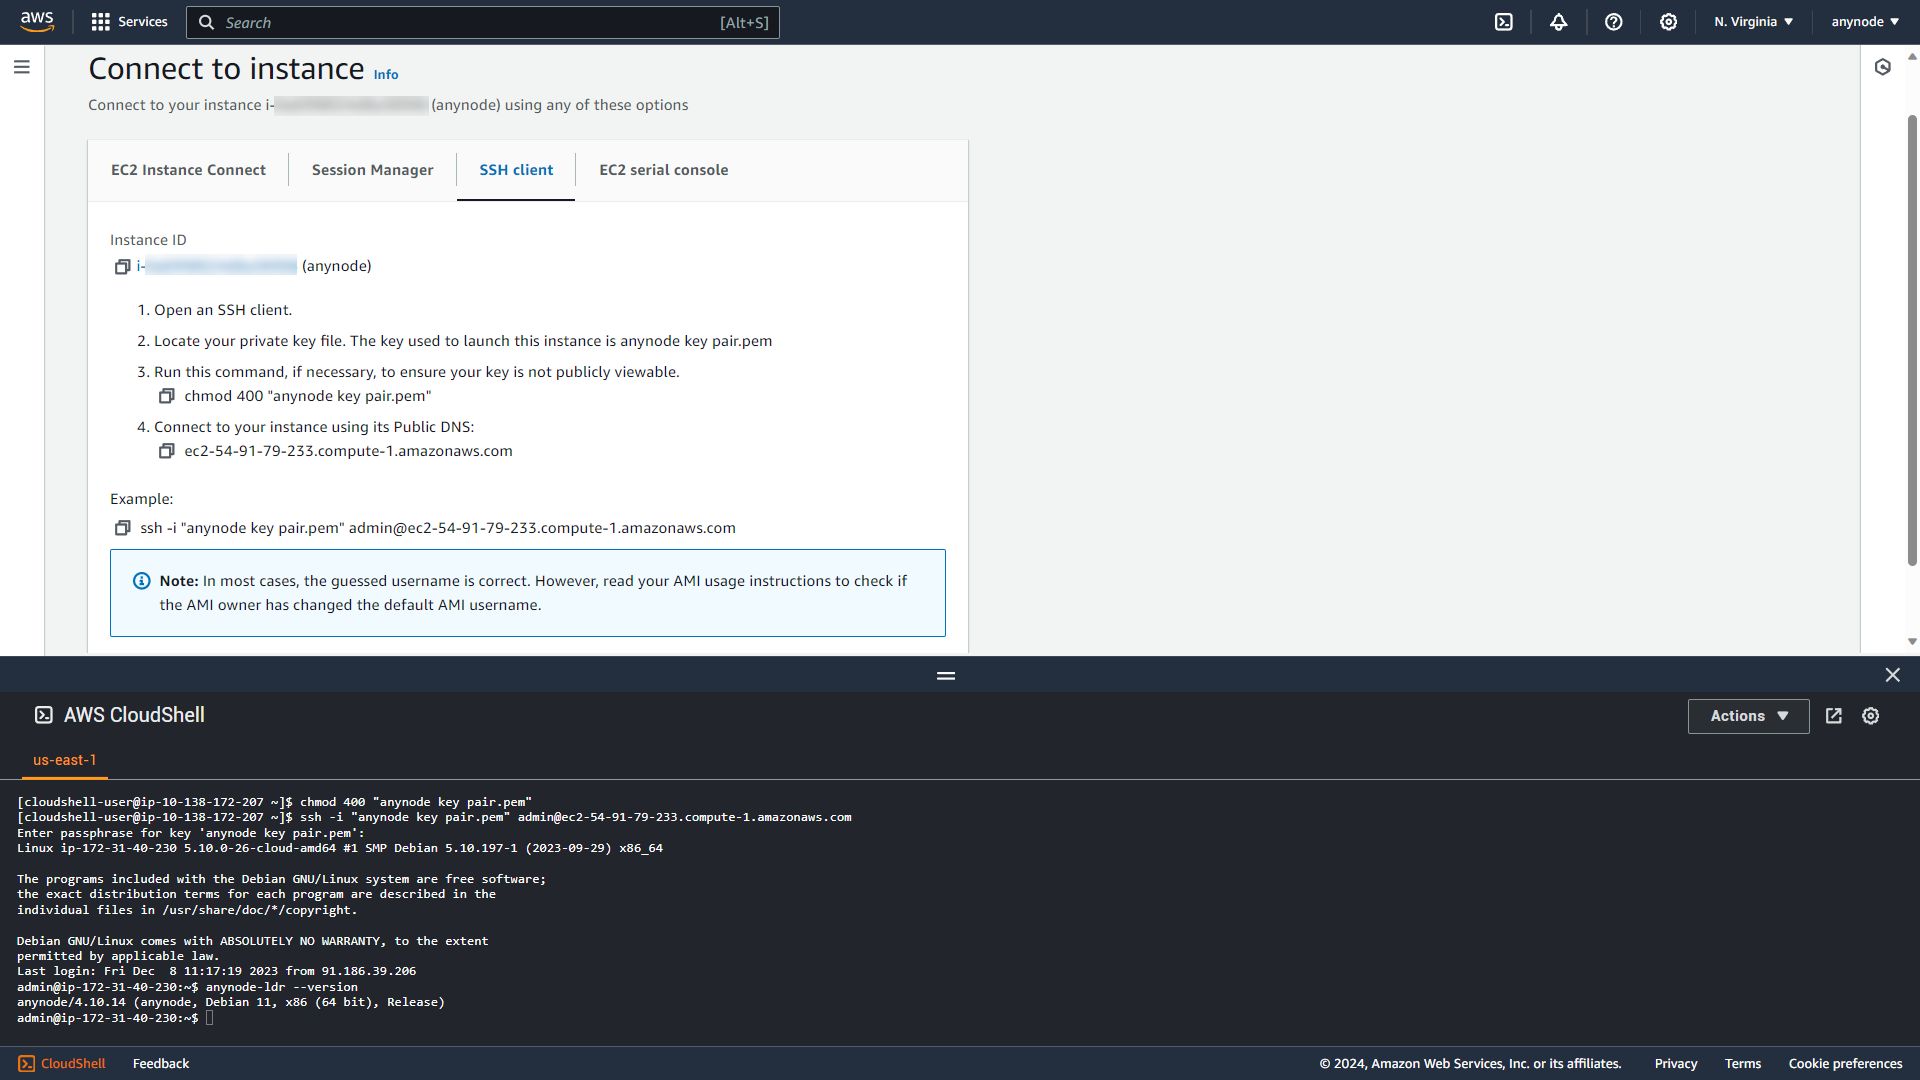
To access the VM using AWS CloudShell, select your instance in the overview of instances and then click on the button in the upper-right menu.
Connect to your instance using any of these options.
The access methods offer various options and security aspects. You can find detailed advantages and setup instructions in the documentation provided online by AWS. The choice of access method should be based on your security requirements. In this guide, we demonstrate access via AWS CloudShell and alternatively via SSH using PuTTY.
Here, we demonstrate accessing it through the internal AWS CloudShell.
Click on the option SSH Client.
AWS has already assembled the corresponding commands for you here.
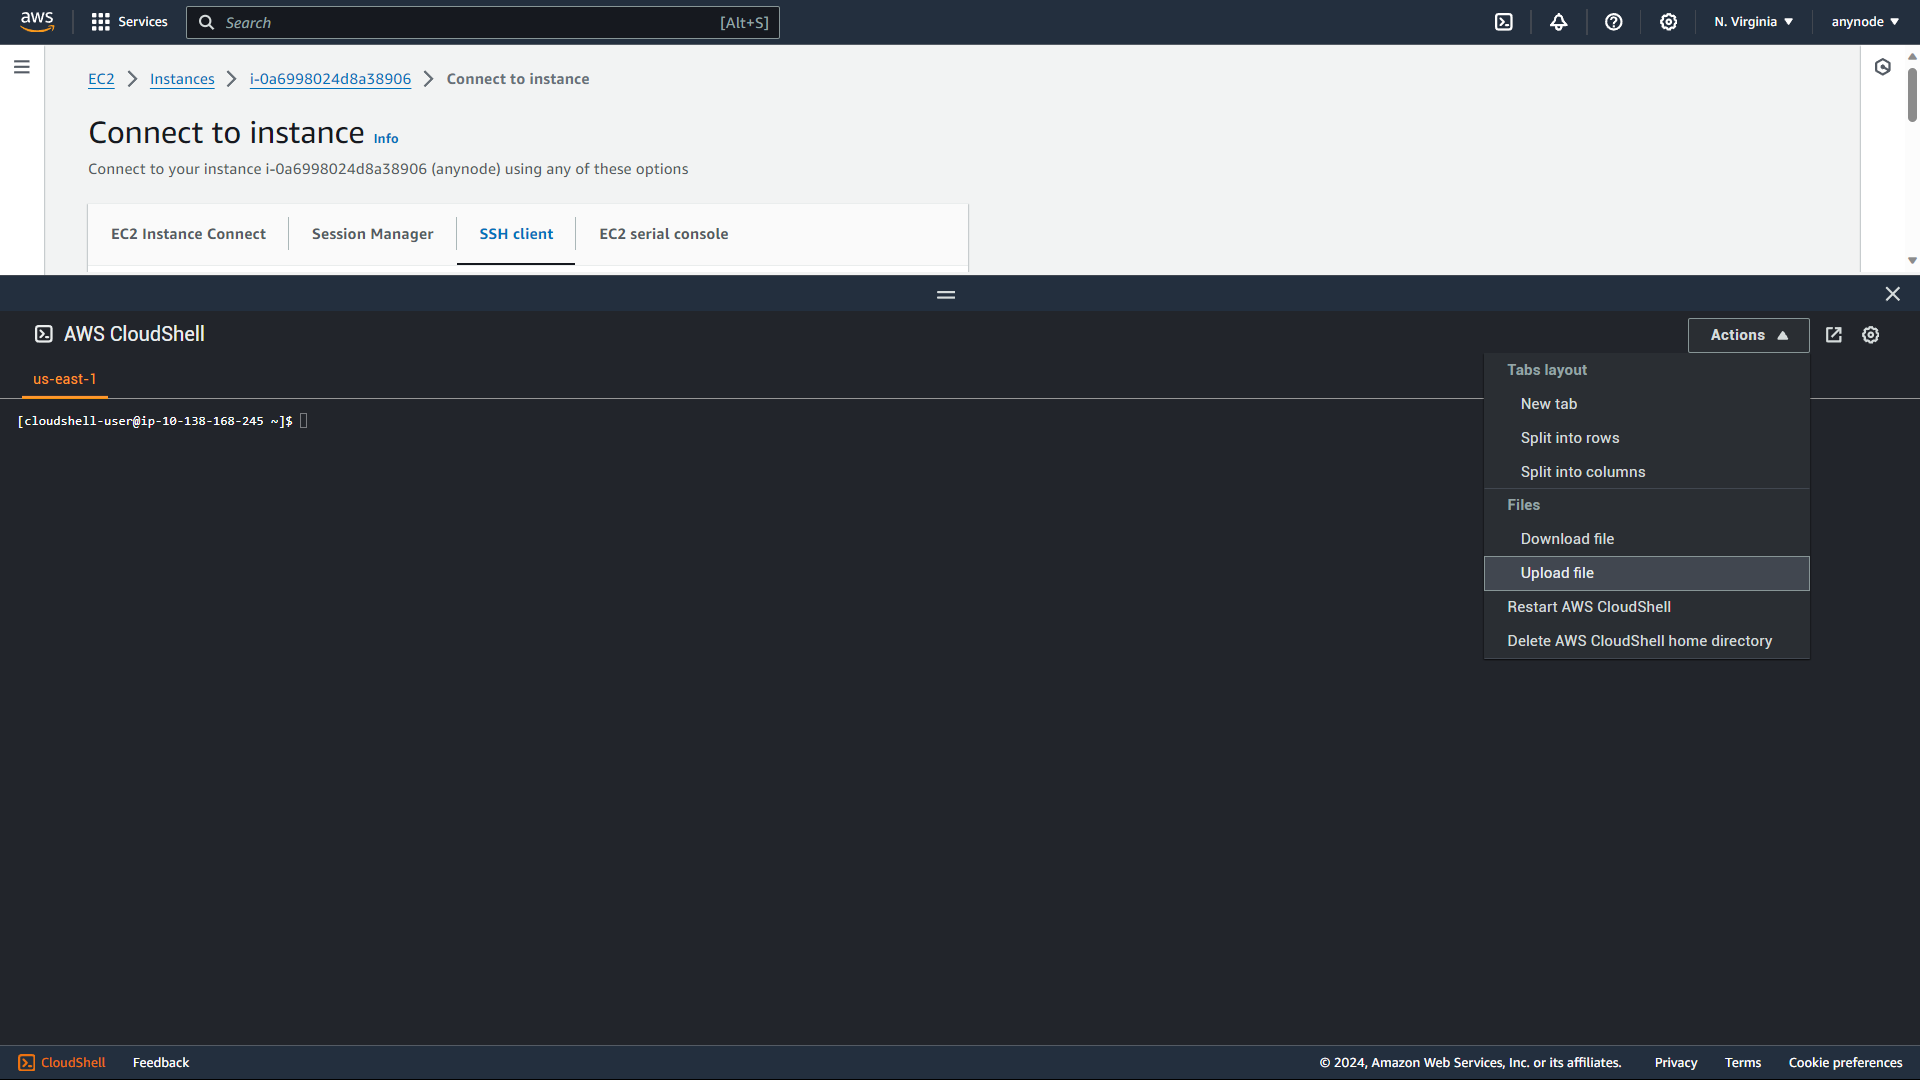
Open the AWS CloudShell in the lower left corner.
Click on the CloudShell button and upload your private key. This is only necessary once. The private key will be stored for subsequent access.
-
Copy and execute the
chmod 400 "anynode key pair.pem"command to ensure your key is not publicly accessible -
Copy and execute the example command beginning with
ssh -ito connect to your instance using its public DNS. Example: -
ssh -i "anynode key pair.pem" admin@ec2-18-234-26-140.compute-1.amazonaws.com -
Type
yesto continue connecting -
Enter the passphrase for your key pair
-
All further accesses can be performed directly using the last
ssh -icommand.
You can check the installed anynode version with the following command:
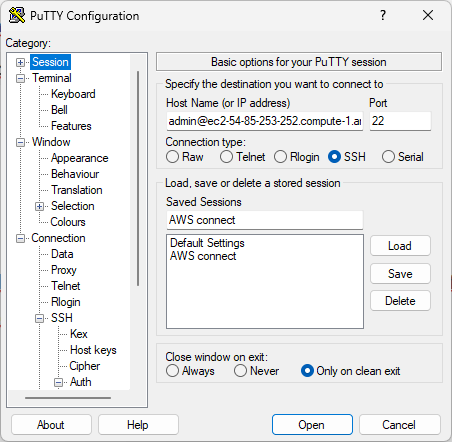
Access to the VM using PuTTY
Finally, we demonstrate accessing the VM using PuTTY.
Start PuTTY.
In the Category pane, choose Session and in the Host Name box, do one of the following:
To connect using your instance's public DNS name, enter
You can find your instance public DNS name in the AWS Management Console. Select Instances in the left menu bar and click on your Instance.
Ensure that the Port value is 22.
Under Connection type, select SSH.
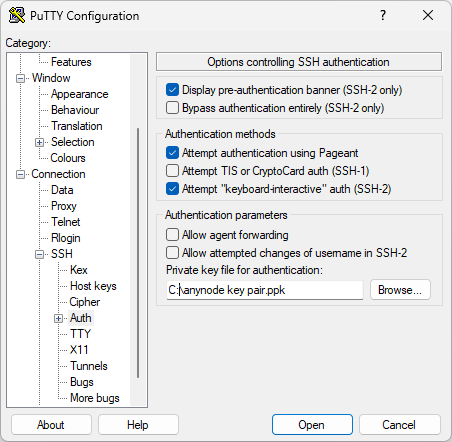
In the Category pane, expand Connection, SSH, and Auth.
Next to Private key file for authentication, choose the button. Select the .ppk file that you generated for your key pair.
To connect to the instance, click on the button.
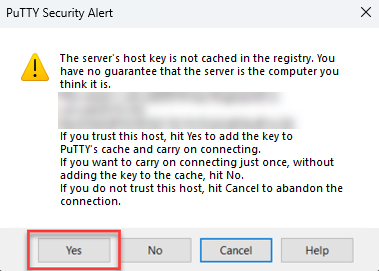
If this is the first time you have connected to this instance, PuTTY displays a security alert dialog box that asks whether you trust the host to which you are connecting.
Click on the button.
You are connected to your instance now. Refer to the chapter Linux for more details on managing your Linux/Debian VM.
Congratulations on the successful completion of deploying anynode – The Software SBC in your AWS environment.
Network Hardening (HTTPS)
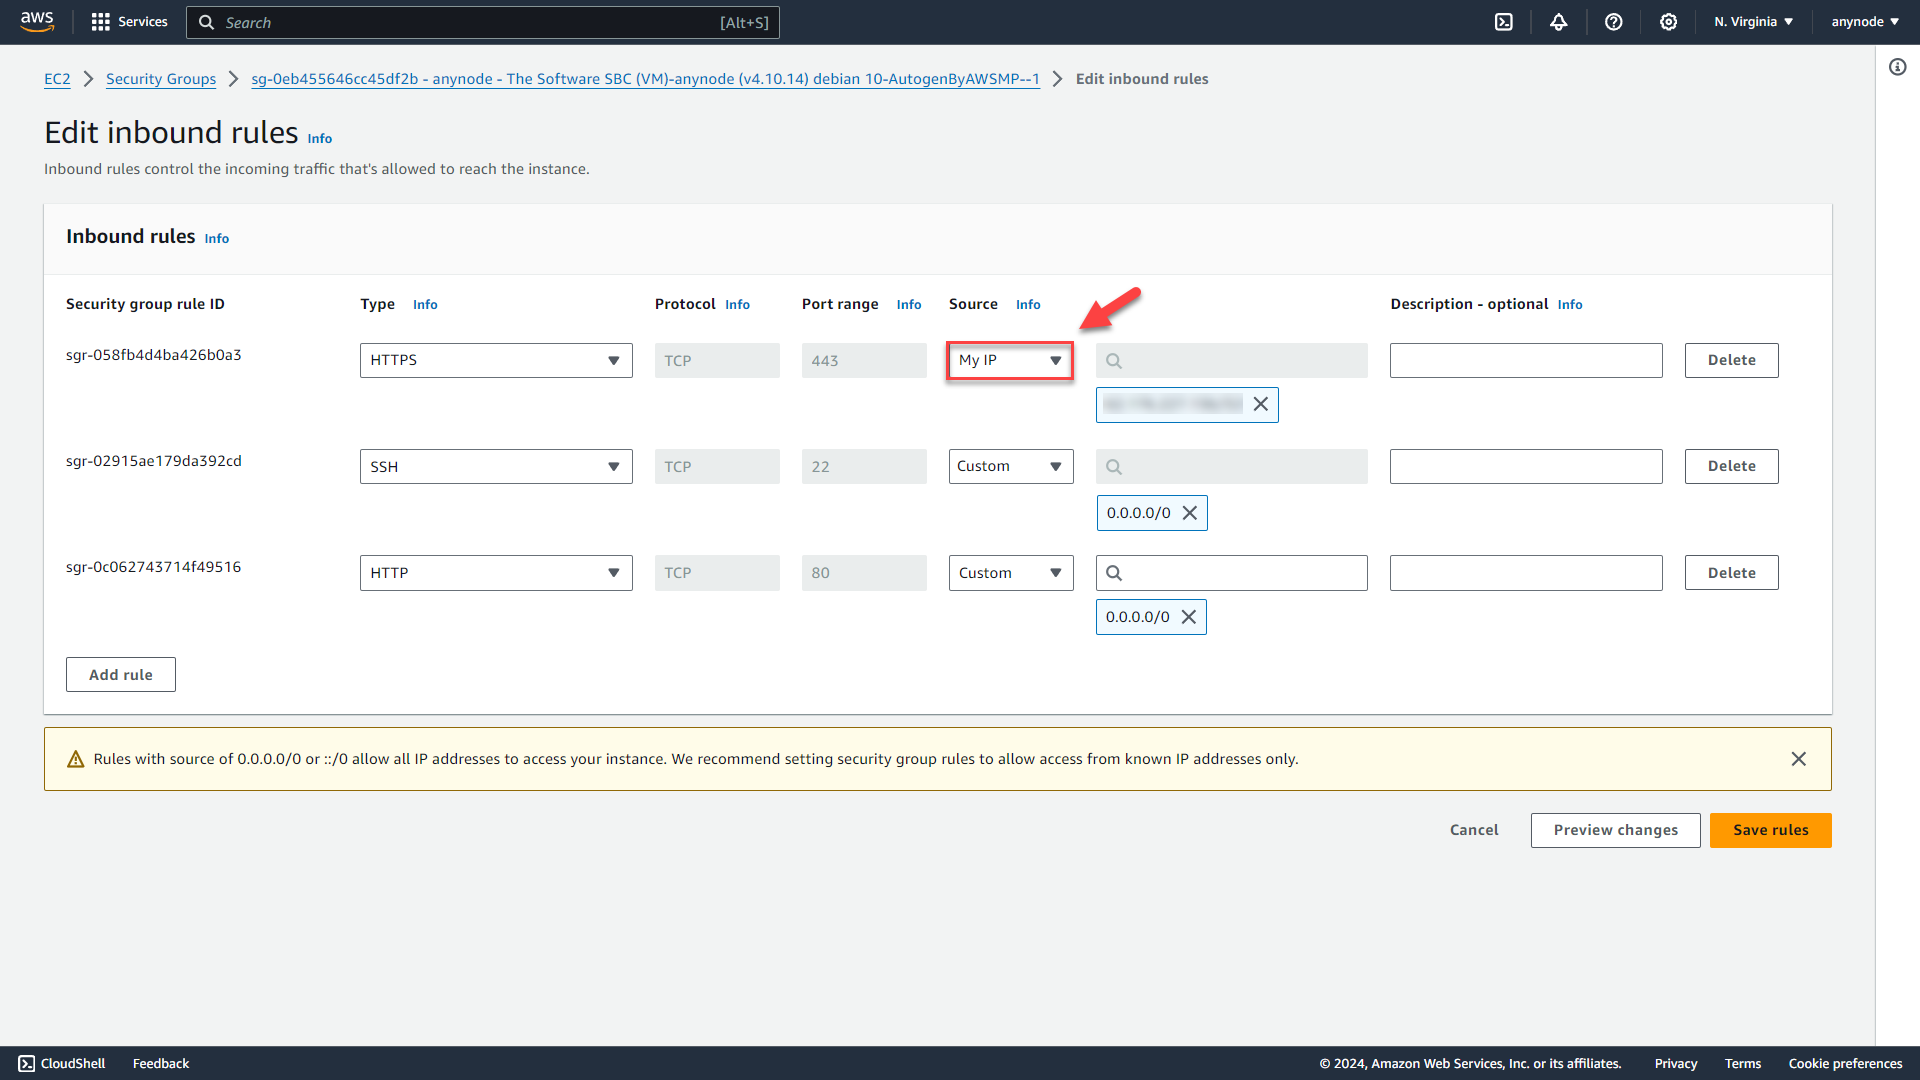
Network hardening helps restrict access to HTTPS and the anynode frontend minimizing unauthorized access attempts. By limiting access to authorized users within the company's network, the risk of security breaches is reduced.
In our example, we outline the steps to limit HTTPS access to the anynode frontend within the security group to your company's network.
In the AWS Console, navigate to Network & Security in the left menu and click on Security Groups. Choose the security group associated with your instance.
Click on the button.

In the HTTPS type rule, specify the source as the IP address or IP range of your company's network. Insert your custom IP or change the Source dropdown menu to My IP. Check whether the automatically detected IP is correct when choosing My IP.
Click on the button.
To configure firewall rules for using other services with anynode in AWS, you need to allow inbound port rules from specific ports.
Please refer to our specific Please refer to our specific guides for Zoom Phone, Cisco Webex, and Google Voice, as they contain detailed information about the ports used for each service.
Change the VM Size
AWS offers flexibility in resizing EC2 instances, the available options may be restricted by factors such as regional availability, instance type characteristics, and compatibility constraints. Always check the AWS documentation and the EC2 instance types available in your chosen region to determine the options for resizing your VM.
Changing the size of a VM hosting anynode in AWS can potentially disrupt ongoing calls.
After creating a virtual machine (VM), you have the option to scale the VM up or down by adjusting its size.
In your AWS EC 2 dashboard, navigate to Instances in the left menu tree. Select your anynode instance.
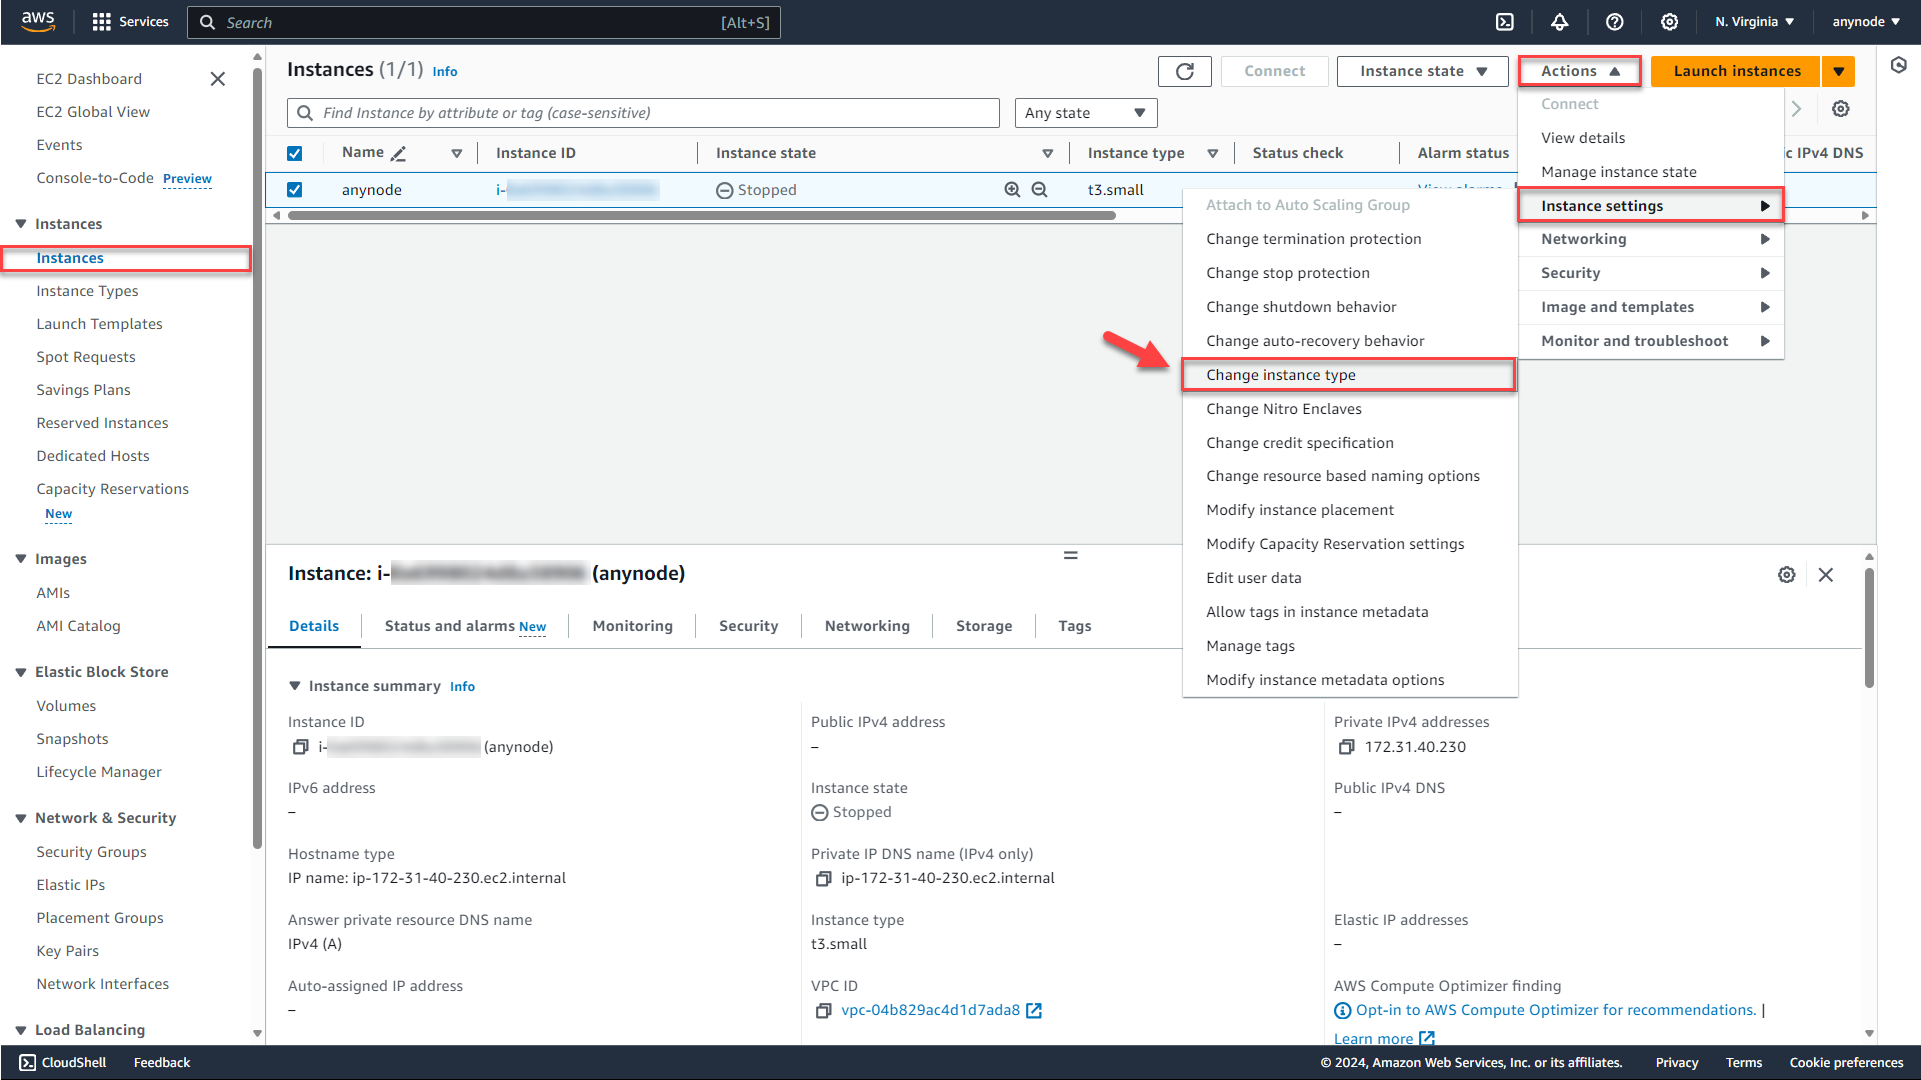
You need to stop the instance first.
Click on the button in the upper right corner and choose Stop instance.
To confirm that you want to stop the instance, choose the button.
Click on the button in the upper right corner.
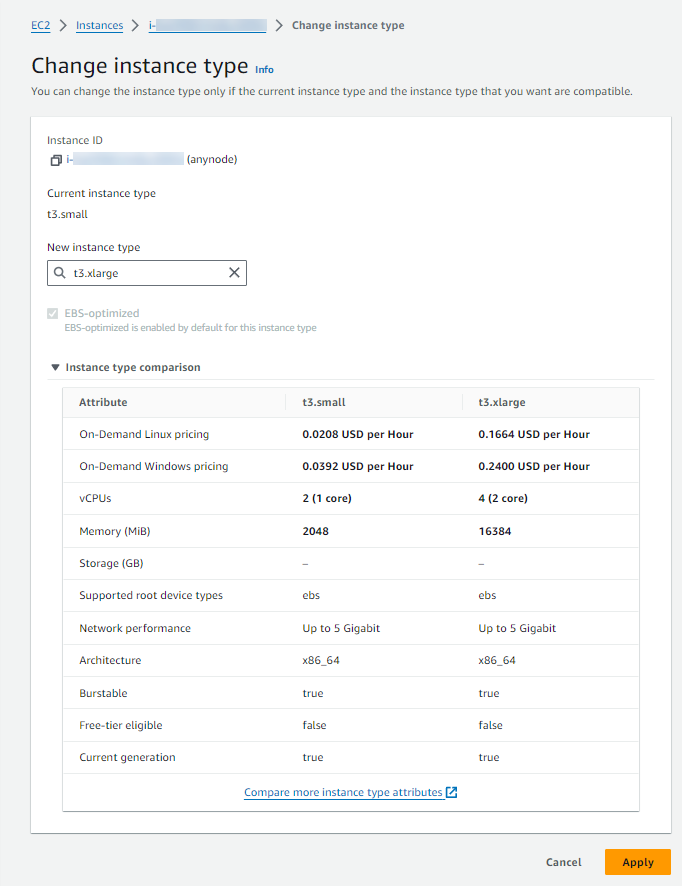
Navigate to Instance Settings and choose Change instance type.
Please select a new instance type from the drop-down menu. You can change the instance type only if the current instance type and the instance type that you want are compatible. You'll have the option to compare the properties of your current instance type with the newly selected one.
Click on the button.
Restart your instance. When you stop and start an instance, AWS relocates the instance to different hardware. If your instance is assigned a public IPv4 address, AWS will release the existing address and assign a new public IPv4 address to your instance. If your anyode instance is associated with an elastic IP, the elastic IP remains bound to the instance, and there is no change in its assignment. The elastic IP persists through instance stops and starts, ensuring that your instance remains reachable via the same public IP address.
Please note that elastic IPs in AWS incur charges if they are not associated with a running instance or if they are associated with an instance that is stopped.
Congratulations on reaching the final stages of deploying anynode on AWS. Get ready to revolutionize your communication infrastructure and propel your business to new heights!