
Azure Marketplace
This chapter will walk you through the necessary procedures, configurations, and best practices for a successful deployment of anynode – The Software SBC on Microsoft Azure. We will elucidate the distinction between the template and the VM (Virtual Machine) offering, and subsequently, we will guide you through the deployment process for each option, step by step.
This chapter will walk you through the necessary procedures, configurations, and best practices for a successful deployment of anynode on Microsoft Azure. We will elucidate the distinction between the template and the VM (Virtual Machine) offering, and subsequently, we will guide you through the deployment process for each option, step by step.
Microsoft Azure is a fast-growing cloud infrastructure platform, and all this capability and power is great for applications such as anynode you want to run on Azure. You should consider Azure as your SBC´s home because of the following advantages:
-
Ease of Deployment: The Azure Marketplace provides a streamlined and straightforward deployment process, making it convenient for users to set up anynode on their Azure infrastructure.
-
Integration with Azure Ecosystem: Leveraging the Azure Marketplace ensures seamless integration with other Azure services and resources, facilitating a cohesive and efficient environment for communication solutions.
-
Scalability: Azure's scalability allows users to easily scale anynode based on their evolving business requirements. This ensures that the solution can adapt to varying workloads and demands.
-
Security and Compliance: Azure adheres to robust security measures and compliance standards. Deploying anynode through the Azure Marketplace helps ensure that your communication solution benefits from Azure's security features and compliance certifications.
-
Performance Optimization: Utilizing Azure's infrastructure enables the optimization of anynode's performance. Users can take advantage of Azure's global network and data centers for enhanced speed and reliability.
-
Cost Efficiency: Azure offers various pricing models, allowing users to choose the most cost-effective options for their specific needs. This flexibility helps in managing expenses efficiently.
-
High Availability: Achieved through global geo-redundancy, ensures that anynode remains accessible even in the event of a localized outage. This means that the platform continues to operate seamlessly, offering uninterrupted service to users, irrespective of potential disruptions in a specific region or data center. Azure has a vast global presence, allowing users to deploy anynode in different regions to meet specific geographic requirements and improve communication performance on a global scale.
anynode on the Azure Marketplace: Template and VM Offering
Please note: The menus and terminologies at Microsoft Azure are subject to change at any time.
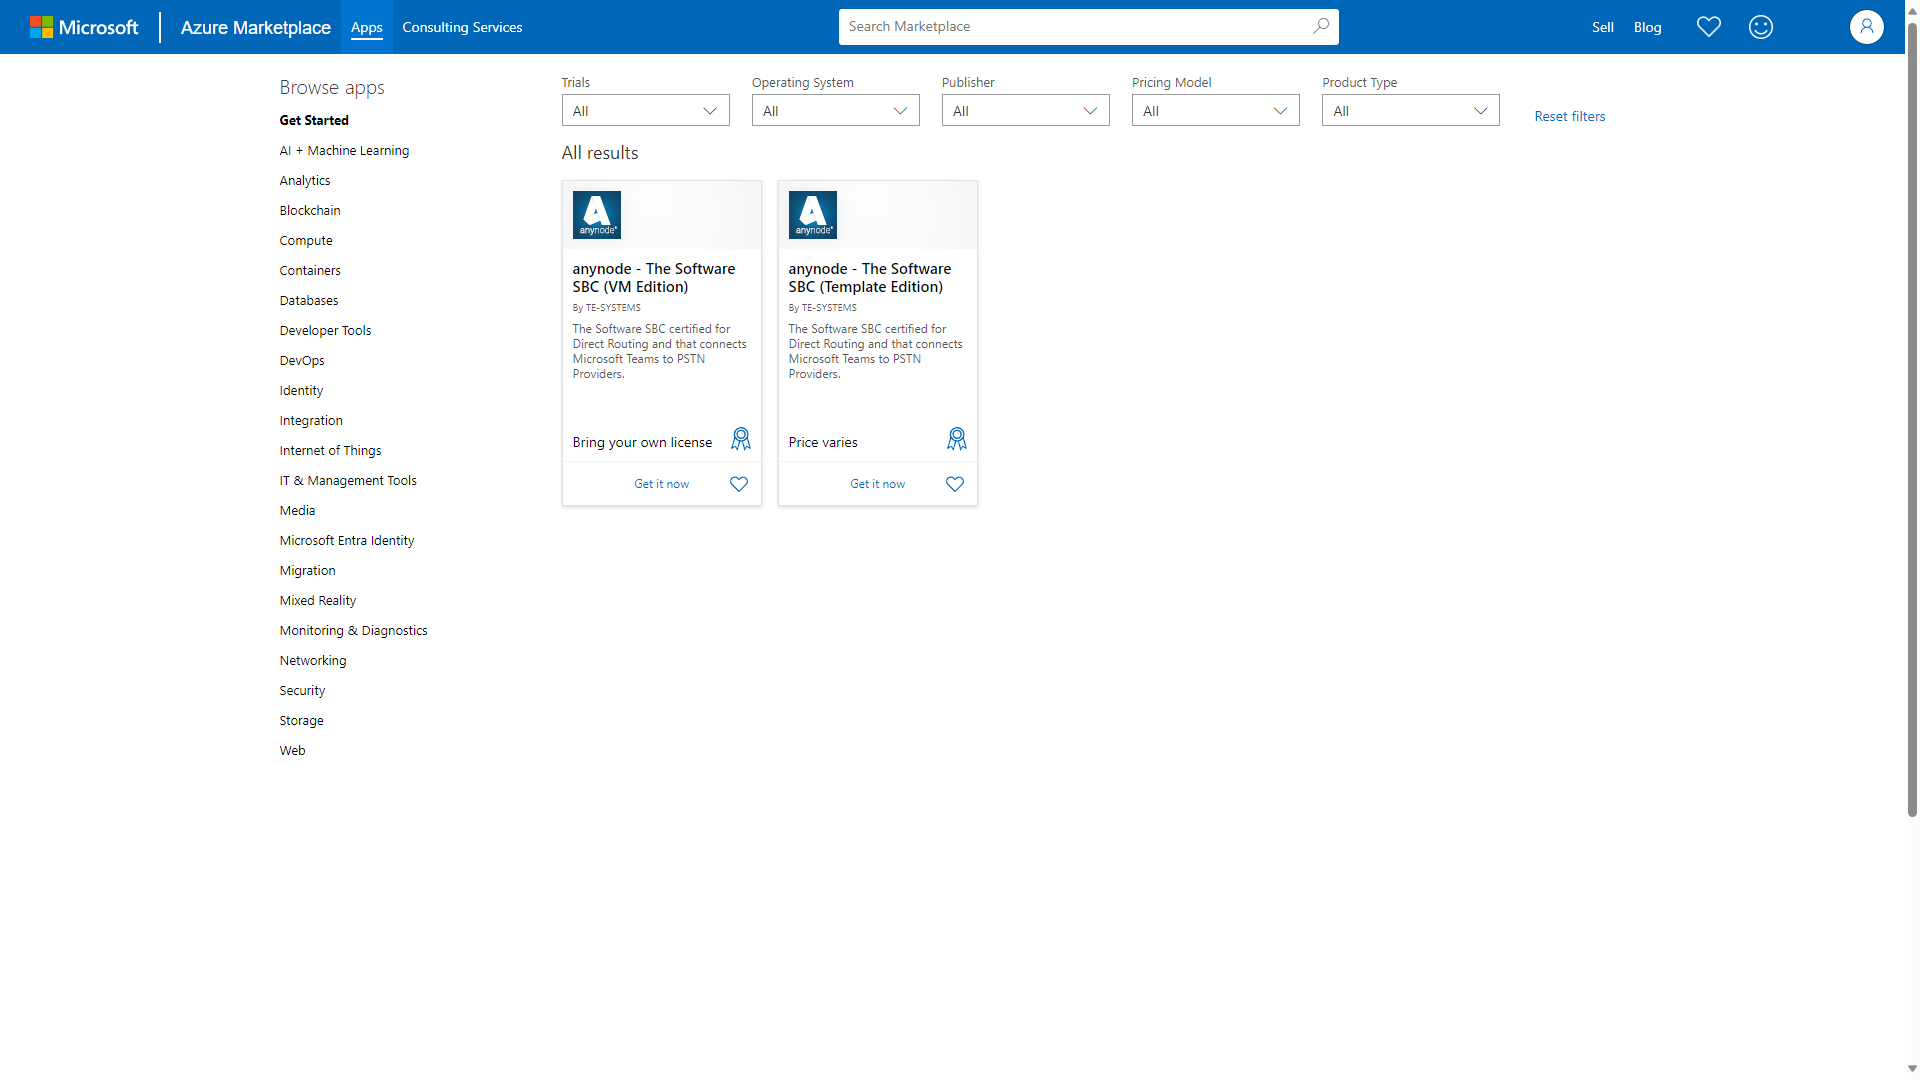
When you search for anynode on the Microsoft Azure Marketplace, you will find “anynode – The Software SBC” as a template and as a VM offering. Both options are validated as a preferred solution on the Marketplace by Microsoft experts.
Before deploying your Azure machine, you need to decide which operating system will fit your requirements best. If you are a Windows Pro and prefer to work with the Windows Server environment, we would recommend the template option. If you want to work with Debian and Linux operating systems, we recommend the VM offering.
When choosing the VM offering, you need to maintain the operating system. Our deployment team must create the VM and upload this to the marketplace, including the whole distribution package. If the VM template was created three months ago, you will receive all operating system updates from these last three months. Maybe a restart of this VM is also necessary. The advantage of this option is the speed of the deployment. Internally, this is just a file copy of the image.
To conclude: Think about the operating system first. There will be no difference in the features between both offerings
Check Microsoft Azure Subscription
Log in to Azure with your Office 365 account.
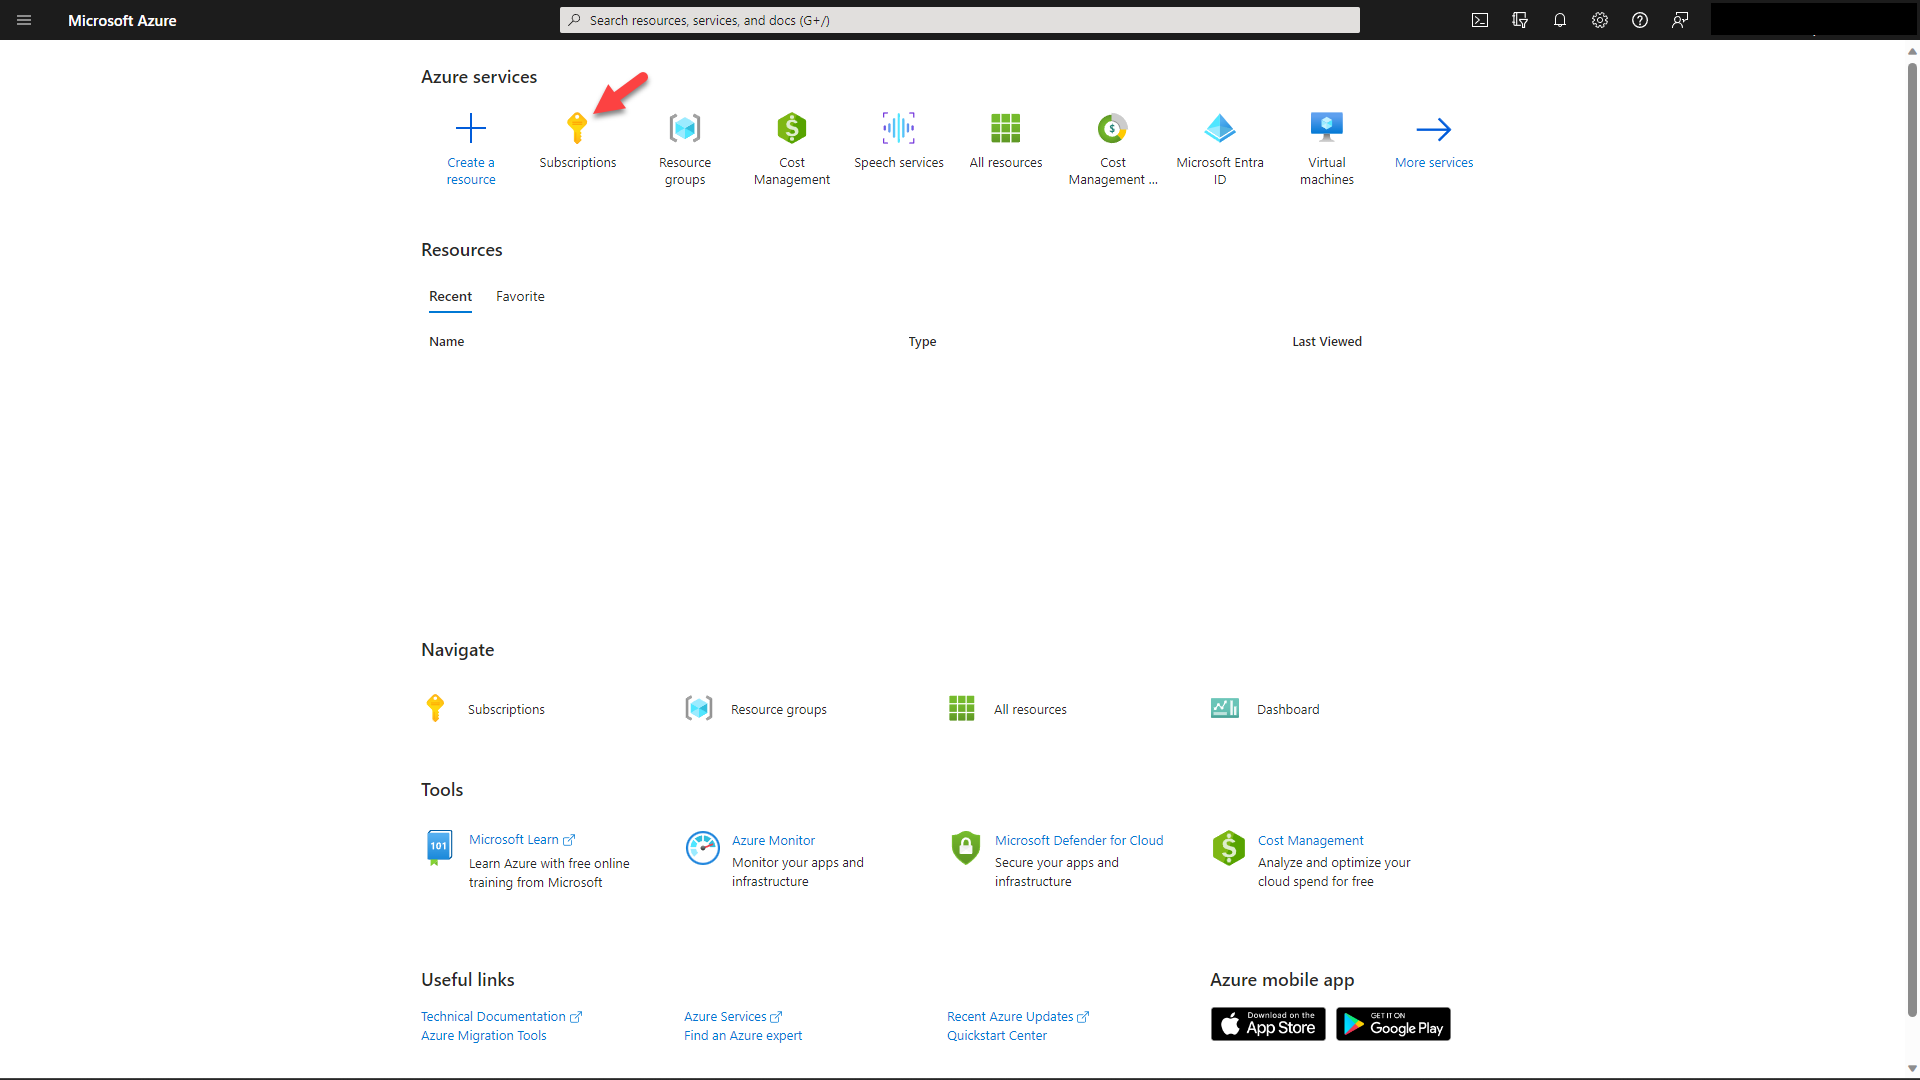
You should first check your Azure subscription in your Azure portal.
Click on the button in the Azure services.
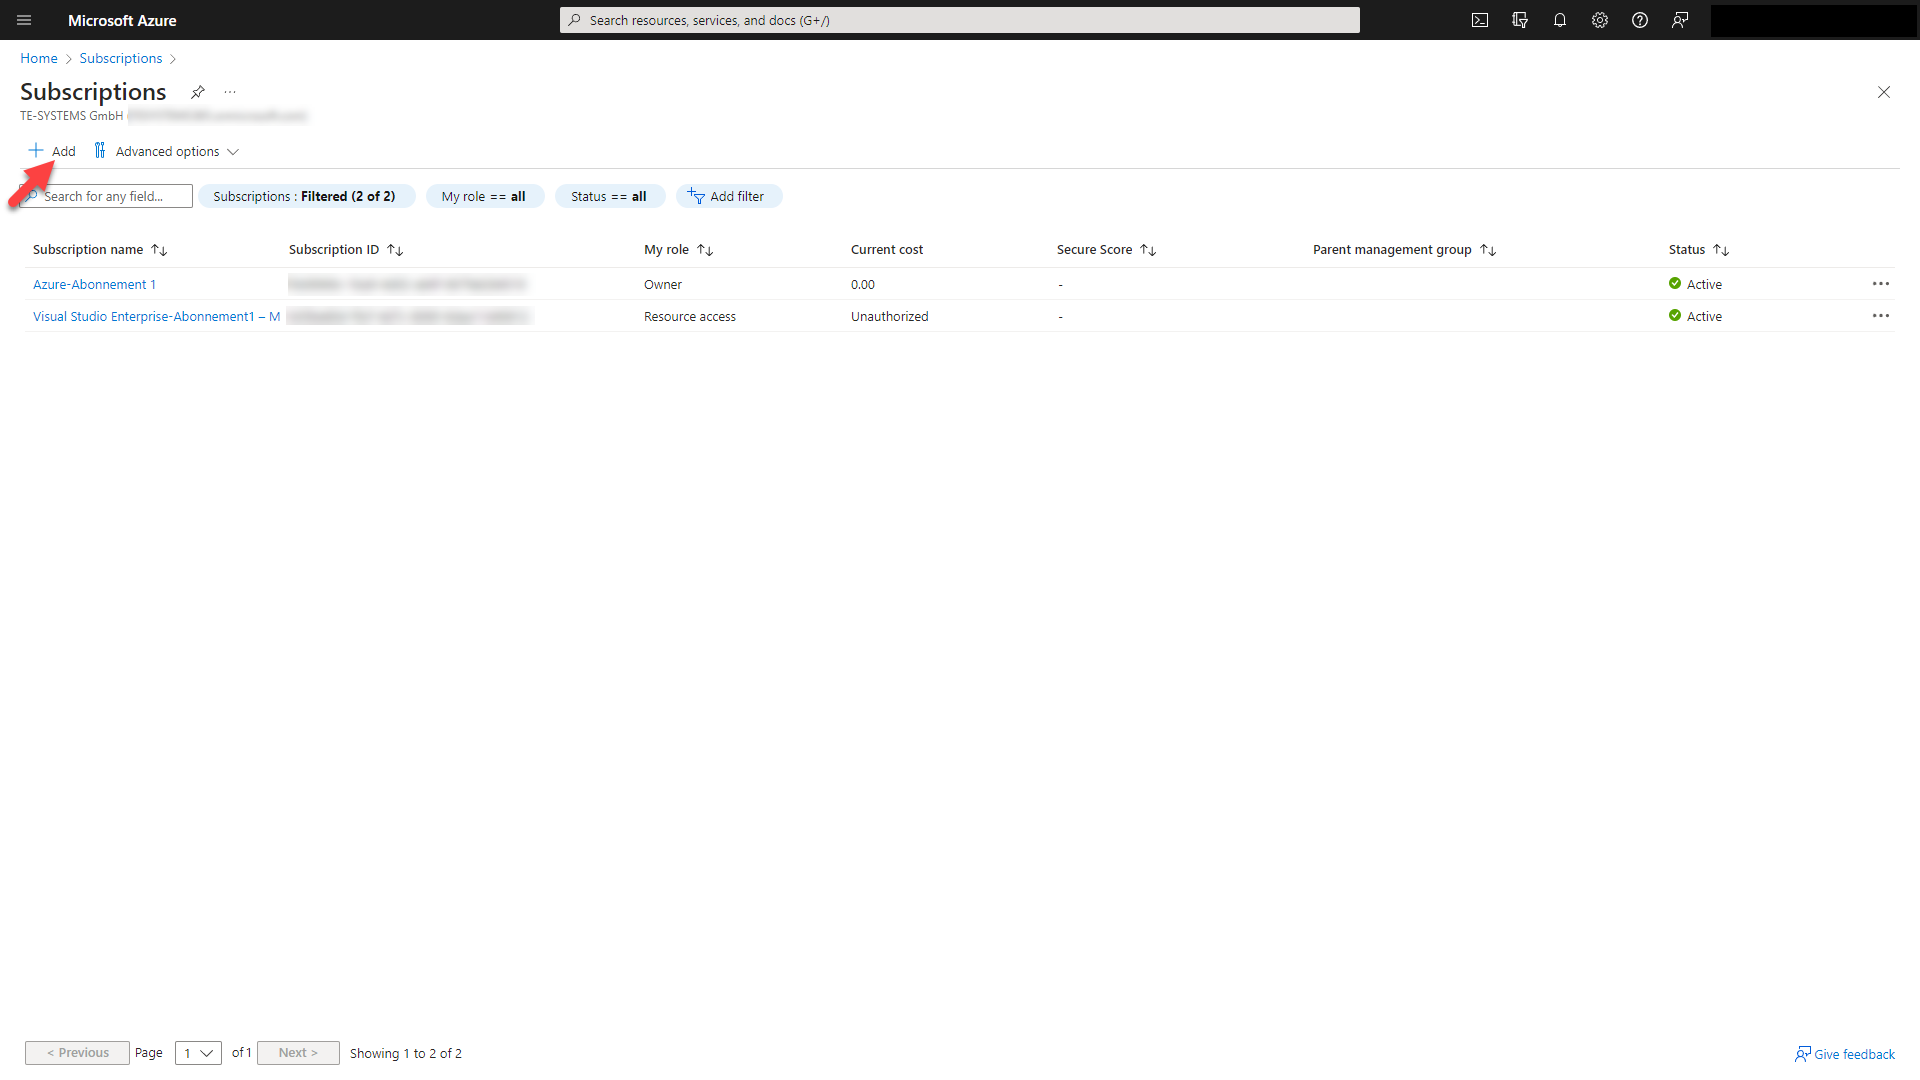
You will get an overview of your subscriptions. If needed, click on button to create a new subscription and fill in your subscription details.
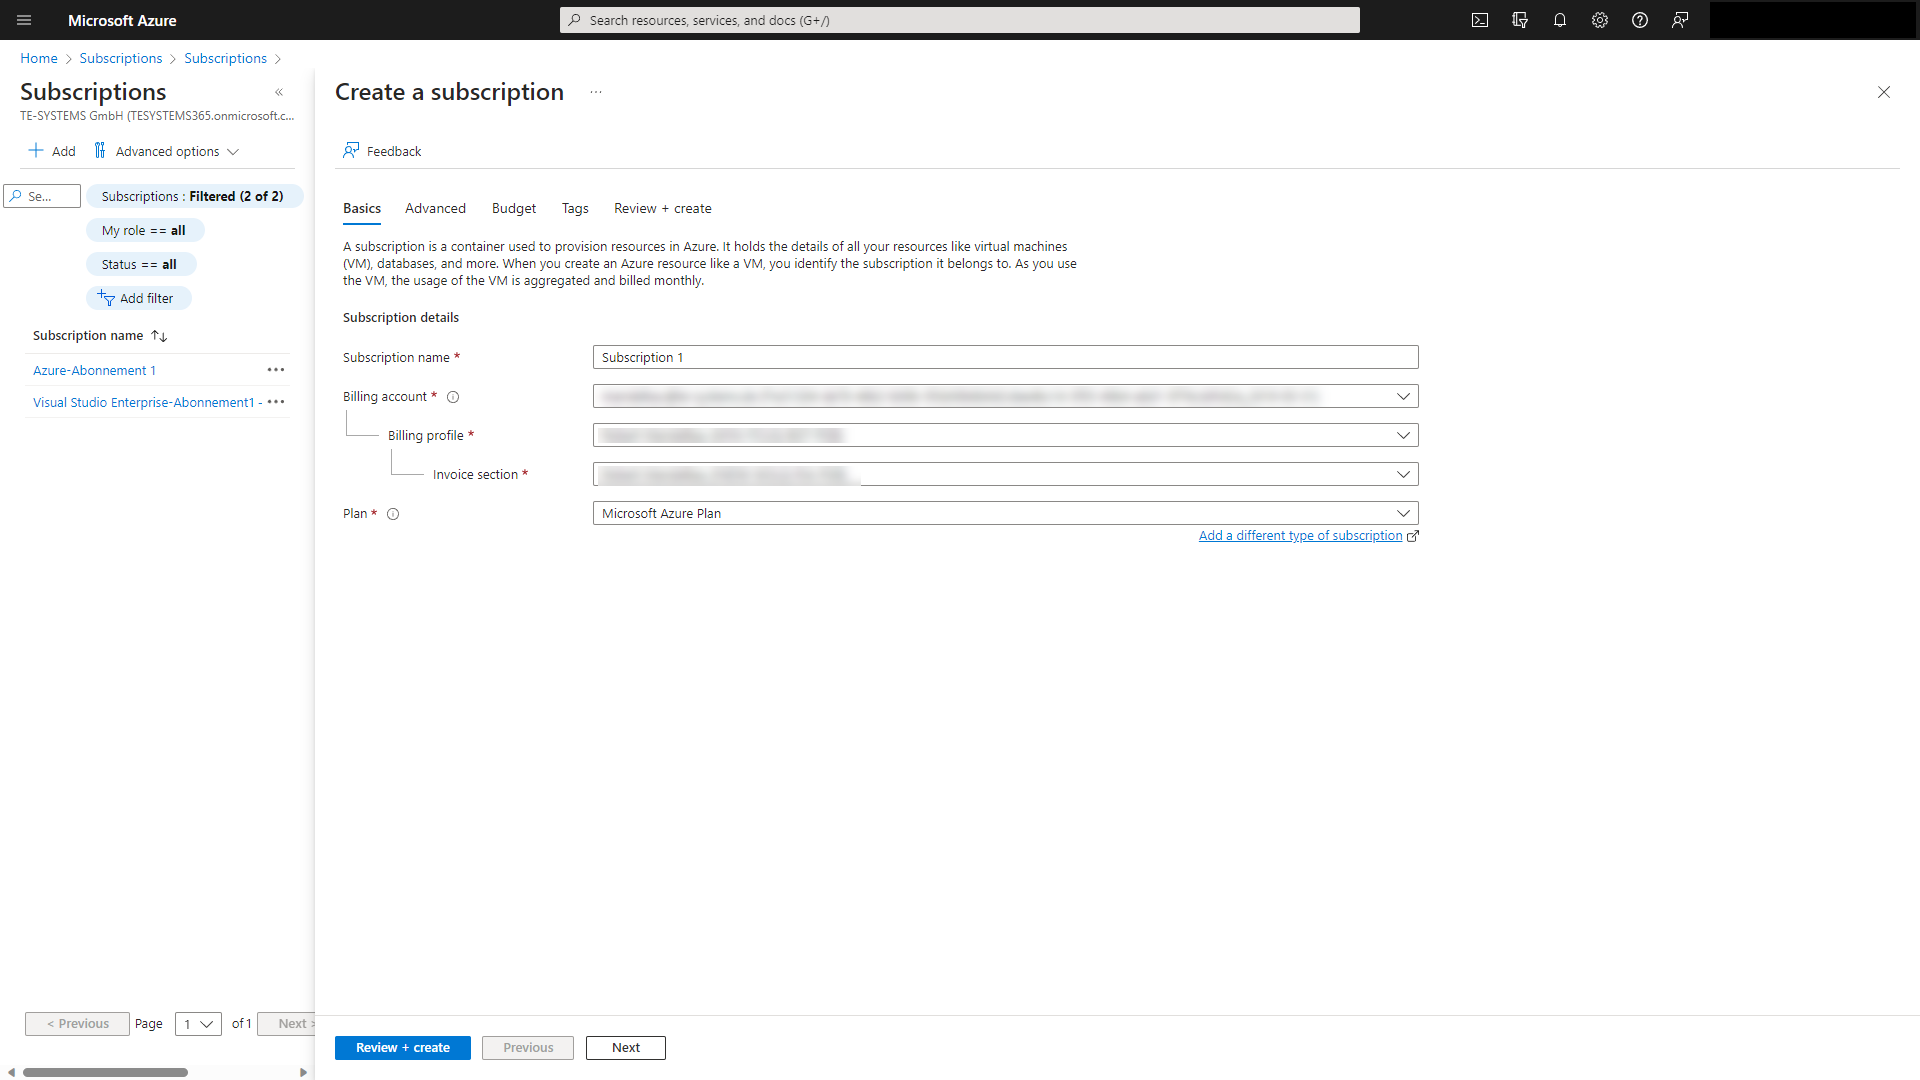
Select an Azure plan to determine the subscription type to create. Click on the button to create your new subscription.
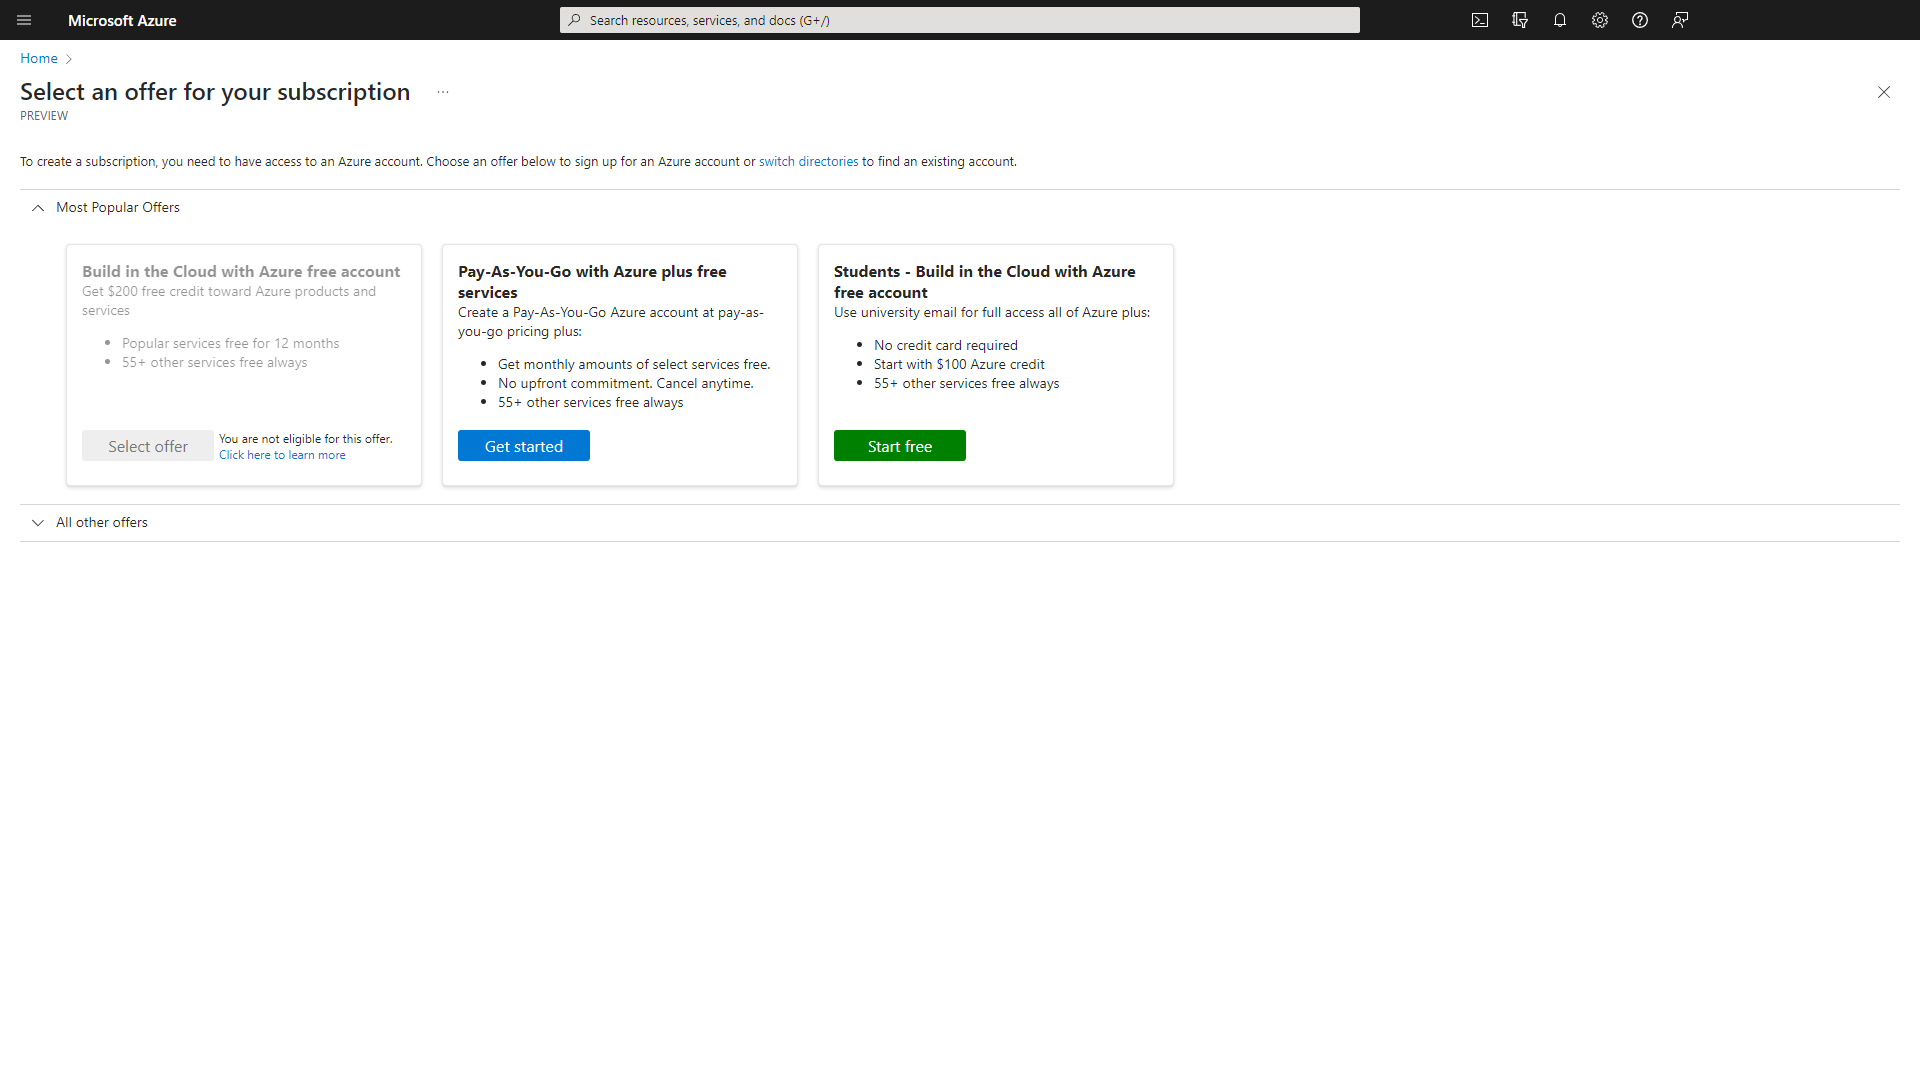
If you currently do not have an active subscription or wish to add a different subscription type, select one of the available offers. If you haven't yet taken advantage of the free trial, you can explore it at no cost.
Option 1: Use the template in Microsoft Azure
We will start with the template deployment. Please note: This is a Bring your own license offering. You need to buy an anynode license or use your anynode subscription license.
Search for anynode in the upper search field.
You will get an overview with some useful links.
Click on anynode – The Software SBC (Template Edition).
Click on .
You will get an overview with some useful links.

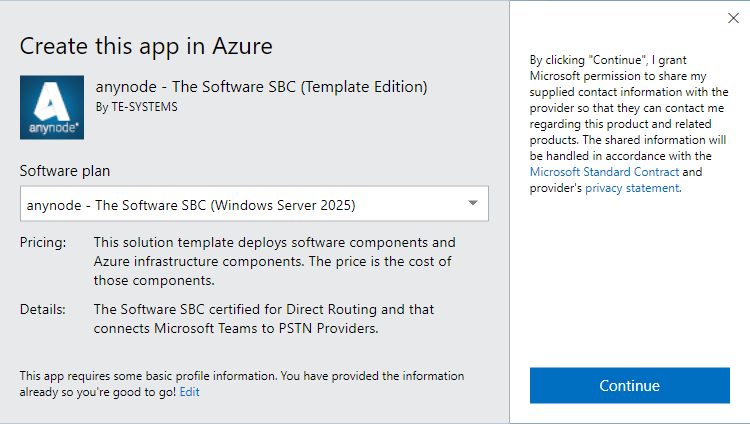
In the next step you will be asked which operating system you prefer.
Please note: It is recommended to choose the latest available operating system.
In this case we have selected Windows Server 2025.
Click on .
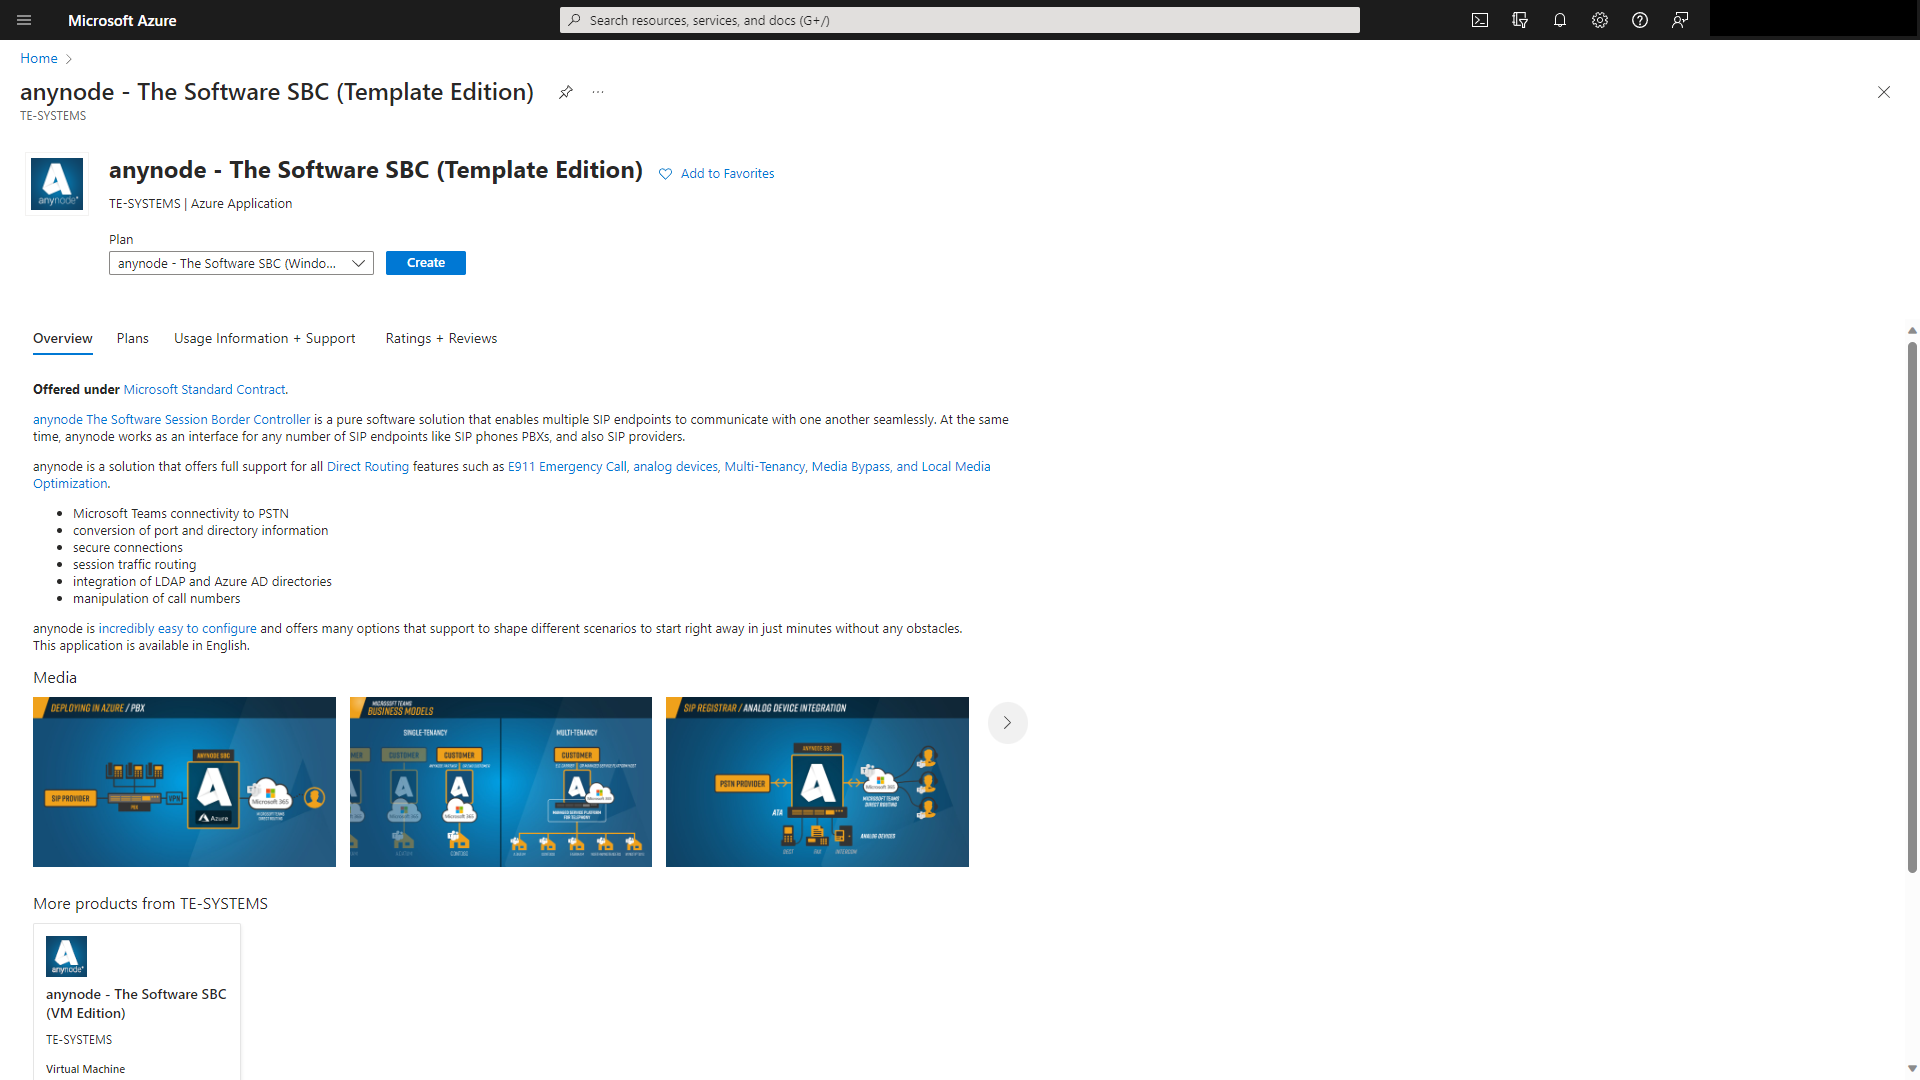
Start the creation process by clicking the button .
Select your subscription to manage deployed resources and costs.
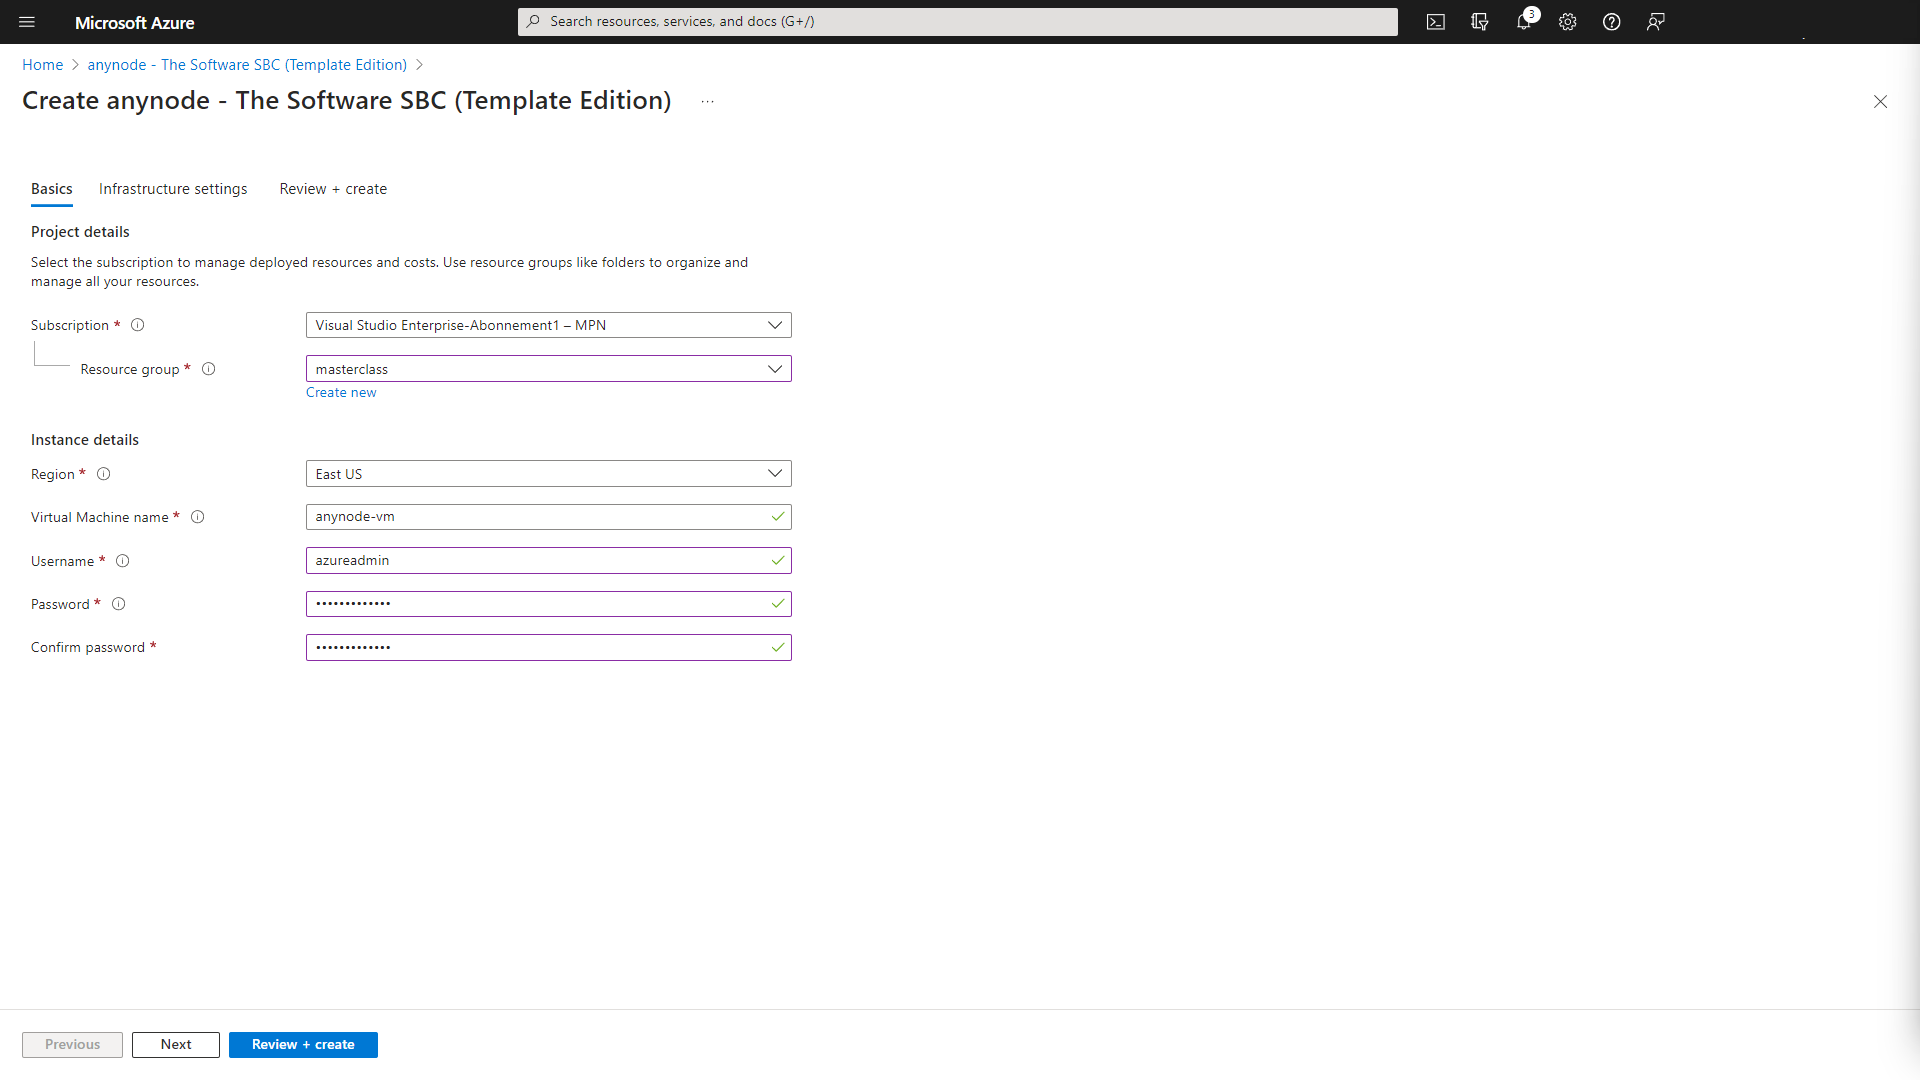
An Azure resource group is a logical container into which Azure resources are deployed and managed. You must select a resource group that shares the same lifecycle, permissions, and policies. Select an existing resource group or create a new one. For test purposes you should create a new resource group. This simplifies the complete deletion afterwards. In our example, we choose the resource group masterclass. Our practical tip: When naming the resource group, consider ending it with "rg," such as "anynode-rg," to facilitate easy identification of the resource group based on its name later.
Choose the Azure region that's right for you and your customers. Not every resource is available in every region. Make sure you select the correct region of the deployment to ensure you have the shortest way to your PSTN provider. Microsoft Teams Media Gateways are available in most areas automatically.
The username and password are necessary to log into your VM later via Remote Desktop. Make sure you remember the credentials.
Passwords should not contain reserved words or unsupported characters. They must include at least 1 lowercase letter, 1 uppercase letter, 1 number, and 1 special character (excluding '' and '-'). The password length should be between 12 and 123 characters.
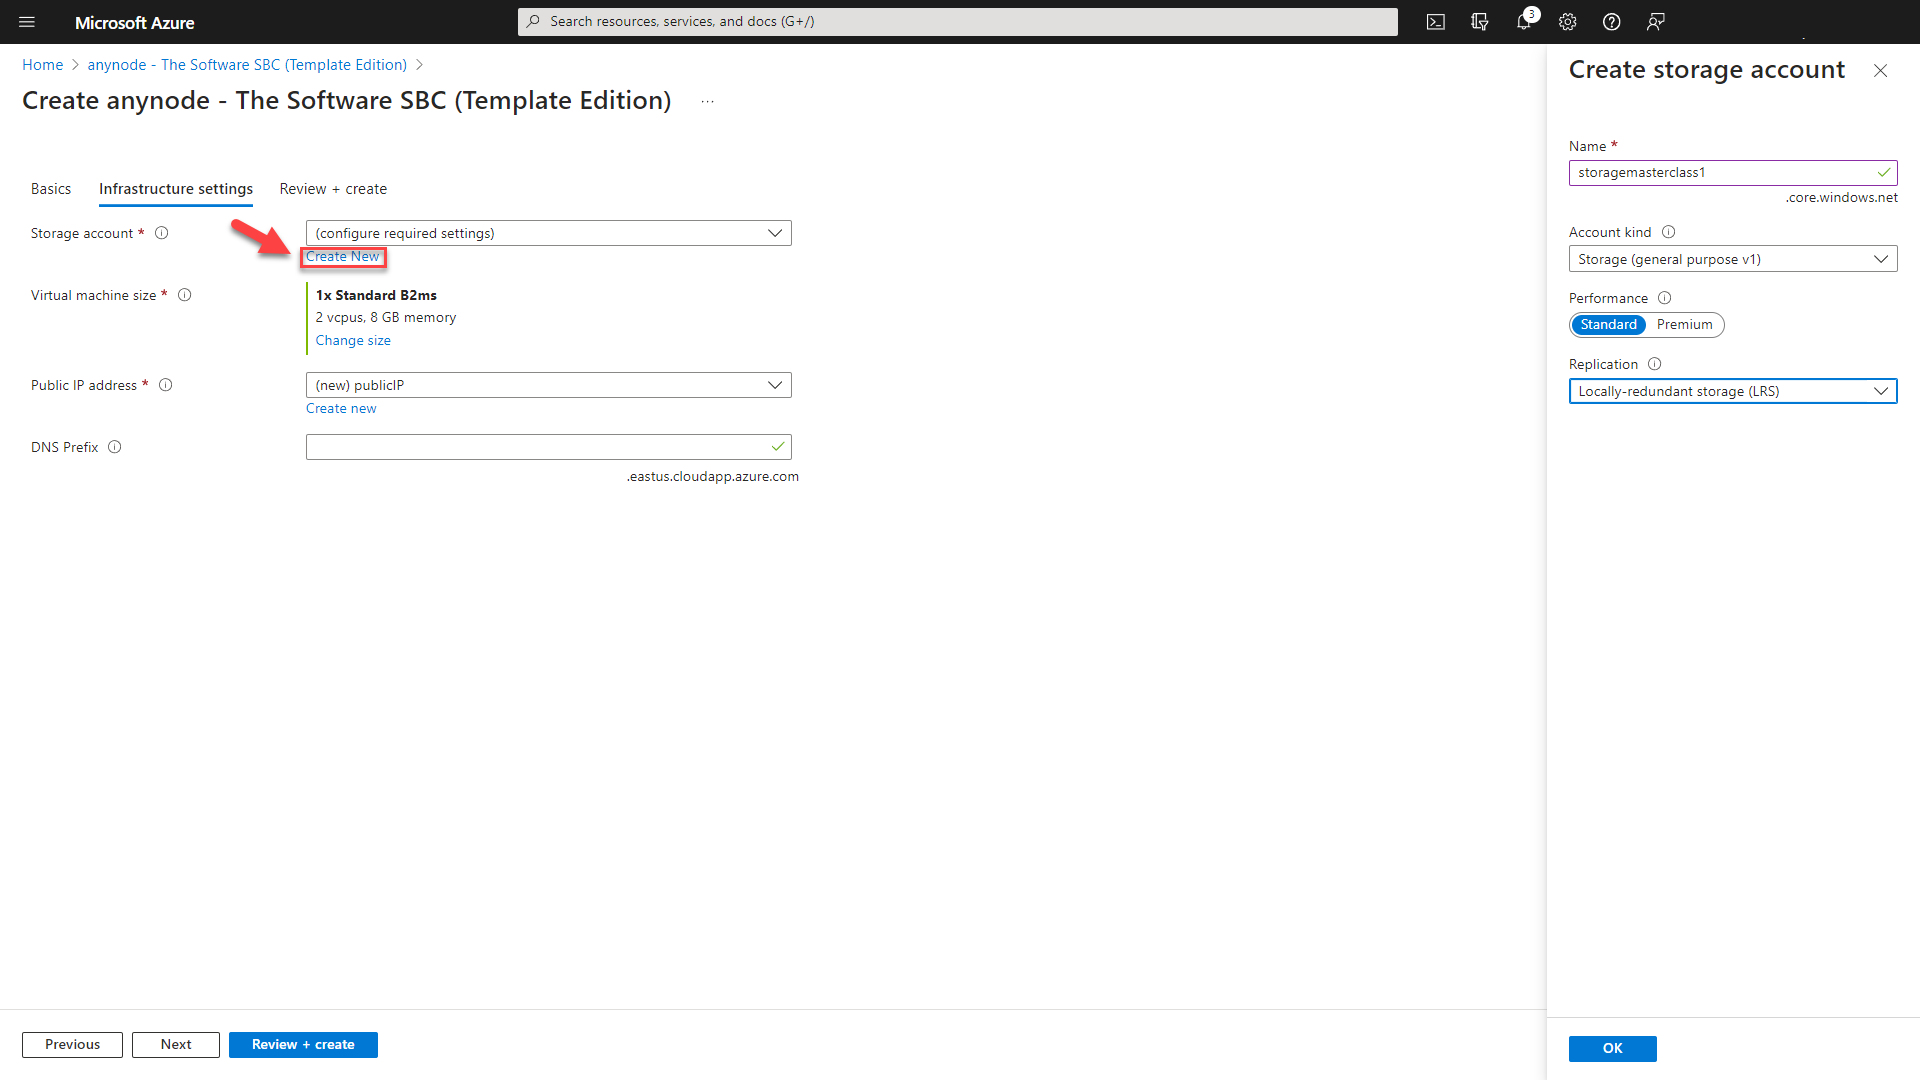
Click on for infrastructure settings.
Create a new storage account with and fill in a name for it. When naming your Storage Account, it is crucial to adhere to the universally applicable rules for a URL. Only lowercase letters are allowed, and no special characters or spaces are permitted. Please consider these guidelines during the naming process. We will use the default values. With a session border controller there is normally no intensive drive access. The standard type is suitable for most deployments.
Click on .
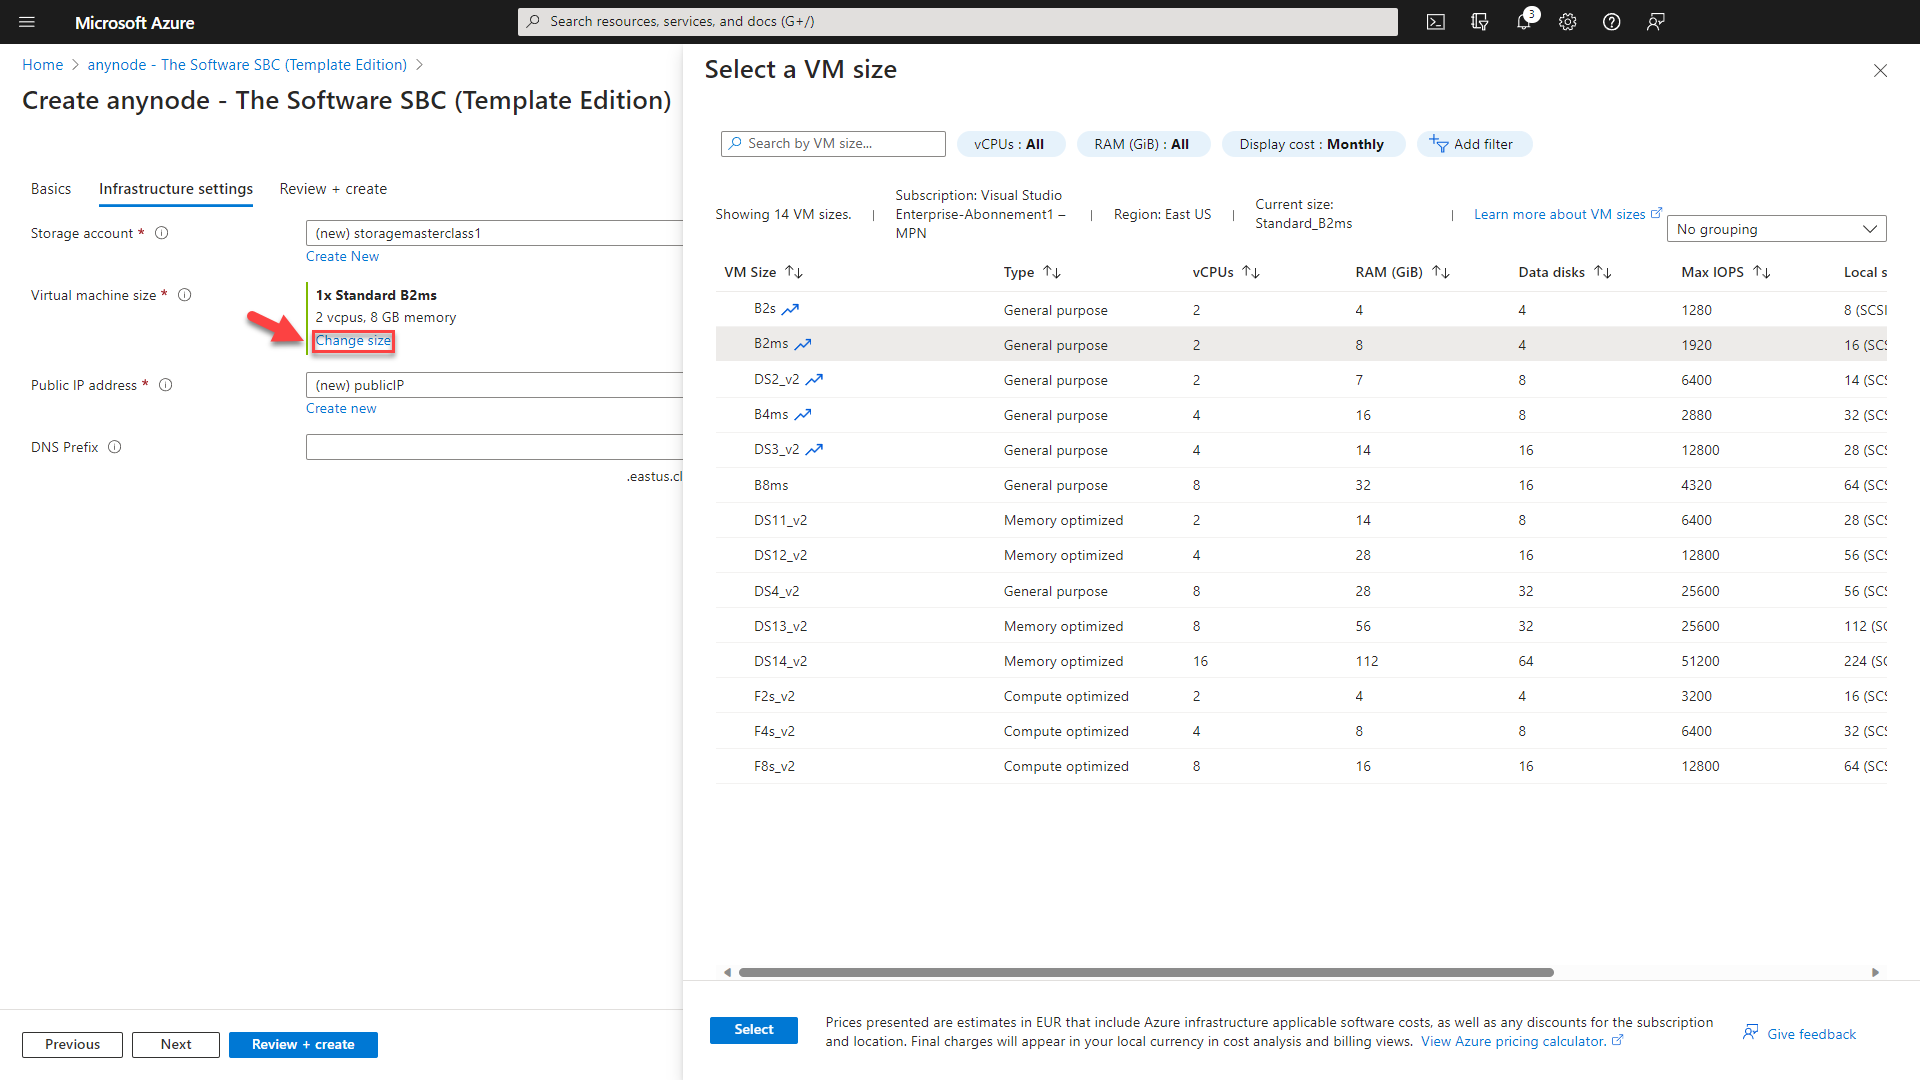
Click on to change the size of the virtual machines here. This will affect how much money you pay for your VM monthly. Depending on your region selection, you have multiple options available. Please note: Not all models are available in all regions. Also, pricing for the same model may vary in the different areas.
We recommend B-series VMs for test purposes and F-series for production systems. You can switch between the models later.
The F-series are optimized VM sizes that have a high CPU-to-memory ratio. If you have a busy contact center and you need the entire number of concurrent calls all day, the F-series is suitable because it guarantees power consistently.
For our deployment example, we have chosen the B-series for anynode.
Click on .
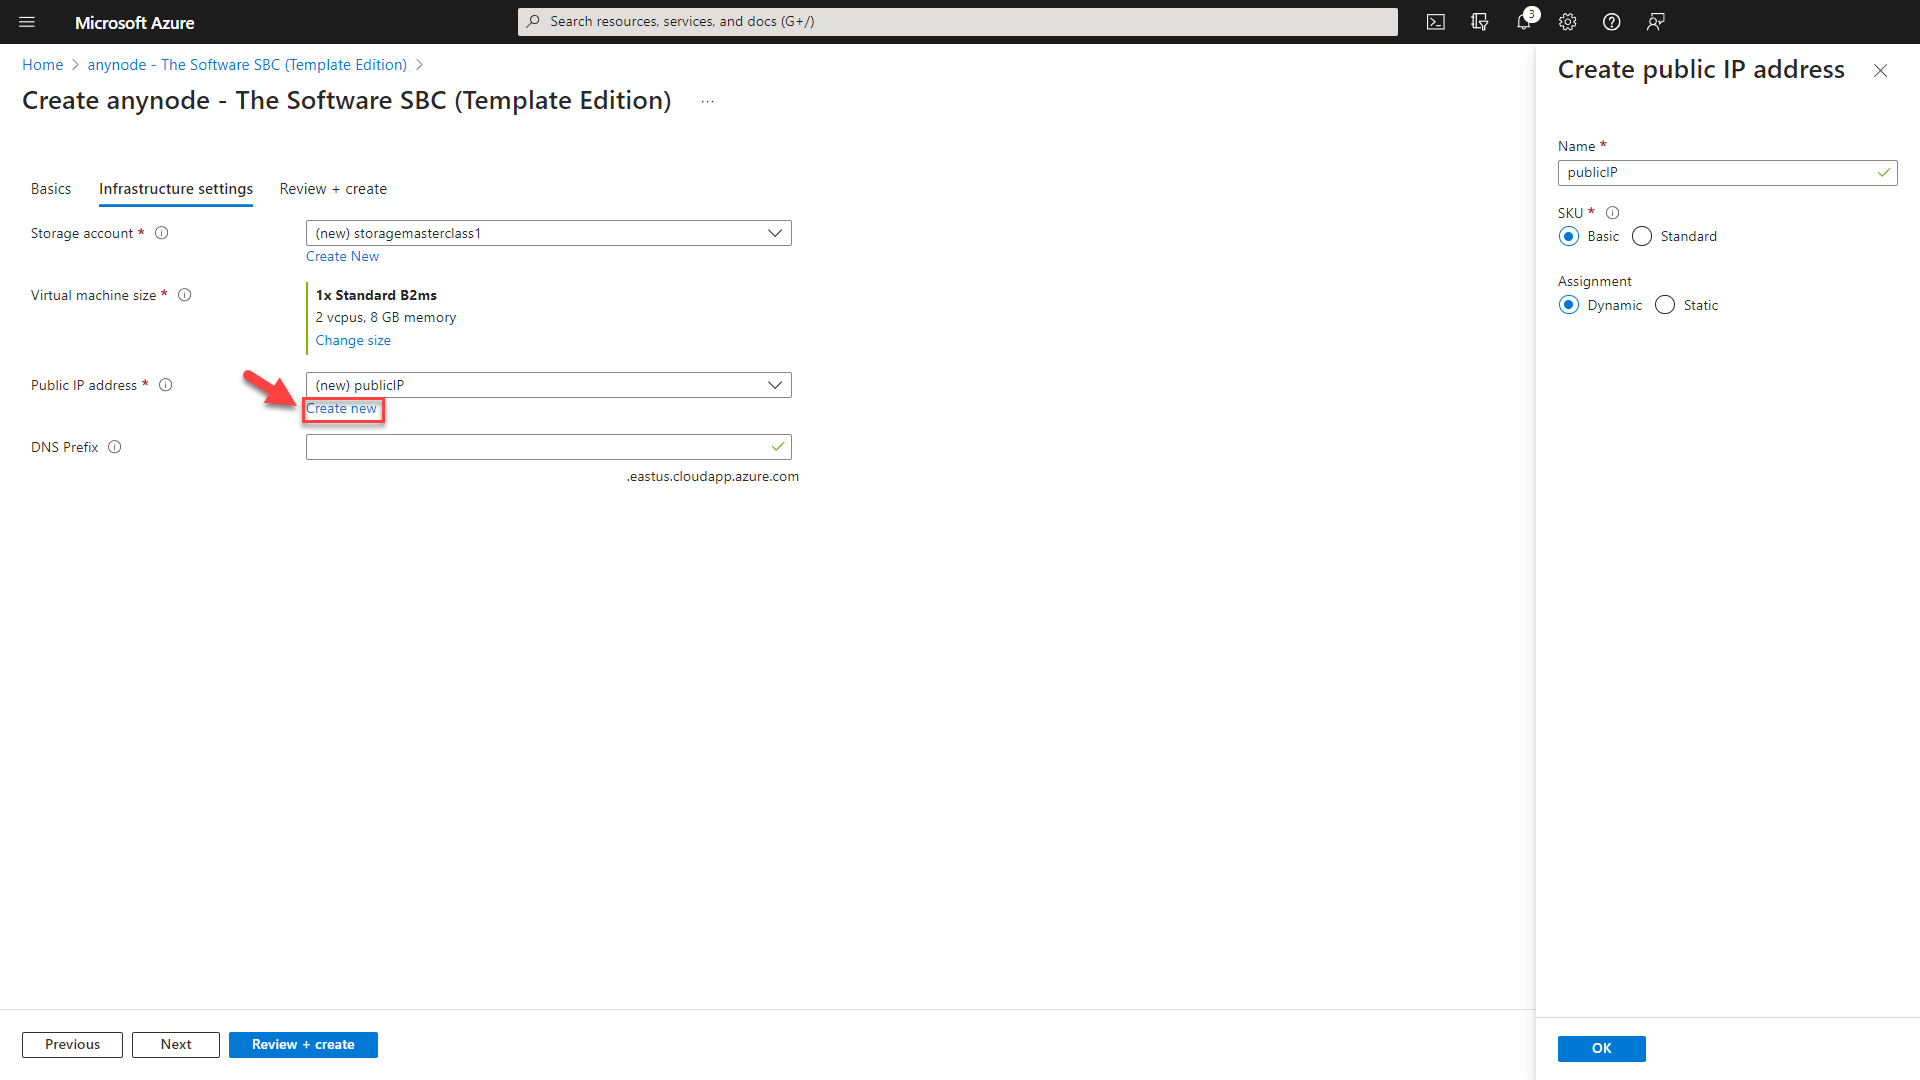
You should use a public IP address if you want to communicate with the virtual machine from outside the virtual network. Click on . You can typically adopt the default settings with ease.
For the utilization of Certificate Issuance Providers such as Let's Encrypt, you should choose the "Assignment" setting depending on your DNS provider. If you are using Microsoft as your DNS provider, leave the setting at the default value "dynamic". However, if you are using a different DNS provider, select the "Static" option.
Confirm the inputs by clicking .
Insert a DNS Prefix for the VM public IP address if you need it.
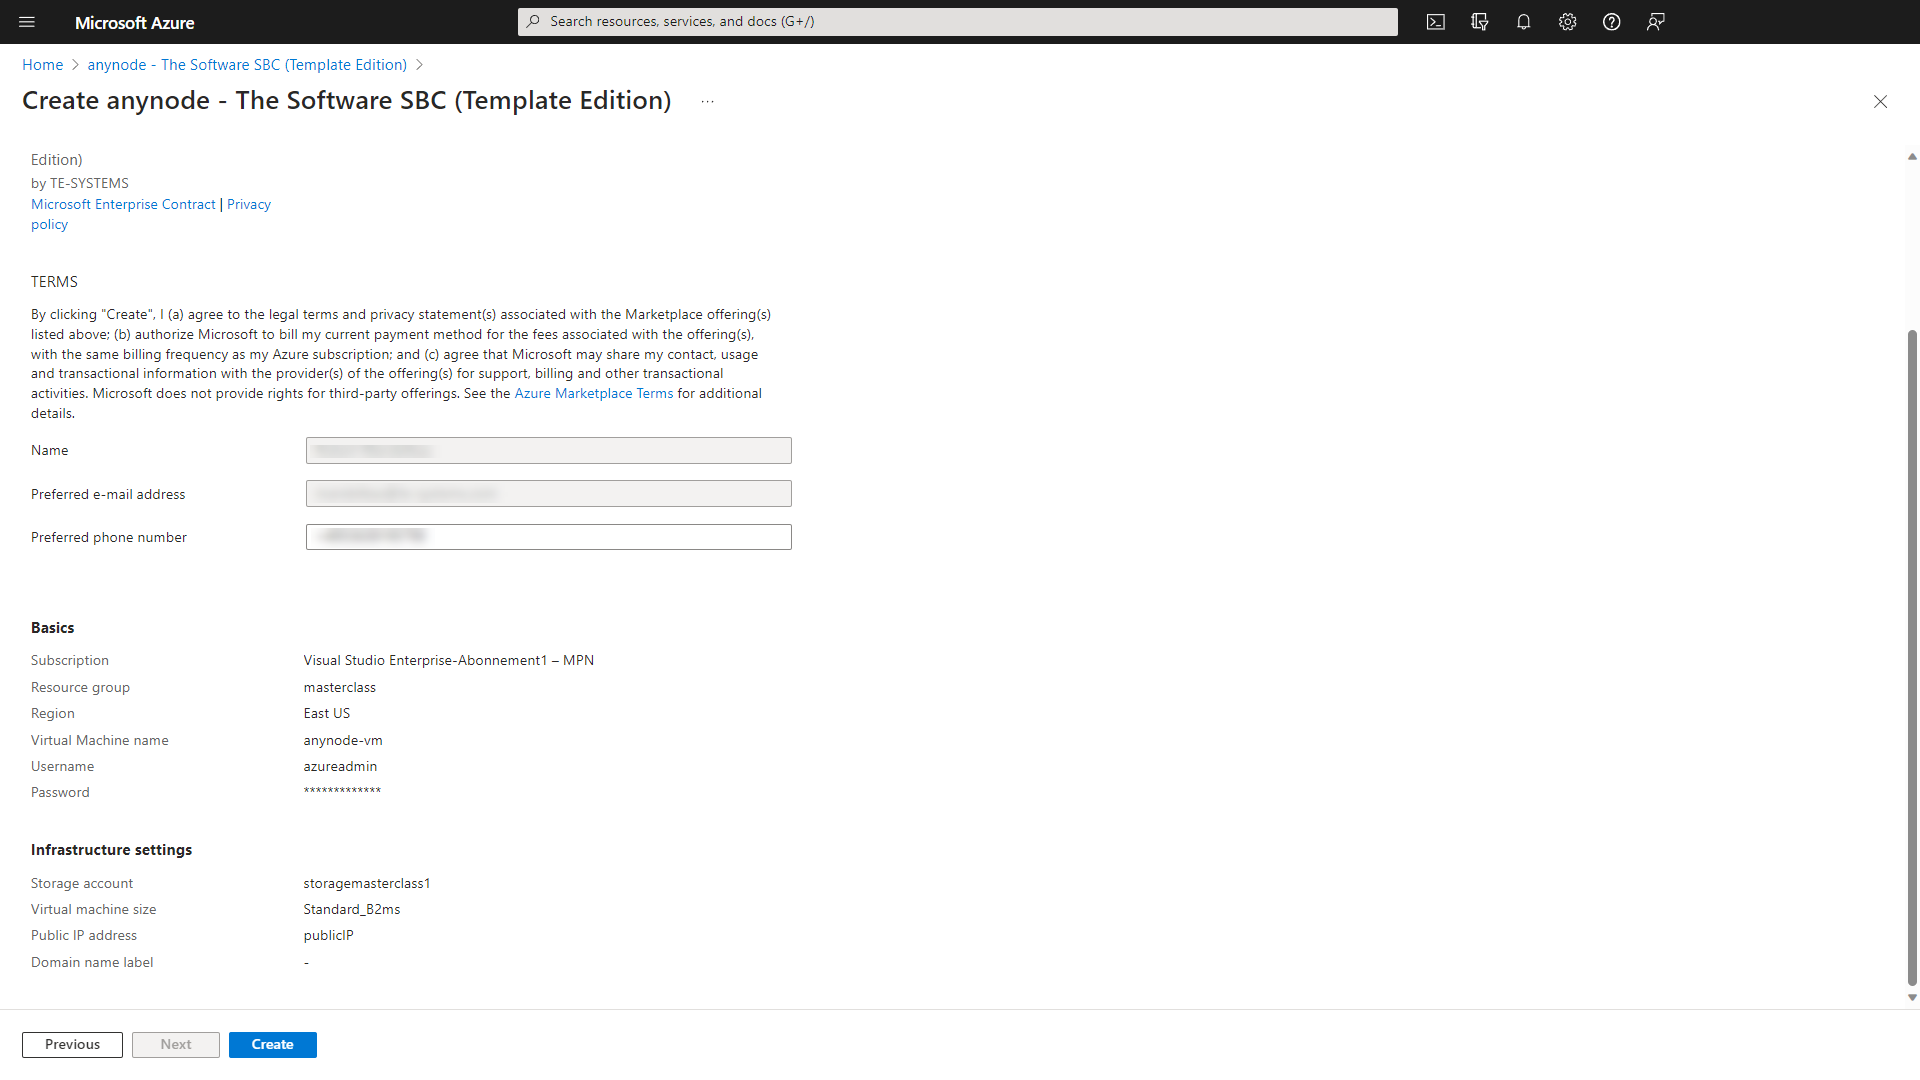
With a click on the button, Azure will make a final validation.
Click on to finalize your deployment. Wait a couple of minutes before you get some details about the progress. Finally, you are ready to go when you see the completion of the deployment.
Click on the button.

Network Hardening Template with Windows Server 2025 (Firewall rules)
It is recommended to prevent all unnecessary external access to the VM. If this is not possible, for example, if anynode is the only machine in the network, access to the anynode frontend should only be allowed from the configurator's IP address.
In our example, this deployment comes with pre-configured inbound port rules for RDP, HTTP and Microsoft Teams.
Deleting RDP access for your Windows Server 2025 VM with anynode in Azure should be considered as part of a comprehensive security strategy to protect your resources from unauthorized access and potential security threats. If you do not need external access via RDP to the VM, Azure provides alternative access methods such as Azure Bastion, which offers secure, browser-based access to VMs without exposing RDP ports to the public Internet.
Please note that there is a difference between deny and delete. Deny means that traffic is explicitly blocked. If a rule is set to deny, any traffic that matches the conditions of that rule will be rejected or blocked. On the other hand, delete means that the rule is removed and no longer active. When a rule is deleted, it has no further effect on the traffic flowing through the firewall.
In the overview of your resource group, click on your newly created virtual machine.
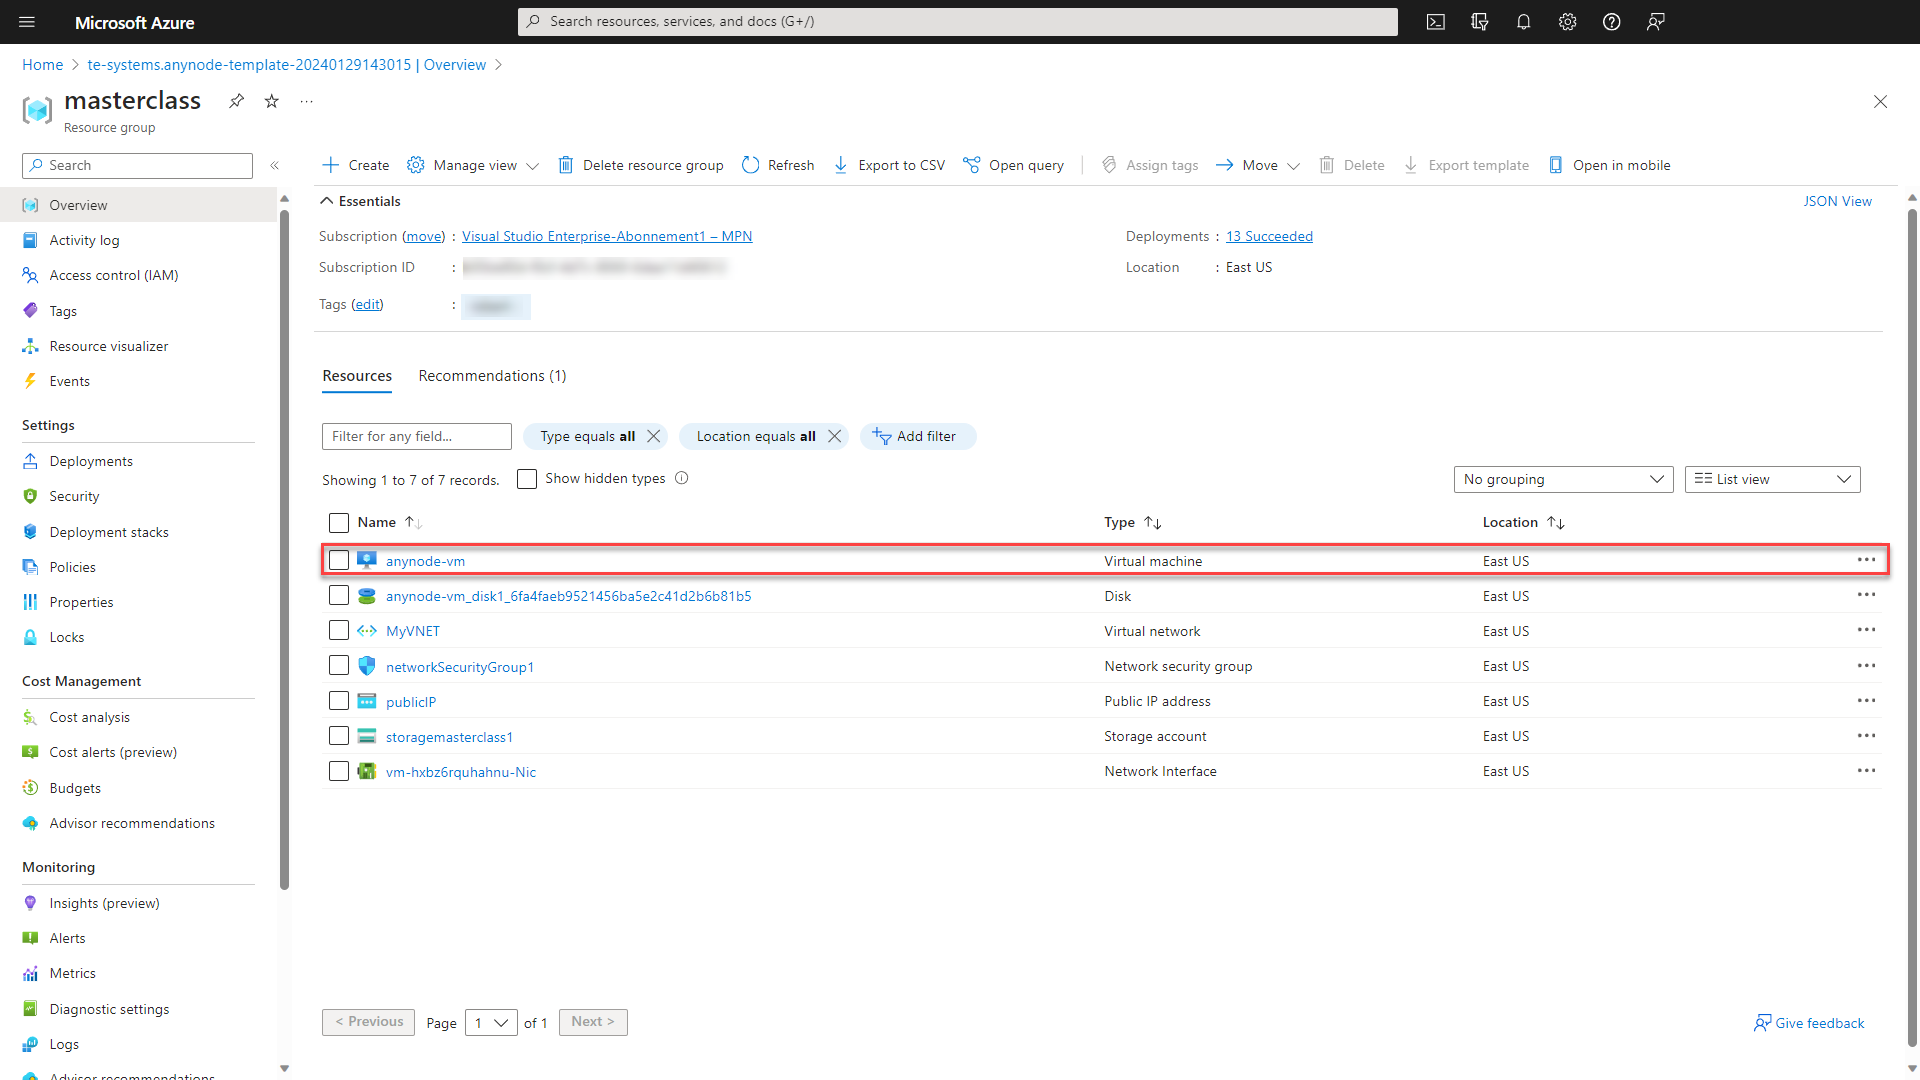
Navigate to your Netwok settings in the left menu.
Navigate to the RDP inbound port rule.
Click on the trash bin icon to delete the rule.
Confirm with the button.
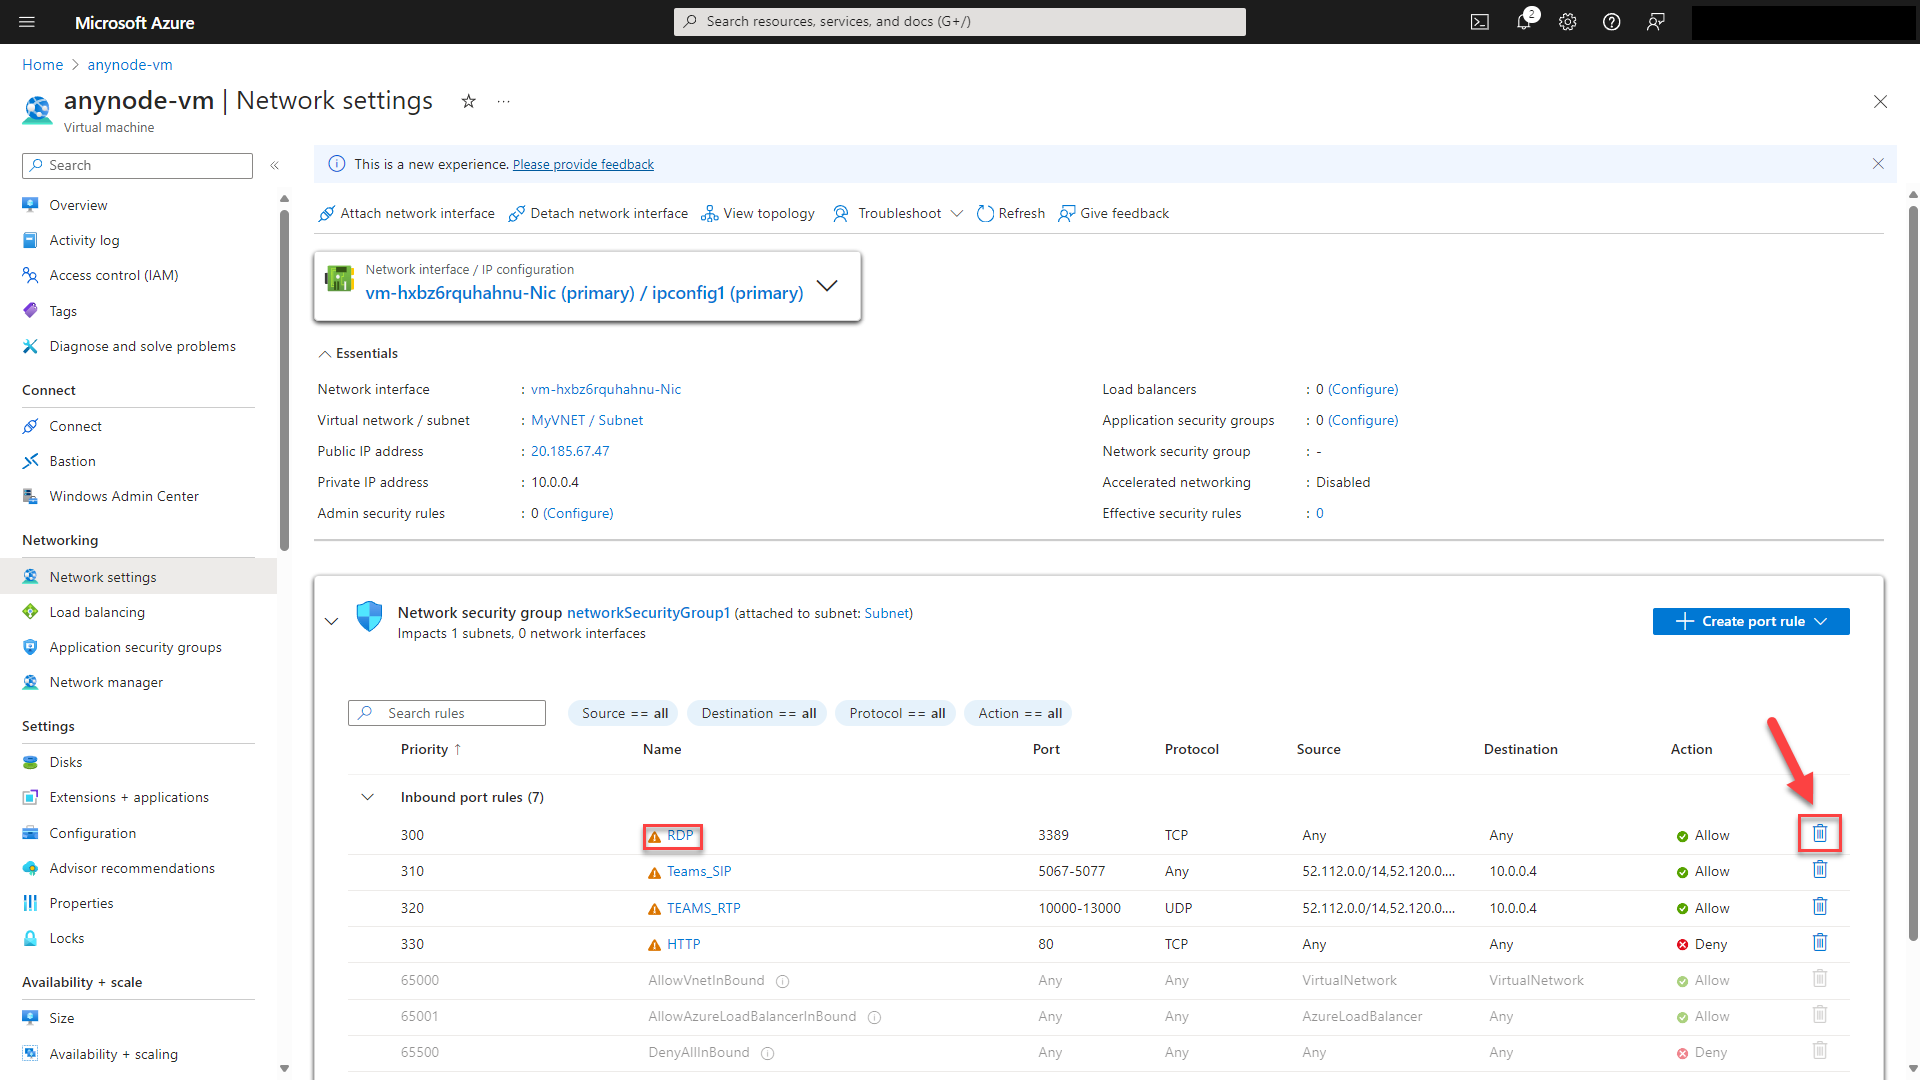
The inbound rule Teams_SIP is a predefined inbound port rule in Azure Network Security Groups (NSGs) that is specifically designed to allow SIP (Session Initiation Protocol) traffic for Microsoft Teams. This rule typically allows inbound traffic on TLS port 5067, which is commonly used for SIP signaling in Microsoft Teams for activities such as establishing and managing calls.
The predefined inbound port rule Teams_RTP in Microsoft Azure refers to a specific rule that allows inbound traffic on the Real-Time Transport Protocol (RTP) port used by Microsoft Teams for audio and video communications. Please check your ports and change them if needed.
If you don't use Microsoft Teams Direct Routing for this deployment, it is recommended that you deny the Teams inbound rules.
To use a Certificate Issuance Provider like "Let's Encrypt" in anynode, external access to anynode is necessary. In such a scenario, it's essential to allow HTTP traffic from the Internet. This rule is also predefined.
By enabling HTTP traffic from the Internet, you enable vital communication from the certificate issuance provider to the anynode instance. This ensures the successful issuance, renewal, and validation of SSL/TLS certificates for your deployment. Certificate Issuance Providers employ various validation methods to verify control over a domain before issuing an SSL/TLS certificate. One common validation method is the HTTP-01 Challenge. The HTTP-01 challenge requires port 80 to be open in your firewall so that the certificate issuance provider can reach your system when needed.
Port 80 should not be used by any other program on the anynode machine with the selected interface IP address. The port will only be opened when a challenge is initiated for certificate renewal or new certificate issuance. Afterward, the port will be closed again.
The outbound rule TO_TEAMS_RTP would likely permit outbound traffic from your Azure resources to Microsoft Teams RTP endpoints, ensuring that communication for Teams meetings and calls can occur without obstruction. This rule is essential for ensuring that Teams functions properly within your Azure environment.
To configure firewall rules for using other services with anynode in Microsoft Azure, you need to allow inbound port rules from specific ports. Please refer to our specific guides for Zoom Phone, Cisco Webex, and Google Voice, as they contain detailed information about the ports used for each service.
Access your anynode Frontend (Template with Windows Server 2025)
Azure Bastion safeguards your virtual machines by offering lightweight, browser-based connectivity, eliminating the necessity to expose them via public IP addresses. This reduces the attack surface and mitigates the risk of unauthorized access. Upon deployment, a Bastion host is automatically generated on a subnet within your virtual network.
Click on and click on your newly created virtual machine.
Use the button in the upper menu and choose Connect via Bastion.

Bastion pricing starts at an hourly base rate.
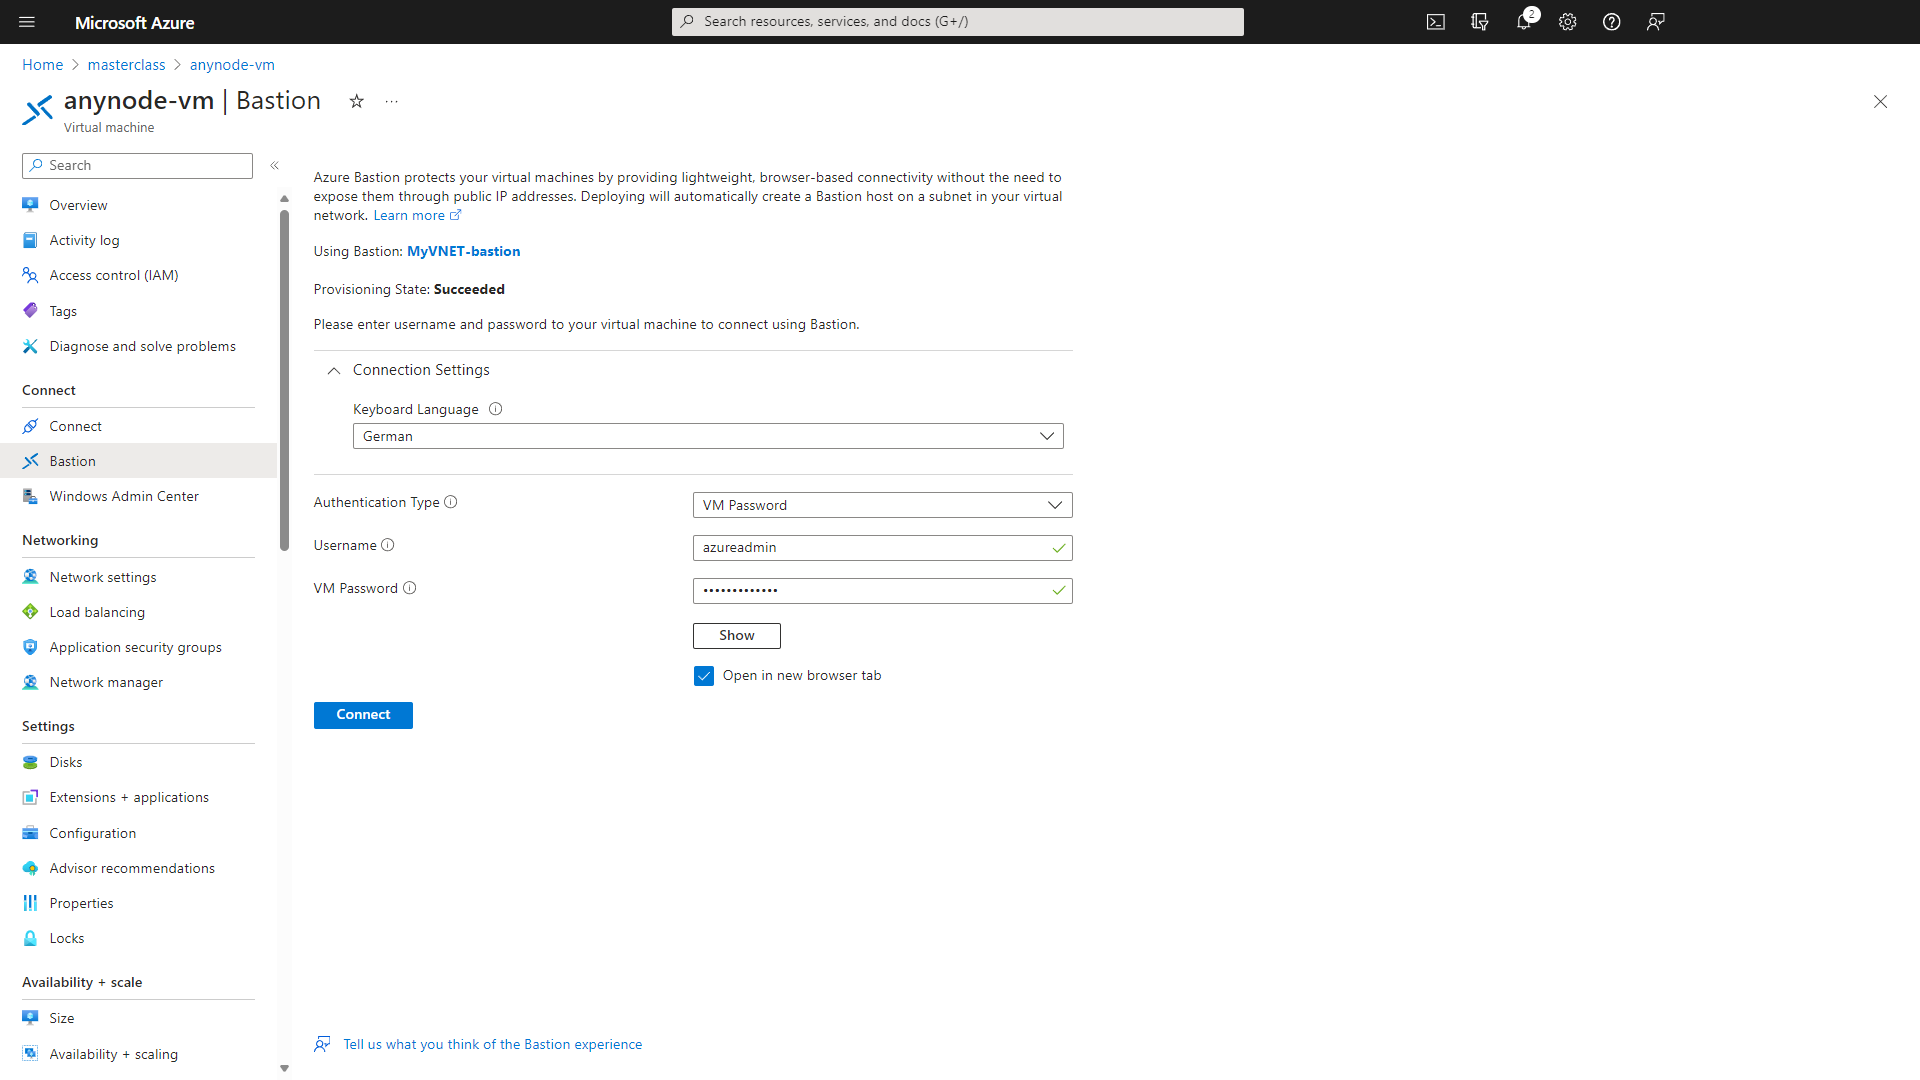
Click on the button.
Select the Keyboard Language of the VM.
Under Authentication Type, choose VM Password.
Utilize the credentials you assigned earlier in the instance details.
Click on the button.
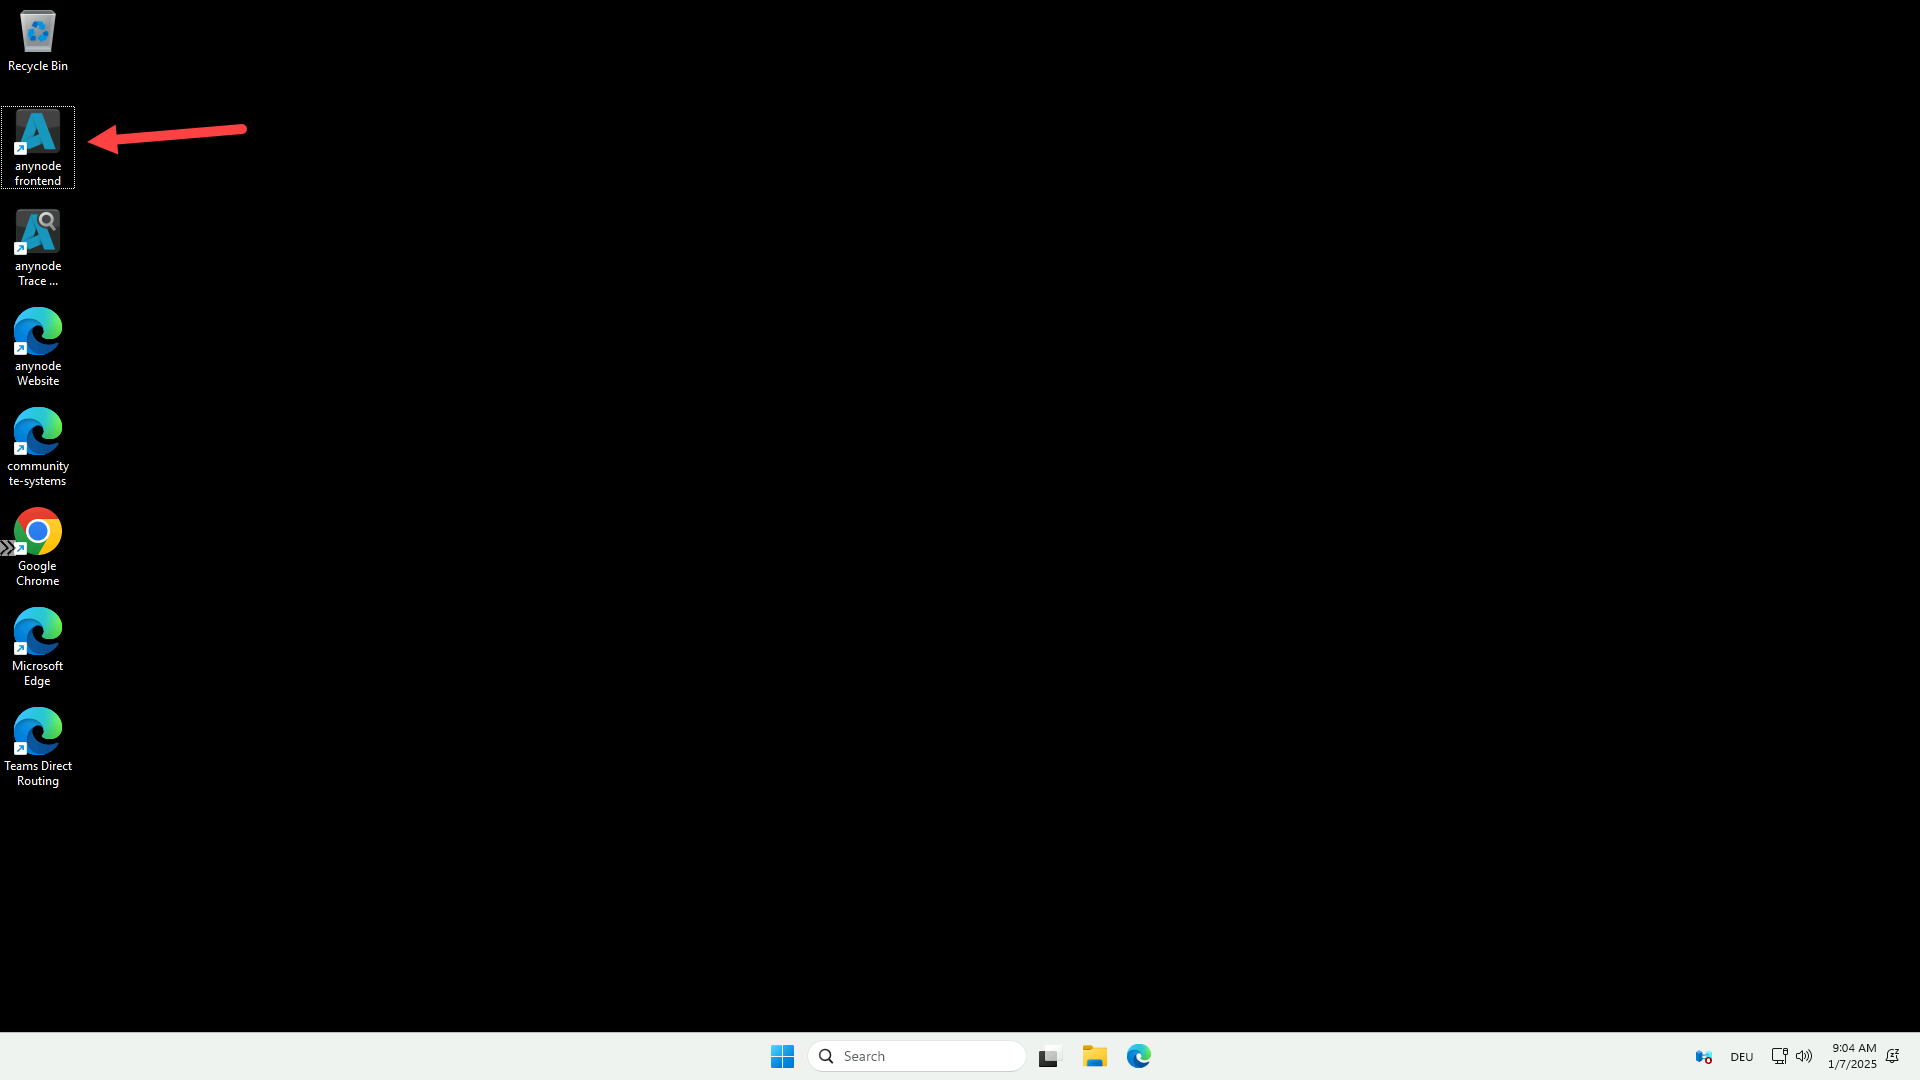
You now have access to your VM with anynode already installed. Simply use the pre-configured shortcut on the desktop to open the anynode frontend in Microsoft Edge. For more guidance on getting started with the anynode frontend, check out our First Steps video.
Here we go! You have successfully deployed anynode in Azure!
Please note that you need to bring in and install your license for your anynode on Microsoft Azure. Our sales team will be happy to assist you.
There is also a Licensing video tutorial available.
If you want to test anynode with a trial without obligation, the free anynode demo license is automatically available with each anynode installation. The demo license is limited to four sessions and plays a sporadic voice announcement, also the functions Media Pass Through and Internal Pass Replacement are not available.
Option 2: Use VM Edition with Windows Server 2025
If you like to work with Windows Server 2025 operating system, you should consider using the VM Edition.
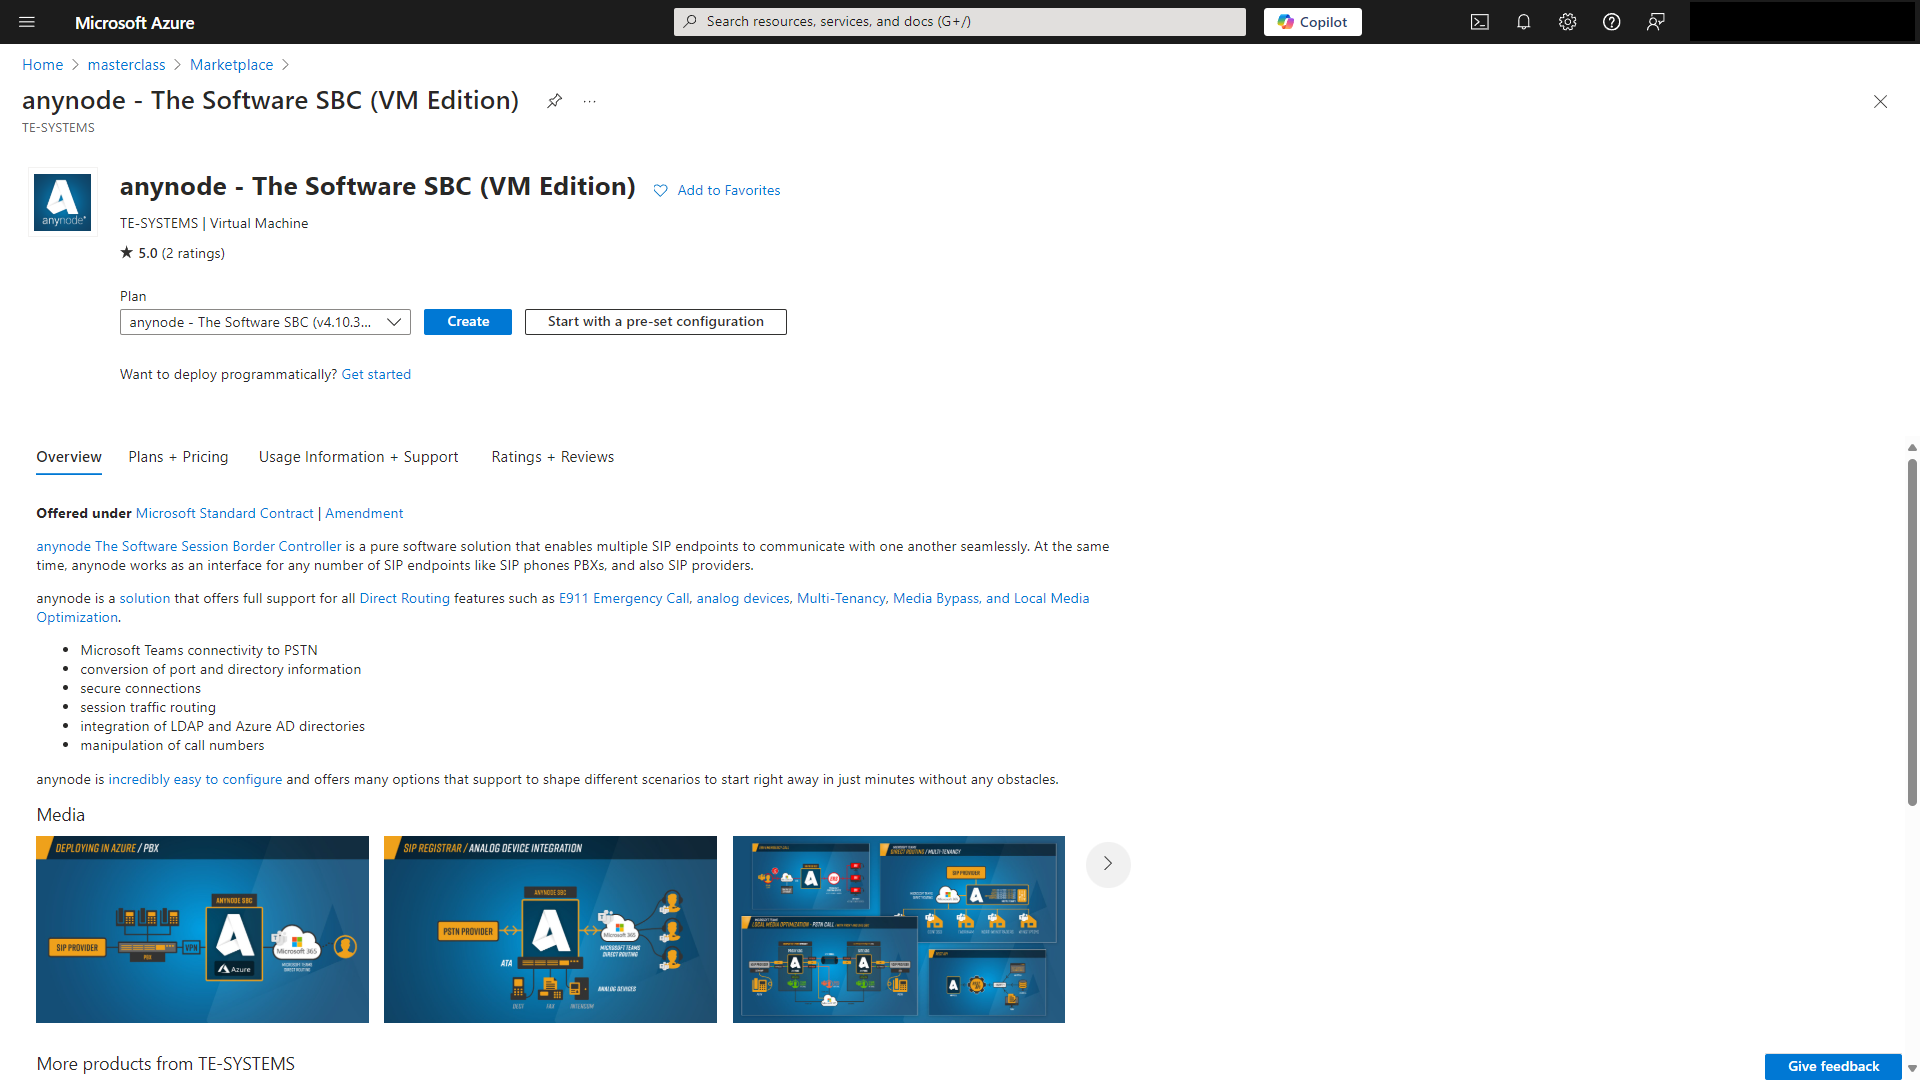
Choose anynode - The Software SBC (VM Edition).
We recommend starting not with a preset configuration.
Select a software plan with Windows Server 2025. Click on .

Start in the register Basics.
Select your subscription to manage deployed resources and costs.
Create a name for your virtual machine.
Choose the Azure region that's right for you and your customers. Not all VM sizes are available in all regions.
An Azure resource group is a logical container into which Azure resources are deployed and managed. You must select a resource group that shares the same lifecycle, permissions, and policies. Select an existing resource group or create a new one. For test purposes you should create a new resource group. This simplifies the complete deletion afterwards. In our example, we are using an existing resource group named masterclass.
Virtual machines in Azure have two distinct names: A virtual machine name used as the Azure resource identifier, and a guest host name. When you create a VM in the portal, the same name is used for both the virtual machine name and the host name. The virtual machine name cannot be changed after the VM is created. You can change the host name when you log into the virtual machine.
Azure offers a range of options for managing availability and resiliency for your applications. Architect your solution to use replicated VMs in Availability Zones or Availability Sets to protect your apps and data from datacenter outages and maintenance events.
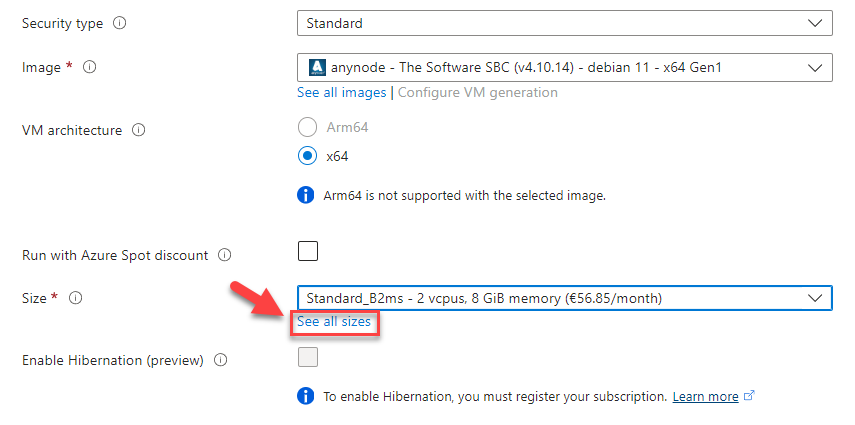
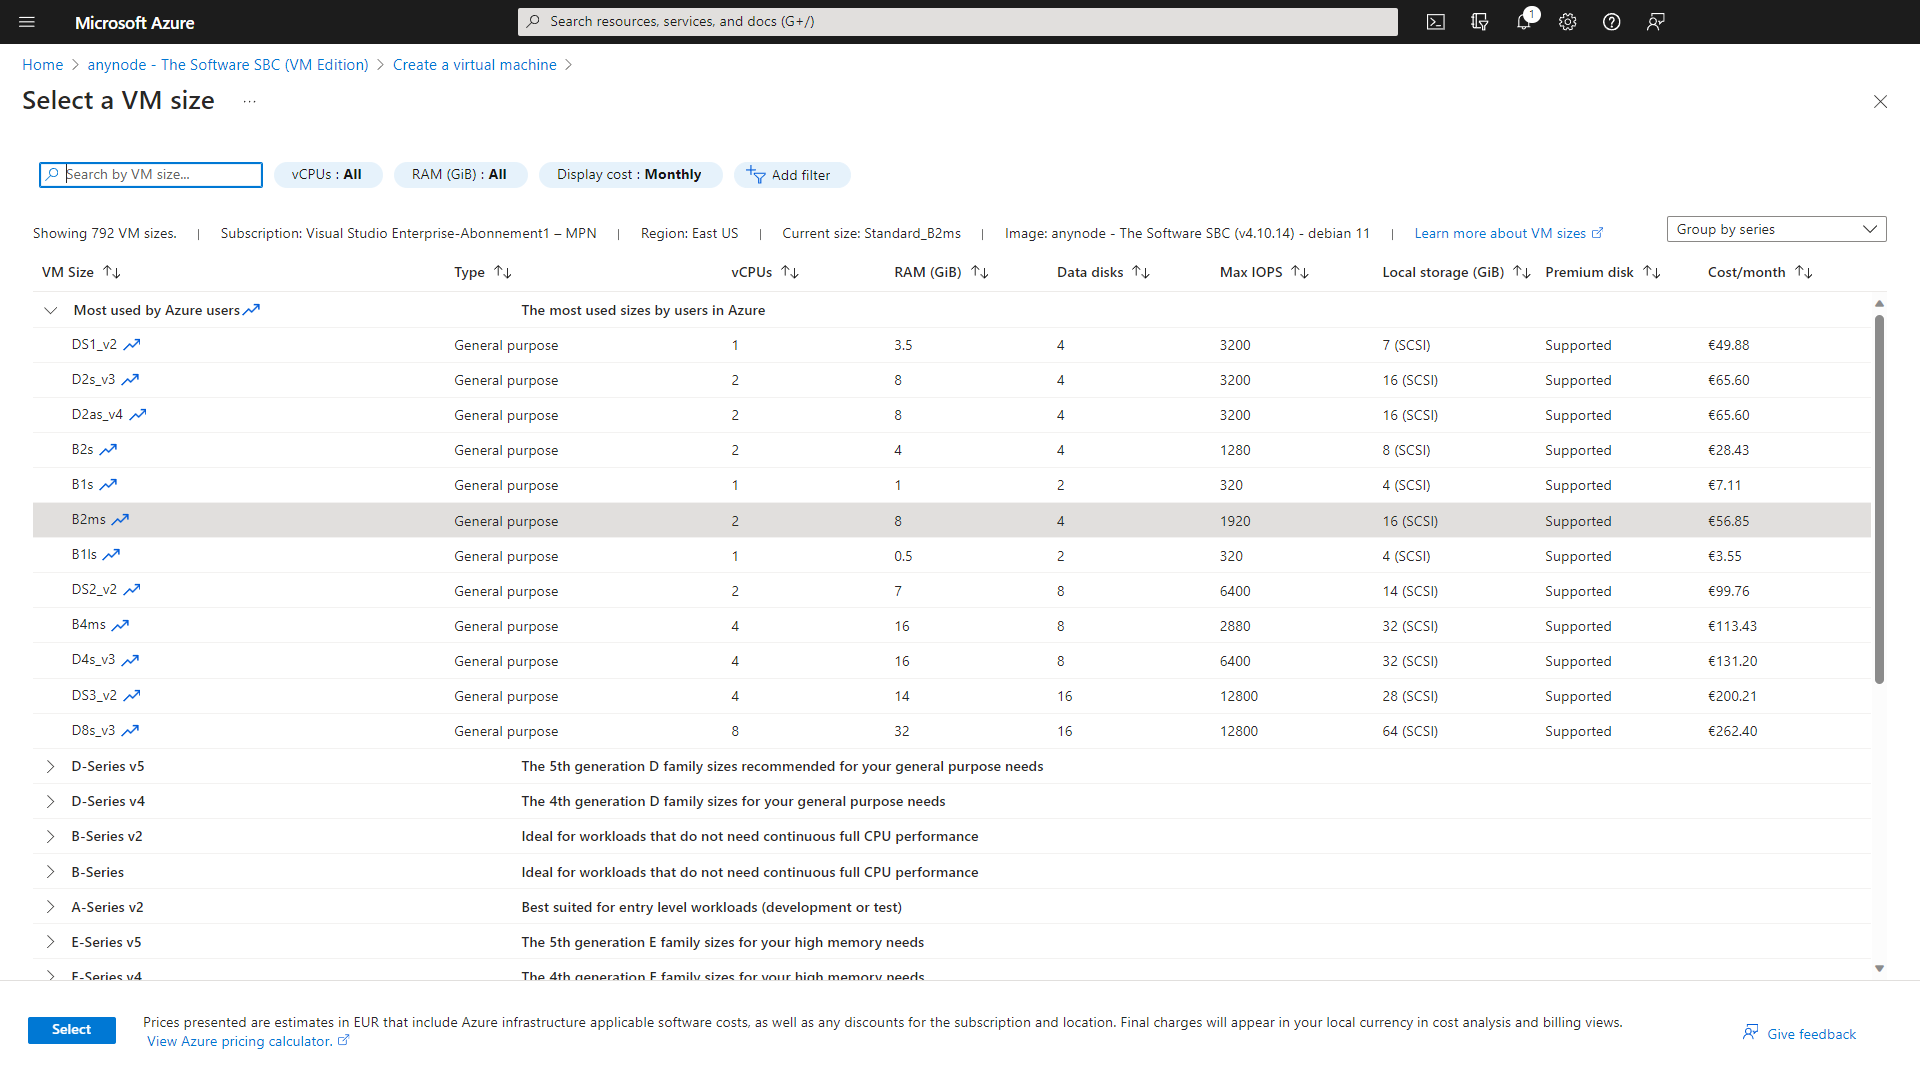
At Size, click on See all sizes. You can select the size of the virtual machines here. This will affect how much money you pay for your VM monthly. Depending on your region selection, you have multiple options available. Please note: Not all models are available in all regions. Also, pricing for the same model may vary in the different areas.
Use the size recommended by the image publisher.
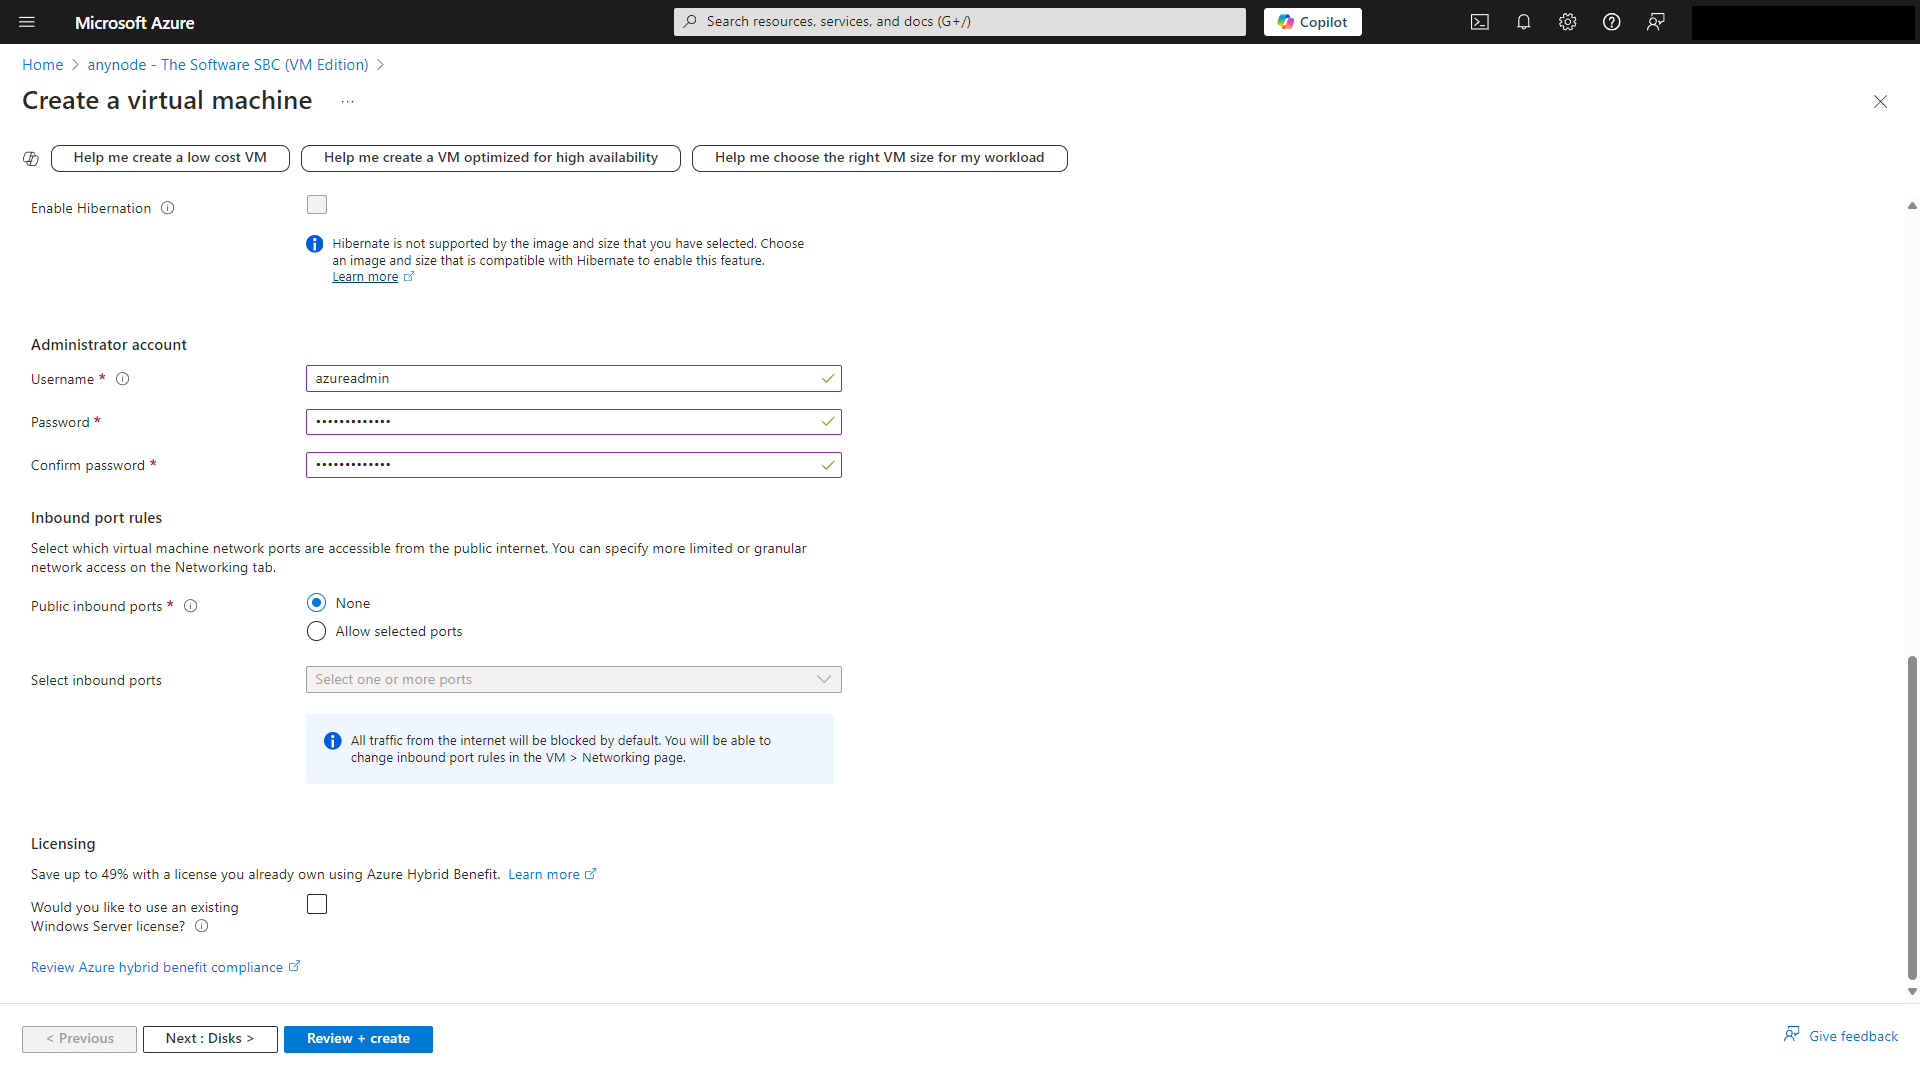
If you plan to use Azure Bastion (recommendation) later for secure access to your virtual machine (VM), you still need to configure a username and password during the VM's initial setup. Select the credentials for your VM administrator account. The password must have 3 of the following: 1 lower case character, 1 upper case character, 1 number, and 1 special character. The value must be between 12 and 123 characters long.
At Inbound port rules, select which virtual machine network ports are accessible from the public Internet. All traffic from the Internet will be blocked by default. You will be able to change inbound port rules in the VM Networking page later.
Denying RDP access for your Windows Server 2025 VM with anynode in Azure should be considered as part of a comprehensive security strategy to protect your resources from unauthorized access and potential security threats. If you do not need external access via RDP to the VM, Azure provides alternative access methods such as Azure Bastion, which offers secure, browser-based access to VMs without exposing RDP ports to the public Internet.
By enabling HTTP traffic from the Internet, you enable vital communication from the certificate issuance provider to the anynode instance. This ensures the successful issuance, renewal, and validation of SSL/TLS certificates for your deployment. Certificate Issuance Providers employ various validation methods to verify control over a domain before issuing an SSL/TLS certificate. One common validation method is the HTTP-01 Challenge. The HTTP-01 challenge requires port 80 to be open in your firewall so that the certificate issuance provider can reach your system when needed.
Port 80 should not be used by any other program on the anynode machine with the selected interface IP address. The port will only be opened when a challenge is initiated for certificate renewal or new certificate issuance. Afterward, the port will be closed again.
Select None to confirm.
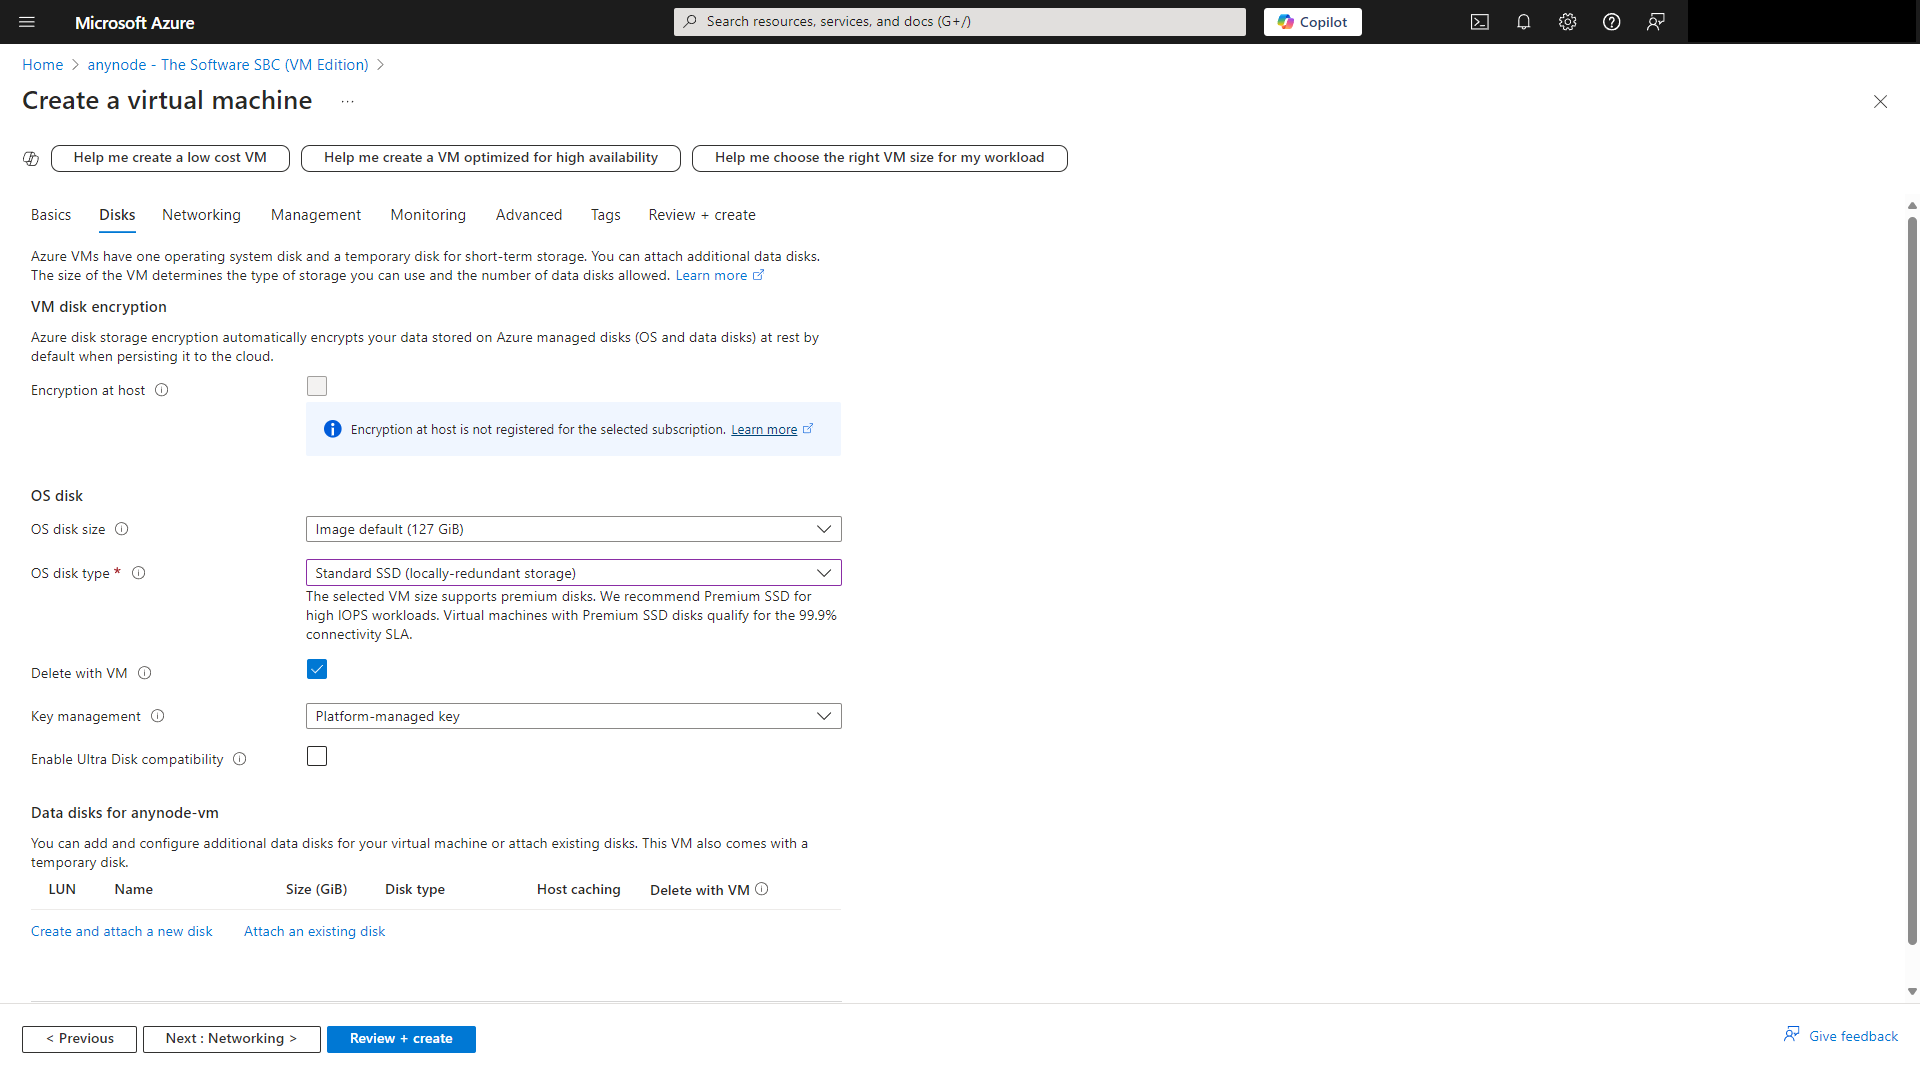
Click on the button to continue to Disks.

At Disks, you can choose between Azure managed disc types to support your workload or scenario.
With a session border controller there is normally no intensive drive access. The standard type is suitable for most deployments.
Choose the Standard SSD.
Click on the button.

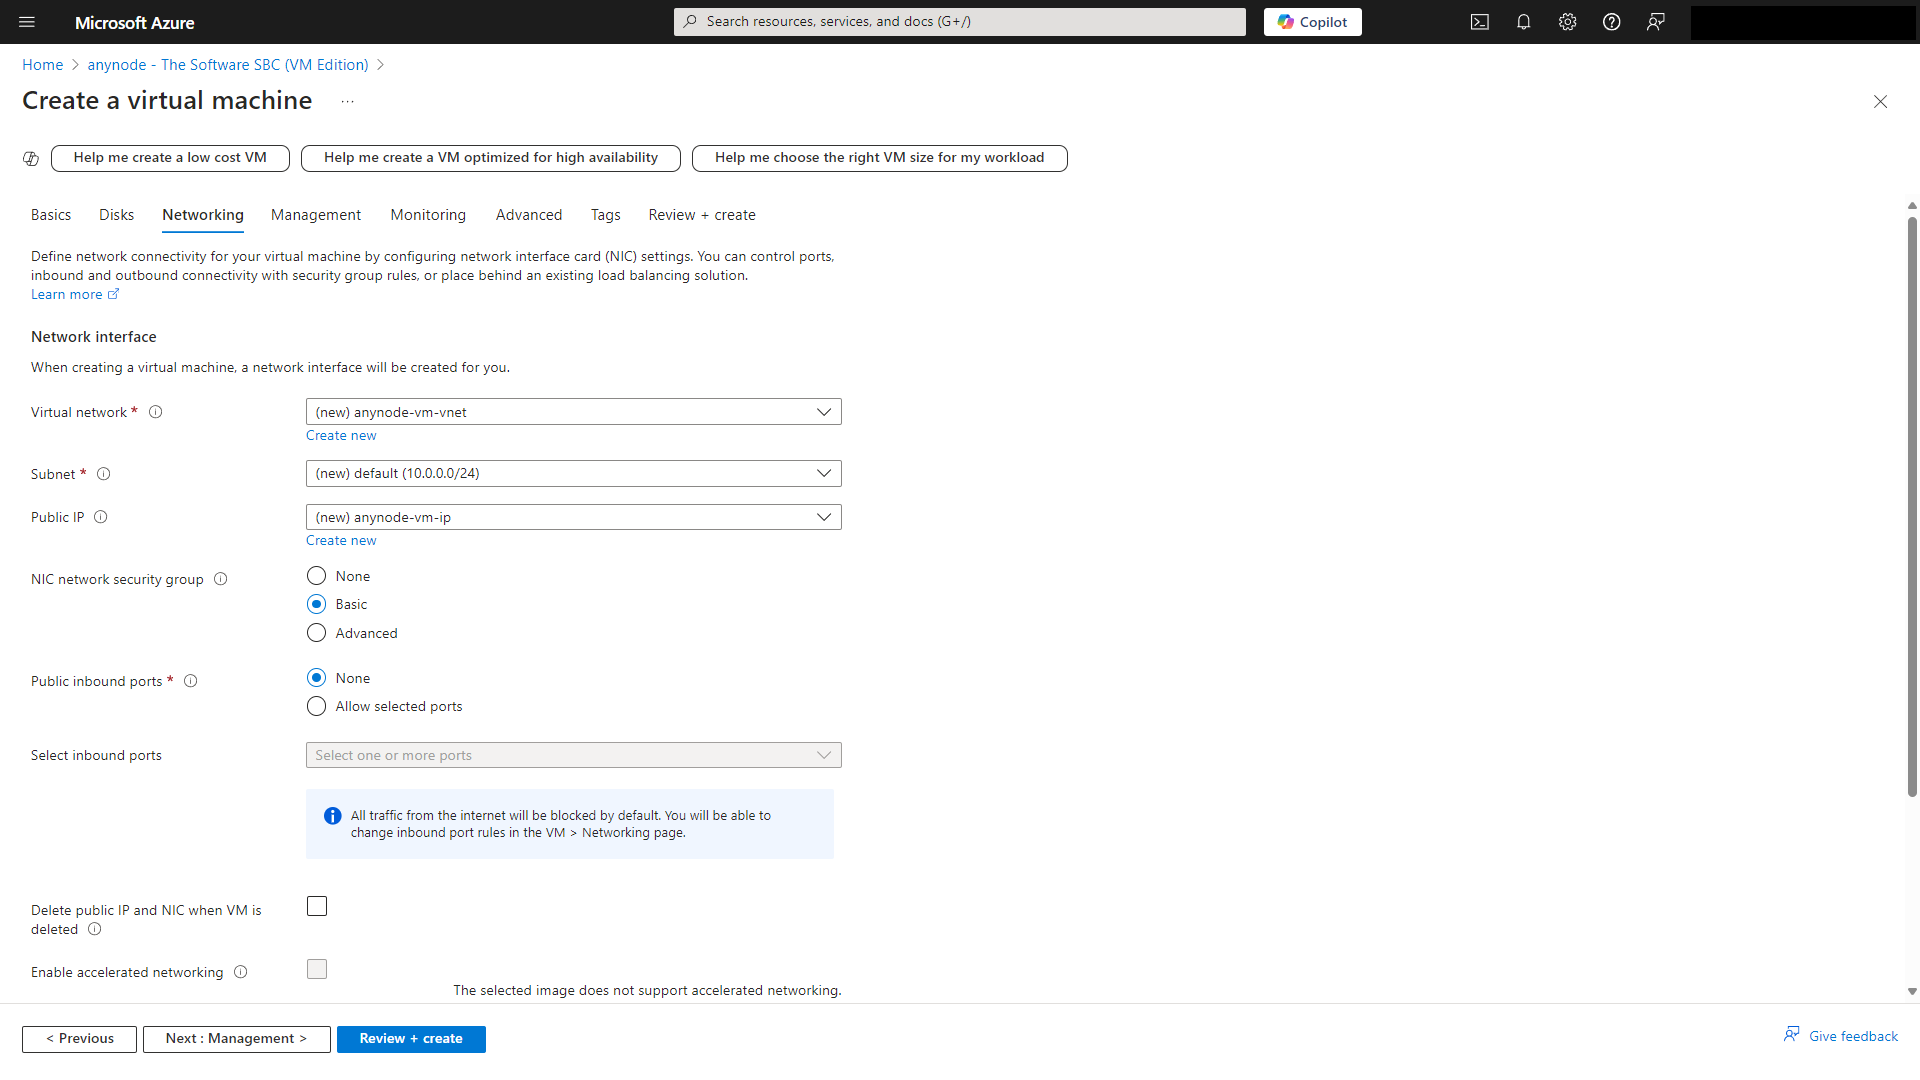
At Networking, accept the default values.
Click .
At Management, you should disable the auto-shutdown.
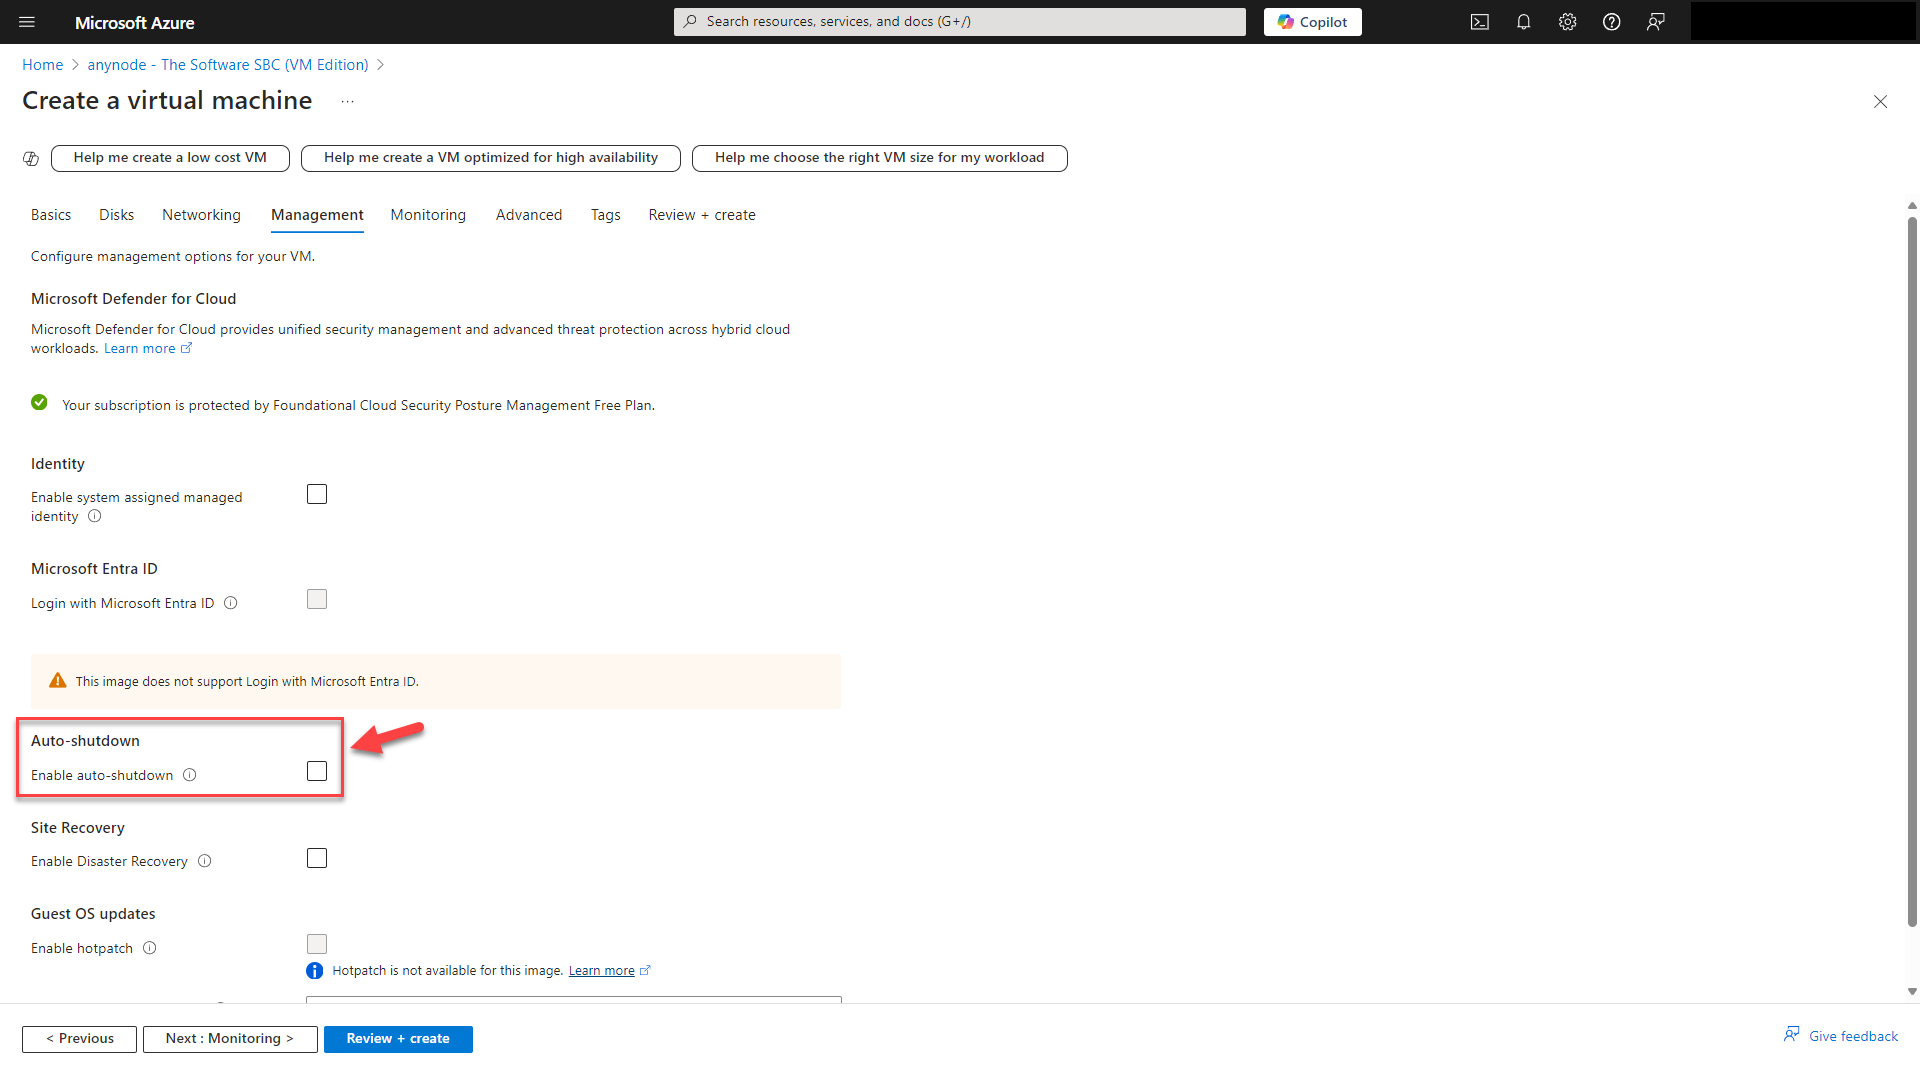
anynode as an SBC is typically used to handle real-time communication (RTC) like voice calls and SIP signaling.
The auto-shutdown feature can stop the VM at a predefined time, causing a disruption in communication services.
If the VM hosting anynode shuts down, all ongoing calls and sessions will be terminated abruptly.
This leads to poor user experience and potential business interruptions, especially in environments where 24/7 availability is critical.
The following settings are optional.
You may proceed by clicking the button.
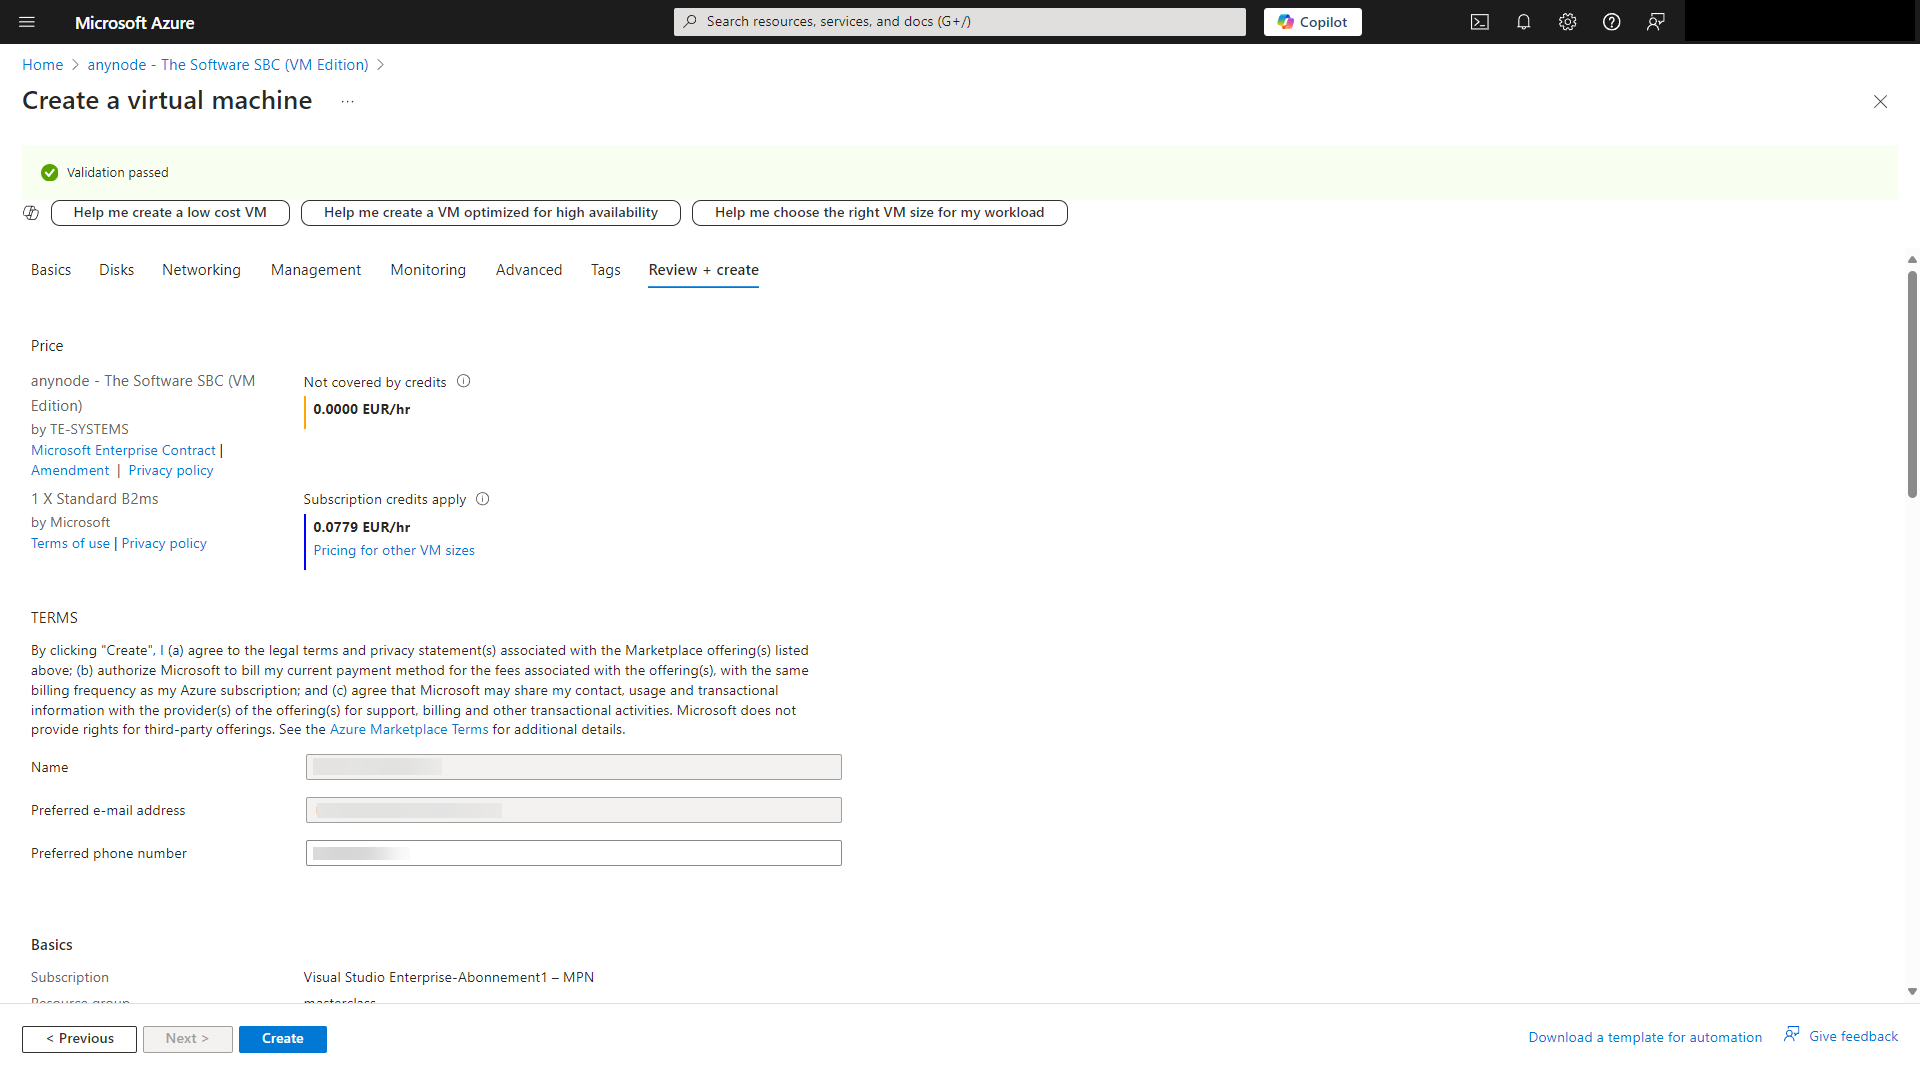
Wait for the passed validation. You will get an overview of the settings and pricing.
Click on .
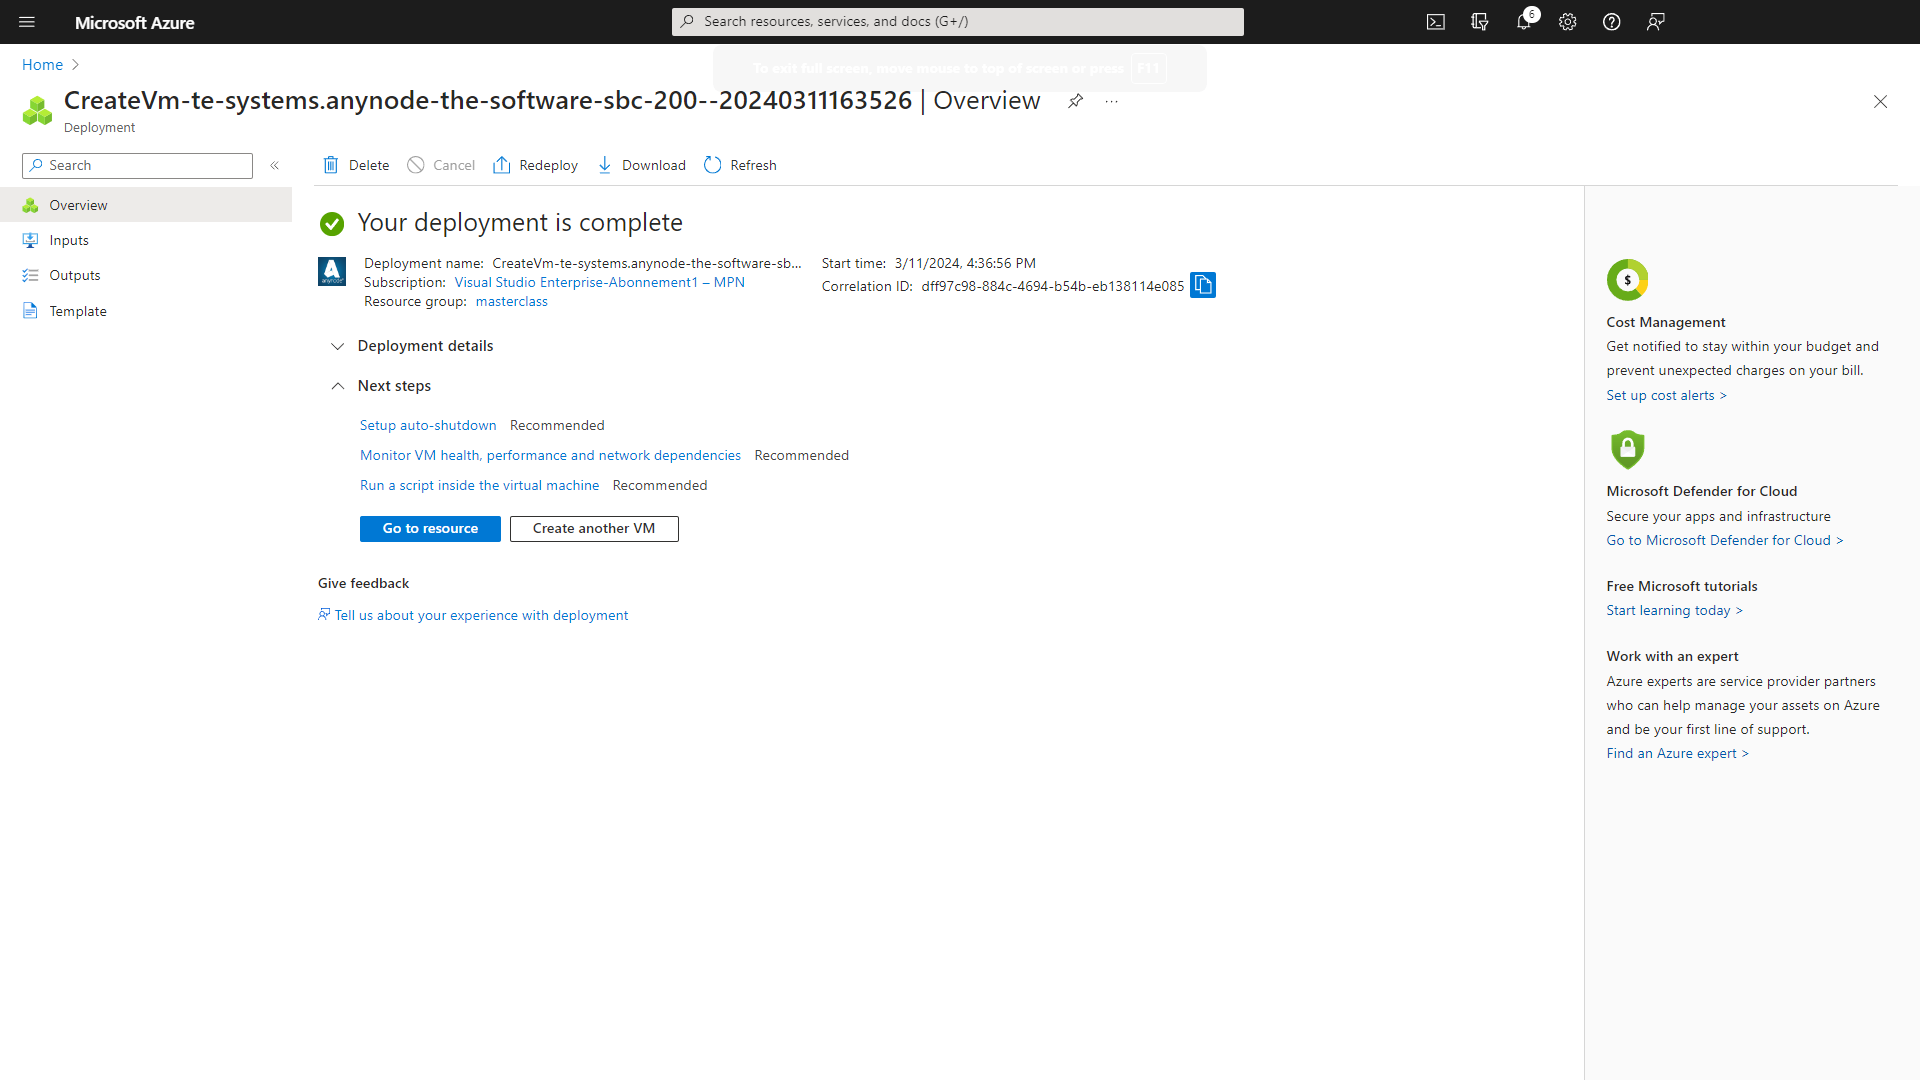
Wait a few minutes for the complete deployment.
Click on the button.
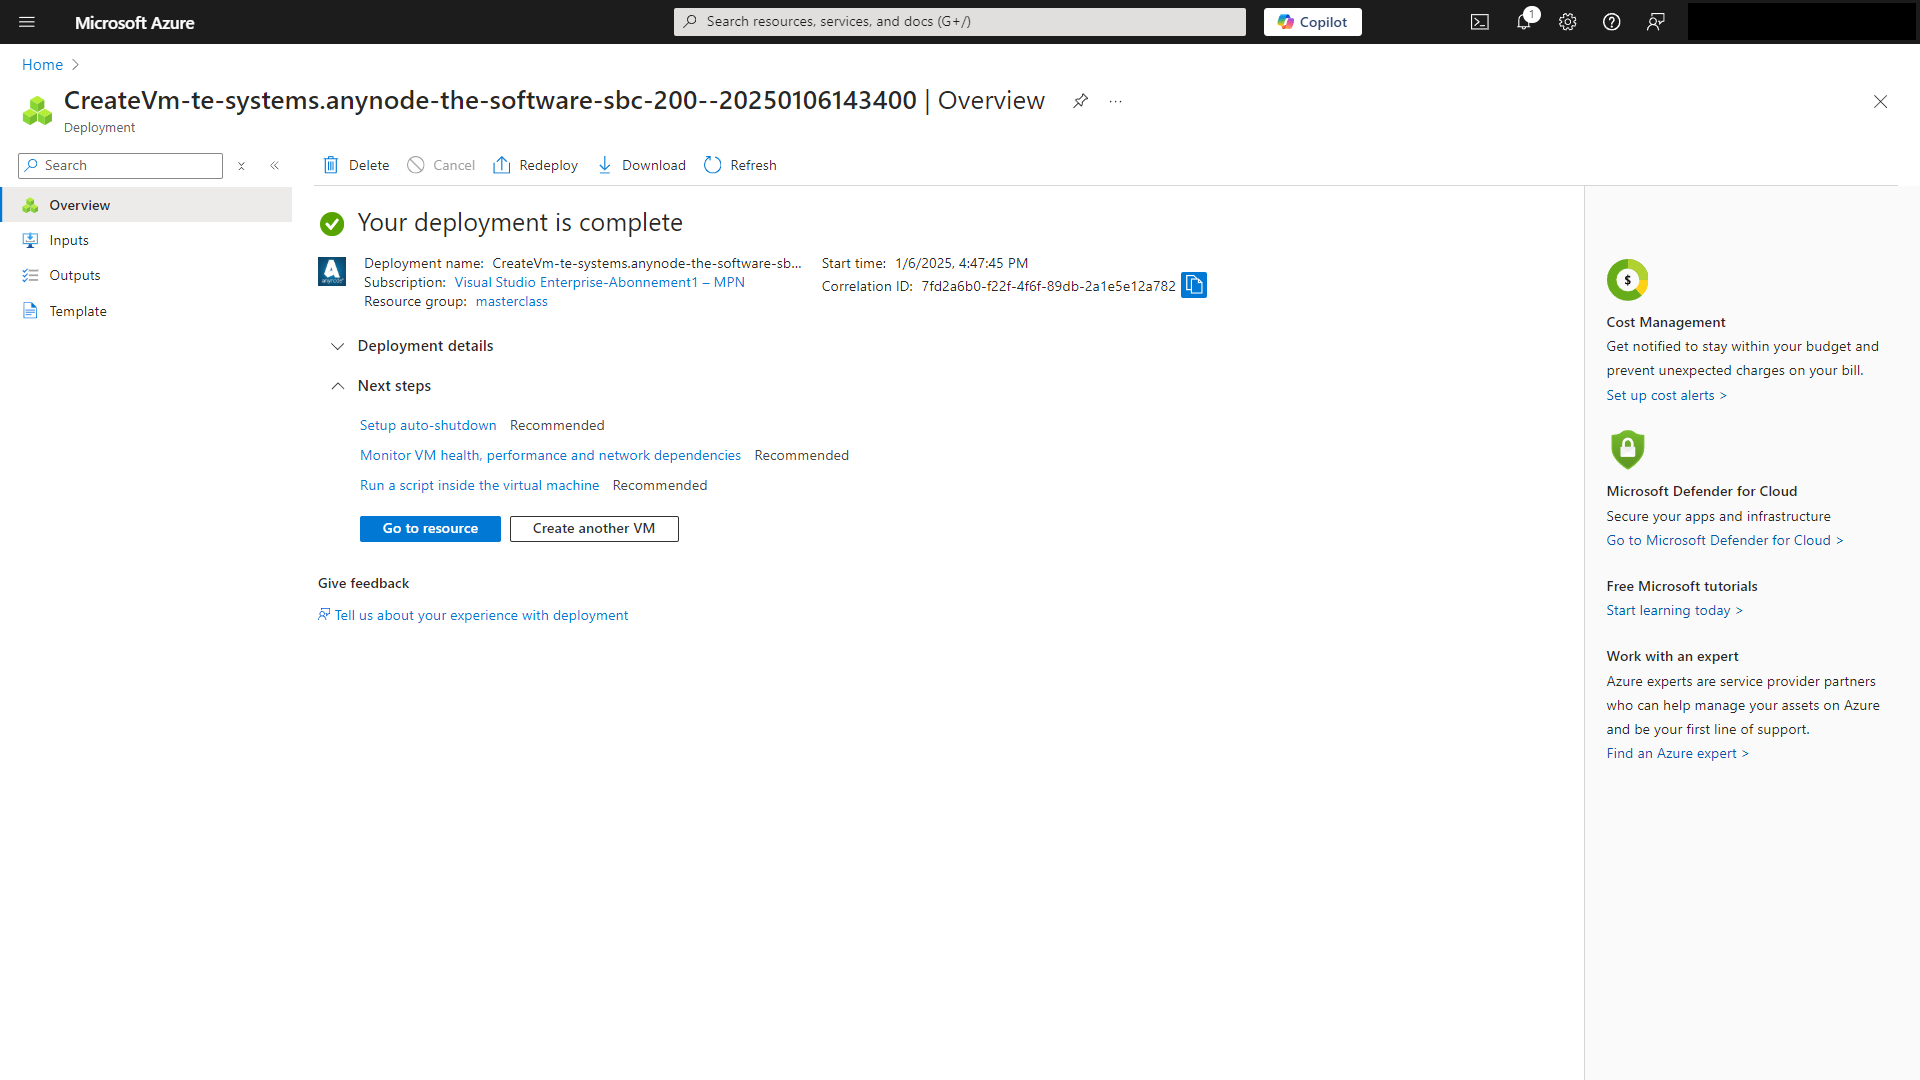
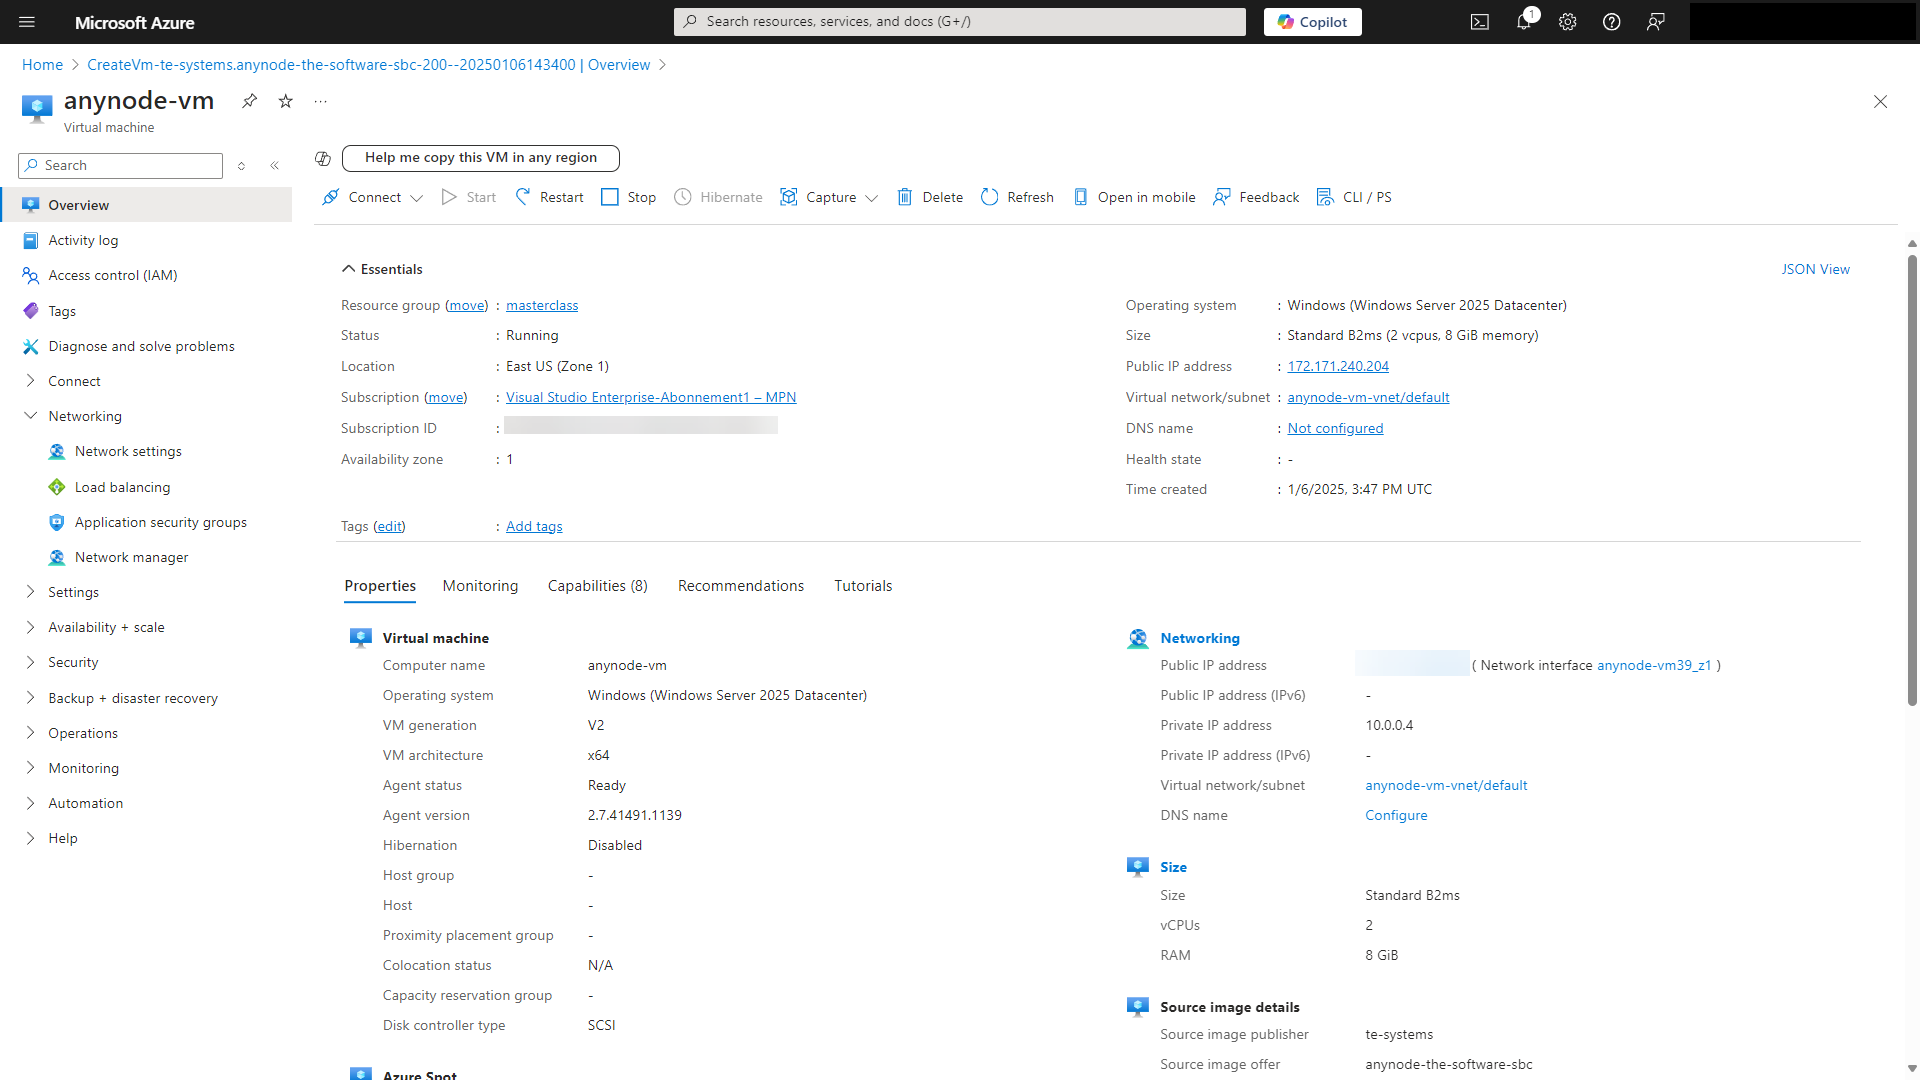
You will get an overview of all essential settings and the status of your VM.
Network Hardening VM Edition with Windows Server 2025 (Firewall rules)
It is recommended to prevent all unnecessary external access to the VM. If this is not possible, for example, if anynode is the only machine in the network, access to the anynode frontend should only be allowed from the configurator's IP address. We generally recommend accessing via Azure Bastion rather than using an SSH client like Putty.
To use a Certificate Issuance Provider like "Let's Encrypt" in anynode, external access to anynode is necessary. In such a scenario, it's essential to grant the provider access to the VM through port 80.
By enabling HTTP traffic from the Internet, you enable vital communication from the certificate issuance provider to the anynode instance.
This ensures the successful issuance, renewal, and validation of SSL/TLS certificates for your deployment. Certificate issuance providers employ various validation methods to verify control over a domain before issuing an SSL/TLS certificate. One common validation method is the HTTP-01 Challenge:
The certificate authority (CA) prompts the applicant to place a specific file or code on the domain's webserver. The CA then attempts to access this resource via HTTP to complete domain validation.
The HTTP-01 challenge requires port 80 to be open in your firewall, allowing the certificate issuance provider to reach your system when needed. Port 80 should not be used by any other program on the anynode machine with the selected interface IP address. The port will only be opened when a challenge is initiated for certificate renewal or new certificate issuance. Afterward, the port will be closed again.
When deploying a virtual machine (VM) in Microsoft Azure, a new Network Security Group is automatically created by default. An NSG serves as a virtual firewall, controlling inbound and outbound network traffic for resources in Azure.
Click on your newly created VM.
Navigate to Networking in the left menu of your VM and click on Network Settings.
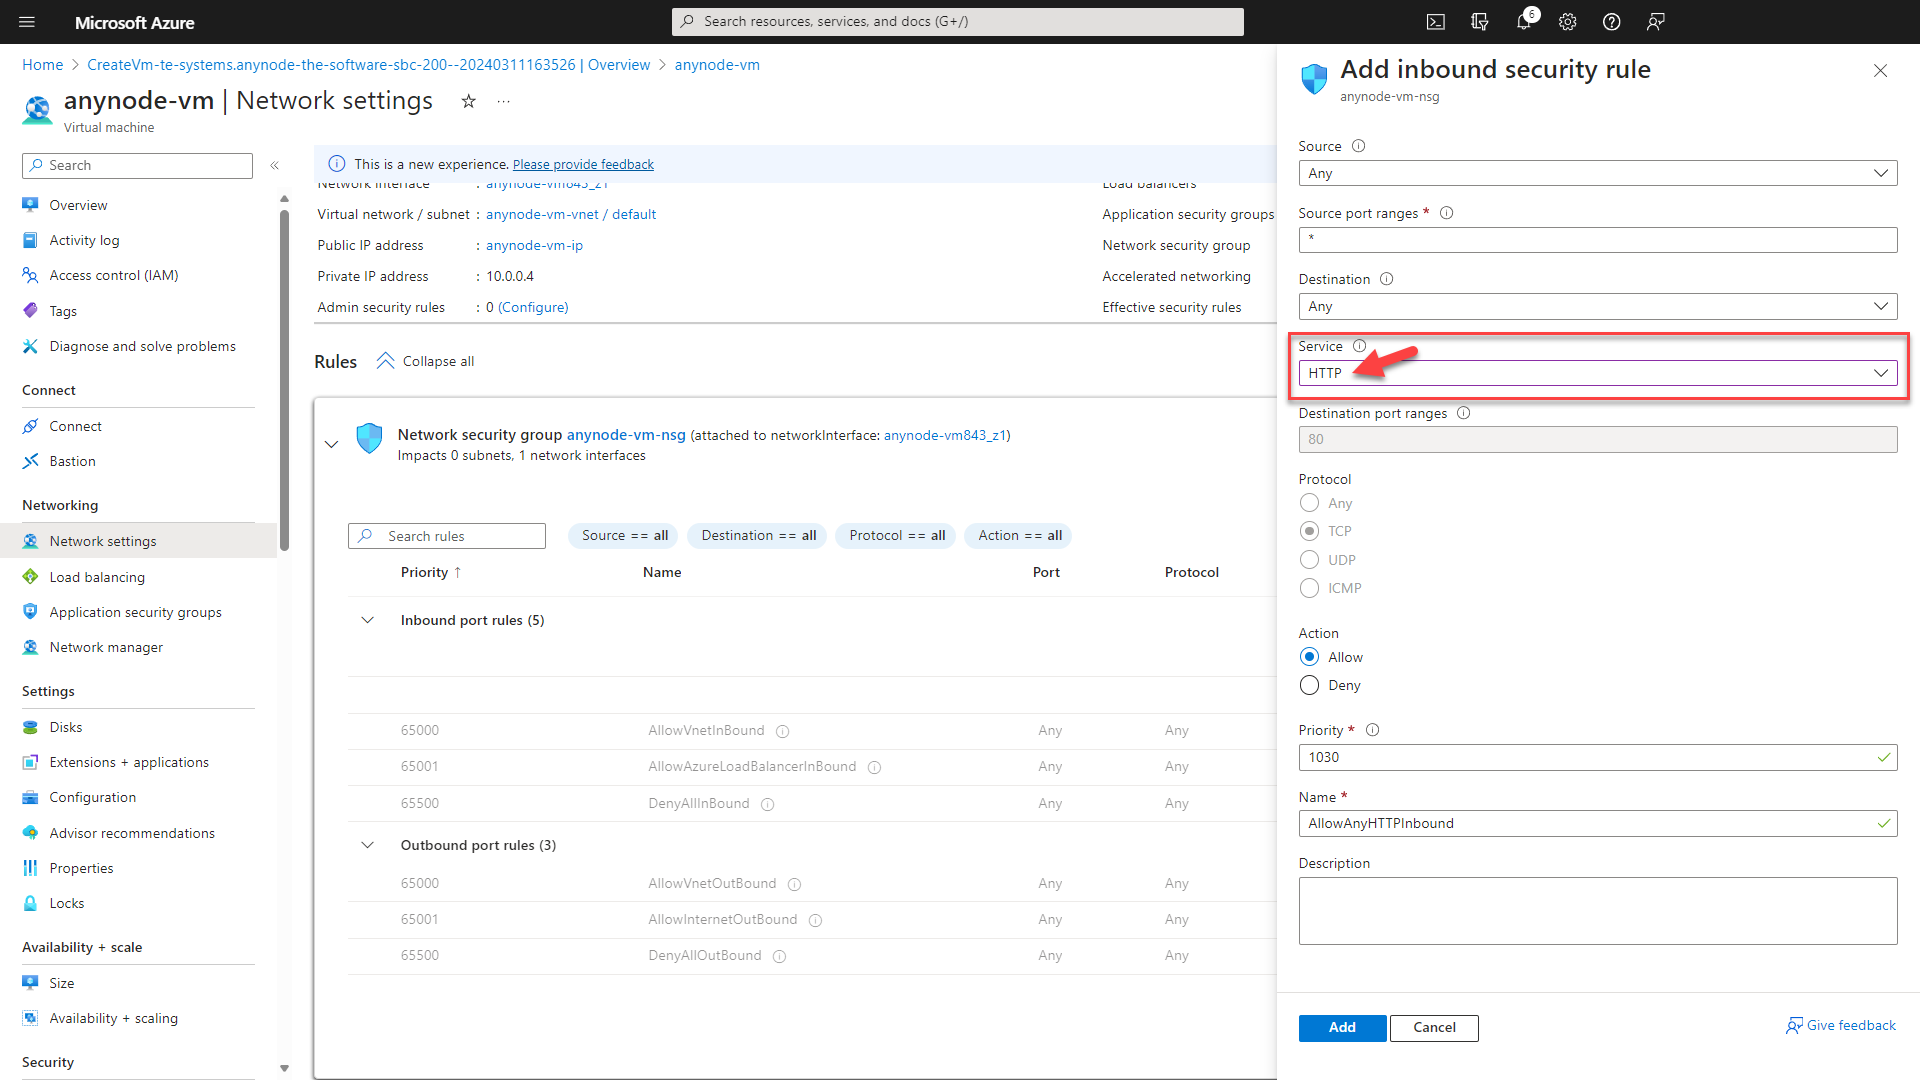
Click on the + button and choose Inbound port rule.
In the right menu, navigate to Service and choose HTTP.
Click on the button.
The following rules are only needed for users of Microsoft Teams Direct Routing. If you don't use Microsoft Teams, continue with the next sub chapter "Access to the anynode Frontend (VM Edition with Windows Server 2025)".
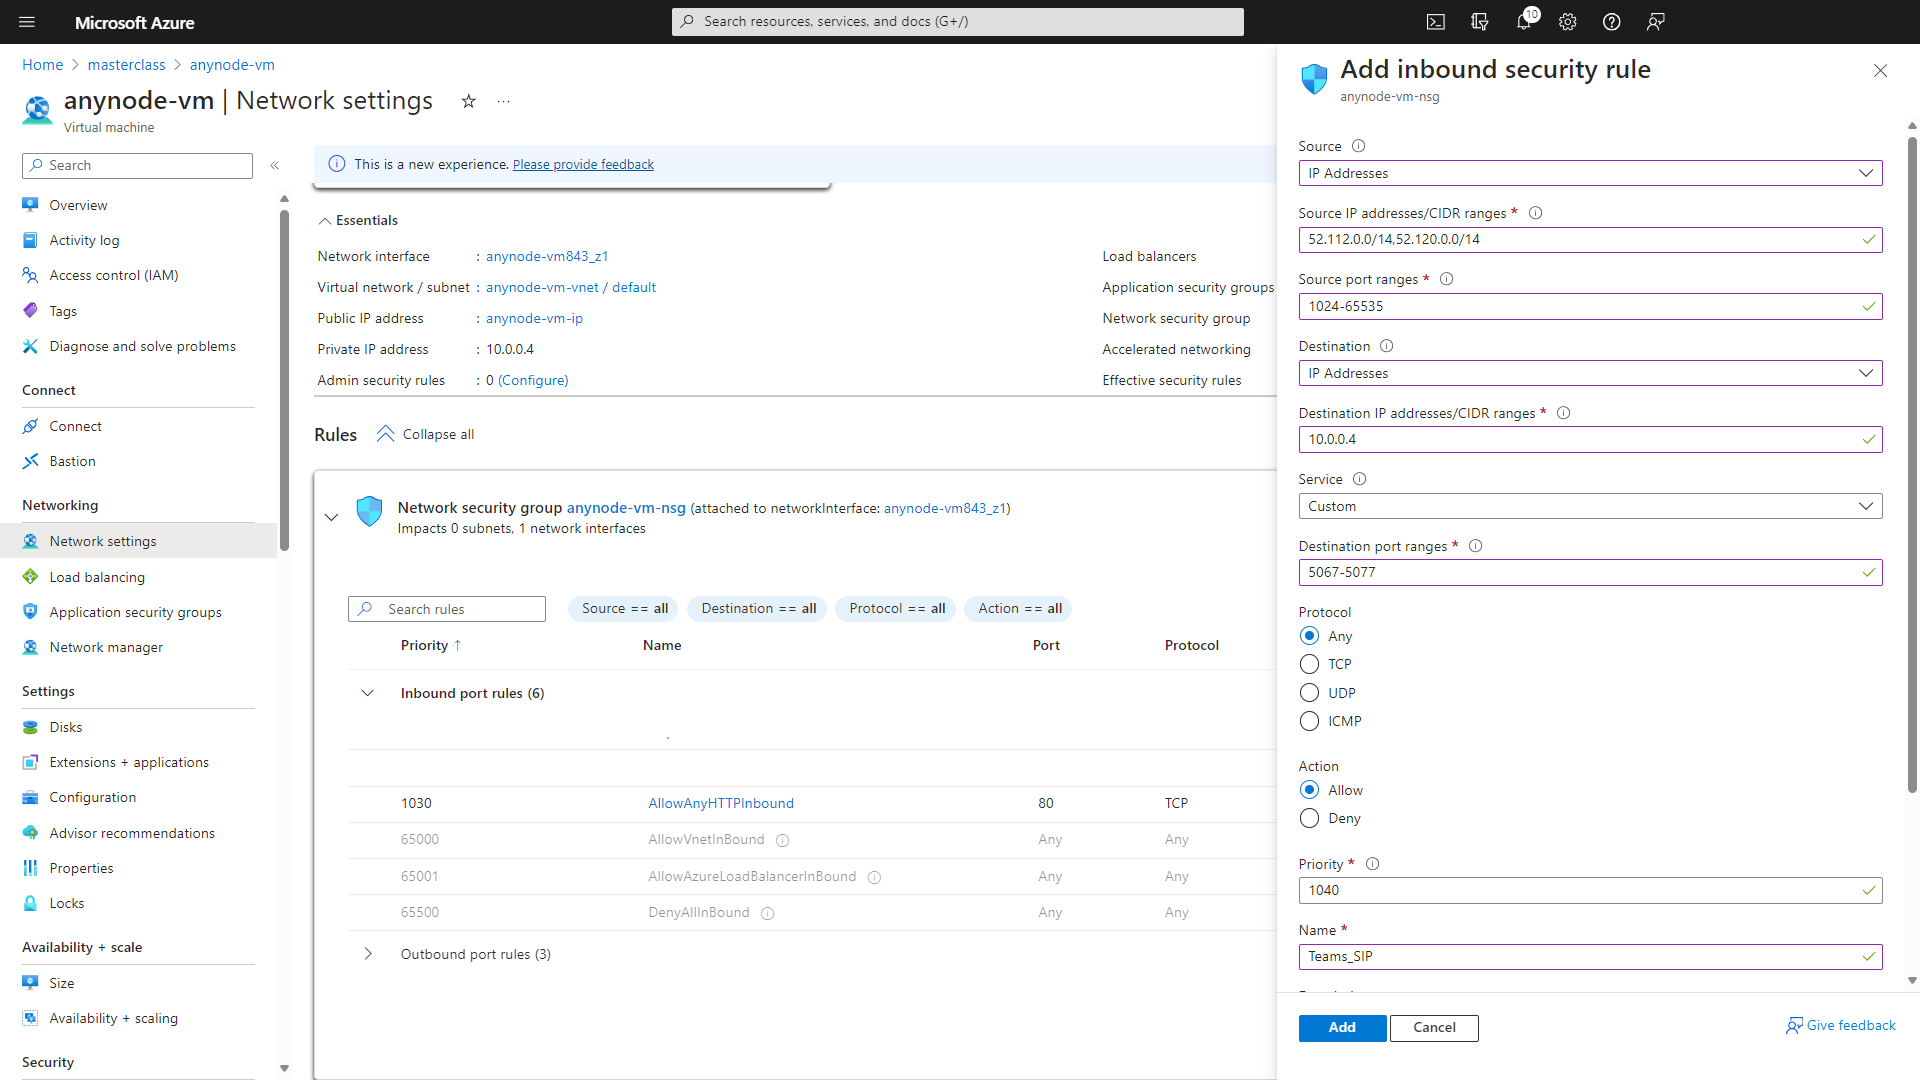
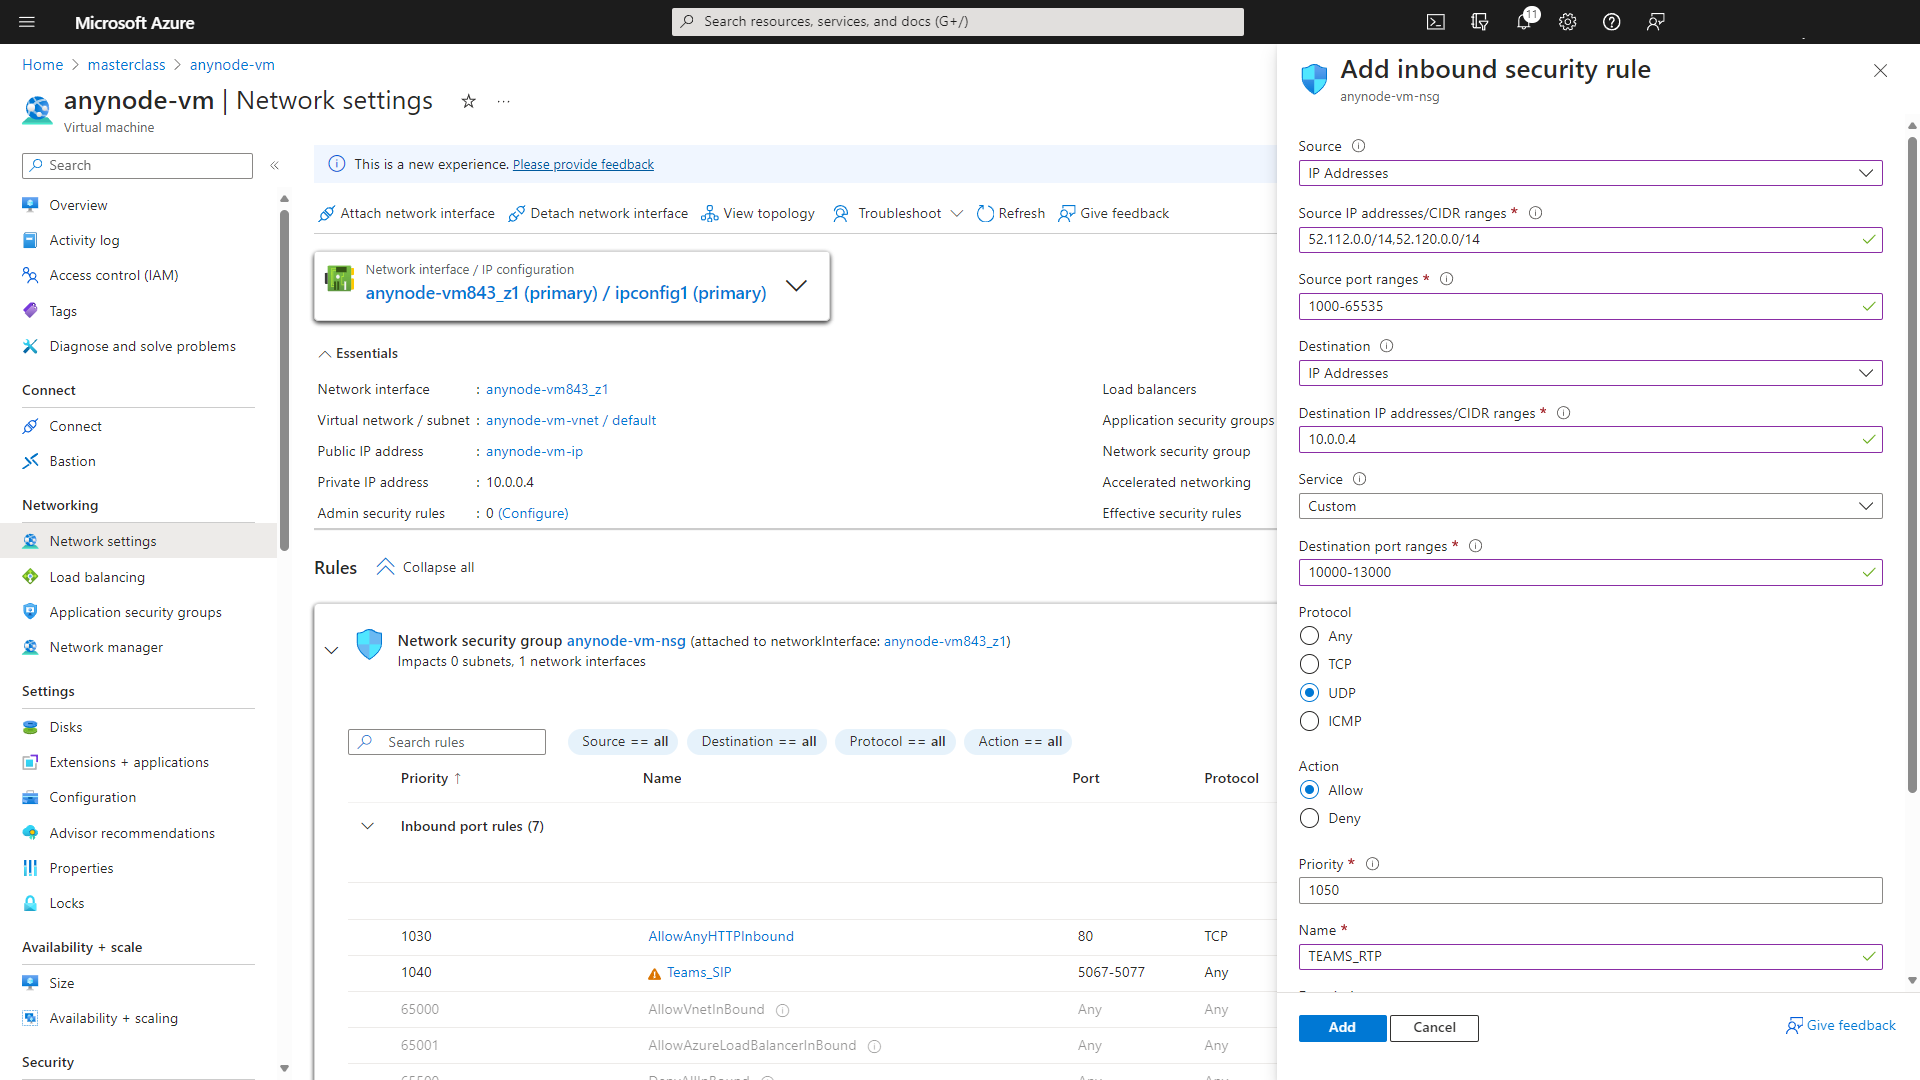
We will now add the rule Teams_SIP. This rule is specifically designed to allow SIP (Session Initiation Protocol) traffic for Microsoft Teams. This rule typically allows inbound traffic on TLS port 5067, which is commonly used for SIP signaling in Microsoft Teams for activities such as establishing and managing calls.
Microsoft typically provides documentation outlining the network requirements for services like Teams. You can check the official Microsoft Teams documentation. Look for information regarding the IP addresses or ranges used by Microsoft Teams. Make sure to keep the rules updated in case Microsoft changes or adds new IP addresses or ranges for Teams traffic.
Repeat the steps to add the Teams_SIP inbound rule.
At Source, choose IP Addresses.
At Source IP addresses/CIDR ranges, use 52.112.0.0/14,52.120.0.0/14
At Source port ranges, use 1024-65535.
At Destination, use IP Addresses.
At Destination IP addresses/CIDR ranges, use 10.0.0.4
At Service, choose Custom.
At Destination port ranges, use 5067-5077.
At Protocol, choose Any.
At Action, choose Allow
Accept the default value for the Priority.
At Name, use Teams_SIP.
Click on the button to continue.

The inbound port rule TEAMS_RTP in Microsoft Azure refers to a specific rule that allows inbound traffic on the Real-Time Transport Protocol (RTP) port used by Microsoft Teams for audio and video communications.
At Source, choose IP Addresses.
At Source IP addresses/CIDR ranges, use 52.112.0.0/14,52.120.0.0/14
At Source port ranges, use 1000-65535.
At Destination, use IP Addresses.
At Destination IP addresses/CIDR ranges, use 10.0.0.4
At Service, choose Custom.
At Destination port ranges, use 10000-13000.
At Protocol, choose UDP.
At Action, choose Allow
Accept the default value for the Priority.
At Name, use Teams_RTP.
Click on the button to continue.
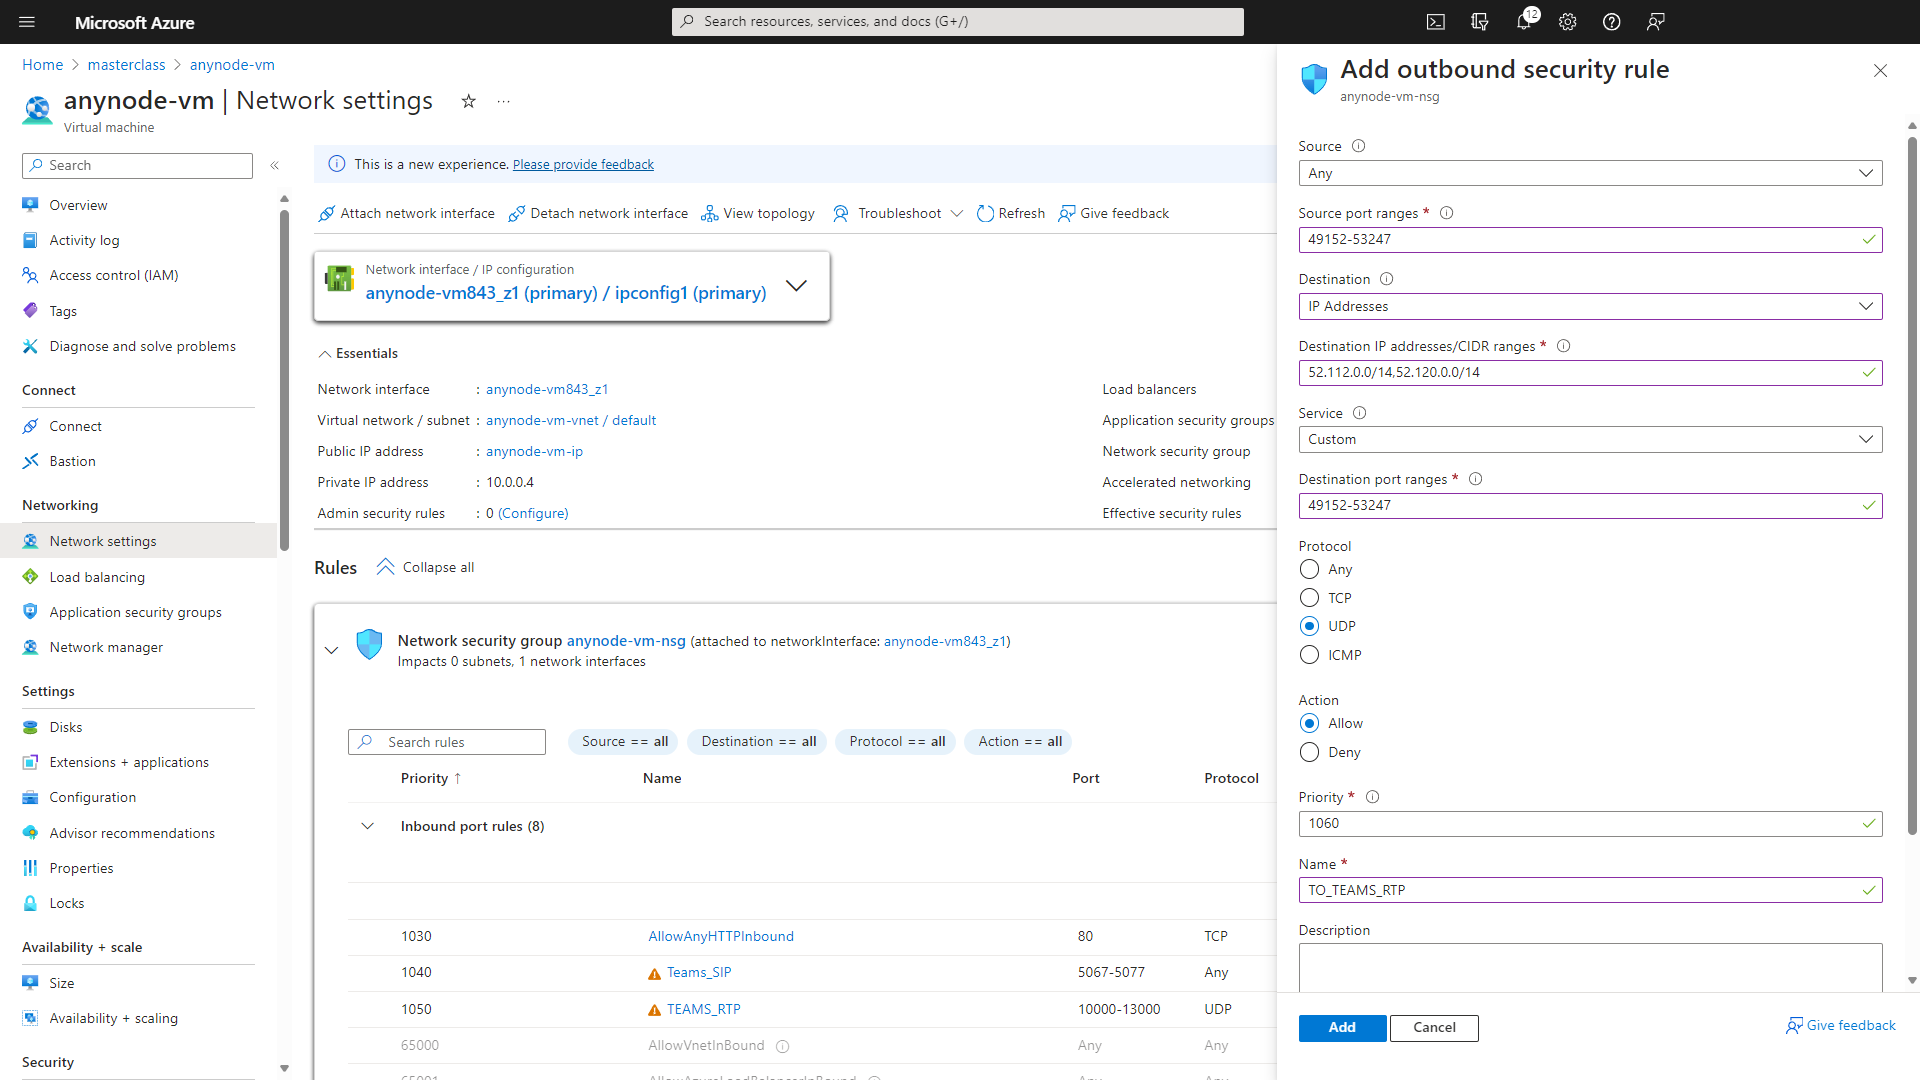
The outbound rule TO_TEAMS_RTP would likely permit outbound traffic from your Azure resources to Microsoft Teams RTP endpoints, ensuring that communication for Teams meetings and calls can occur without obstruction. This rule is essential for ensuring that Teams functions properly within your Azure environment.
Repeat the steps to add the TO_TEAMS_RTP outbound rule. Choose Outbound port rule.
At Source, choose Any.
At Source port ranges, use 49152-53247
At Destination, use IP Addresses.
At Destination IP addresses/CIDR ranges, use 52.112.0.0/14,52.120.0.0/14
At Service, choose Custom.
At Destination port ranges, use 49152-53247.
At Protocol, choose UDP.
At Action, choose Allow
Accept the default value for the Priority.
At Name, use TO_TEAMS_RTP.
Click on the button to continue.
To configure firewall rules for using other services with anynode in Microsoft Azure, you need to allow inbound port rules from specific ports.
Please refer to our specific guides for Zoom Phone, Cisco Webex, and Google Voice, as they contain detailed information about the ports used for each service.
Access to the VM with Windows Server 2025 via Azure Bastion
Azure Bastion safeguards your virtual machines by offering lightweight, browser-based connectivity, eliminating the necessity to expose them via public IP addresses. This reduces the attack surface and mitigates the risk of unauthorized access. Upon deployment, a Bastion host is automatically generated on a subnet within your virtual network.
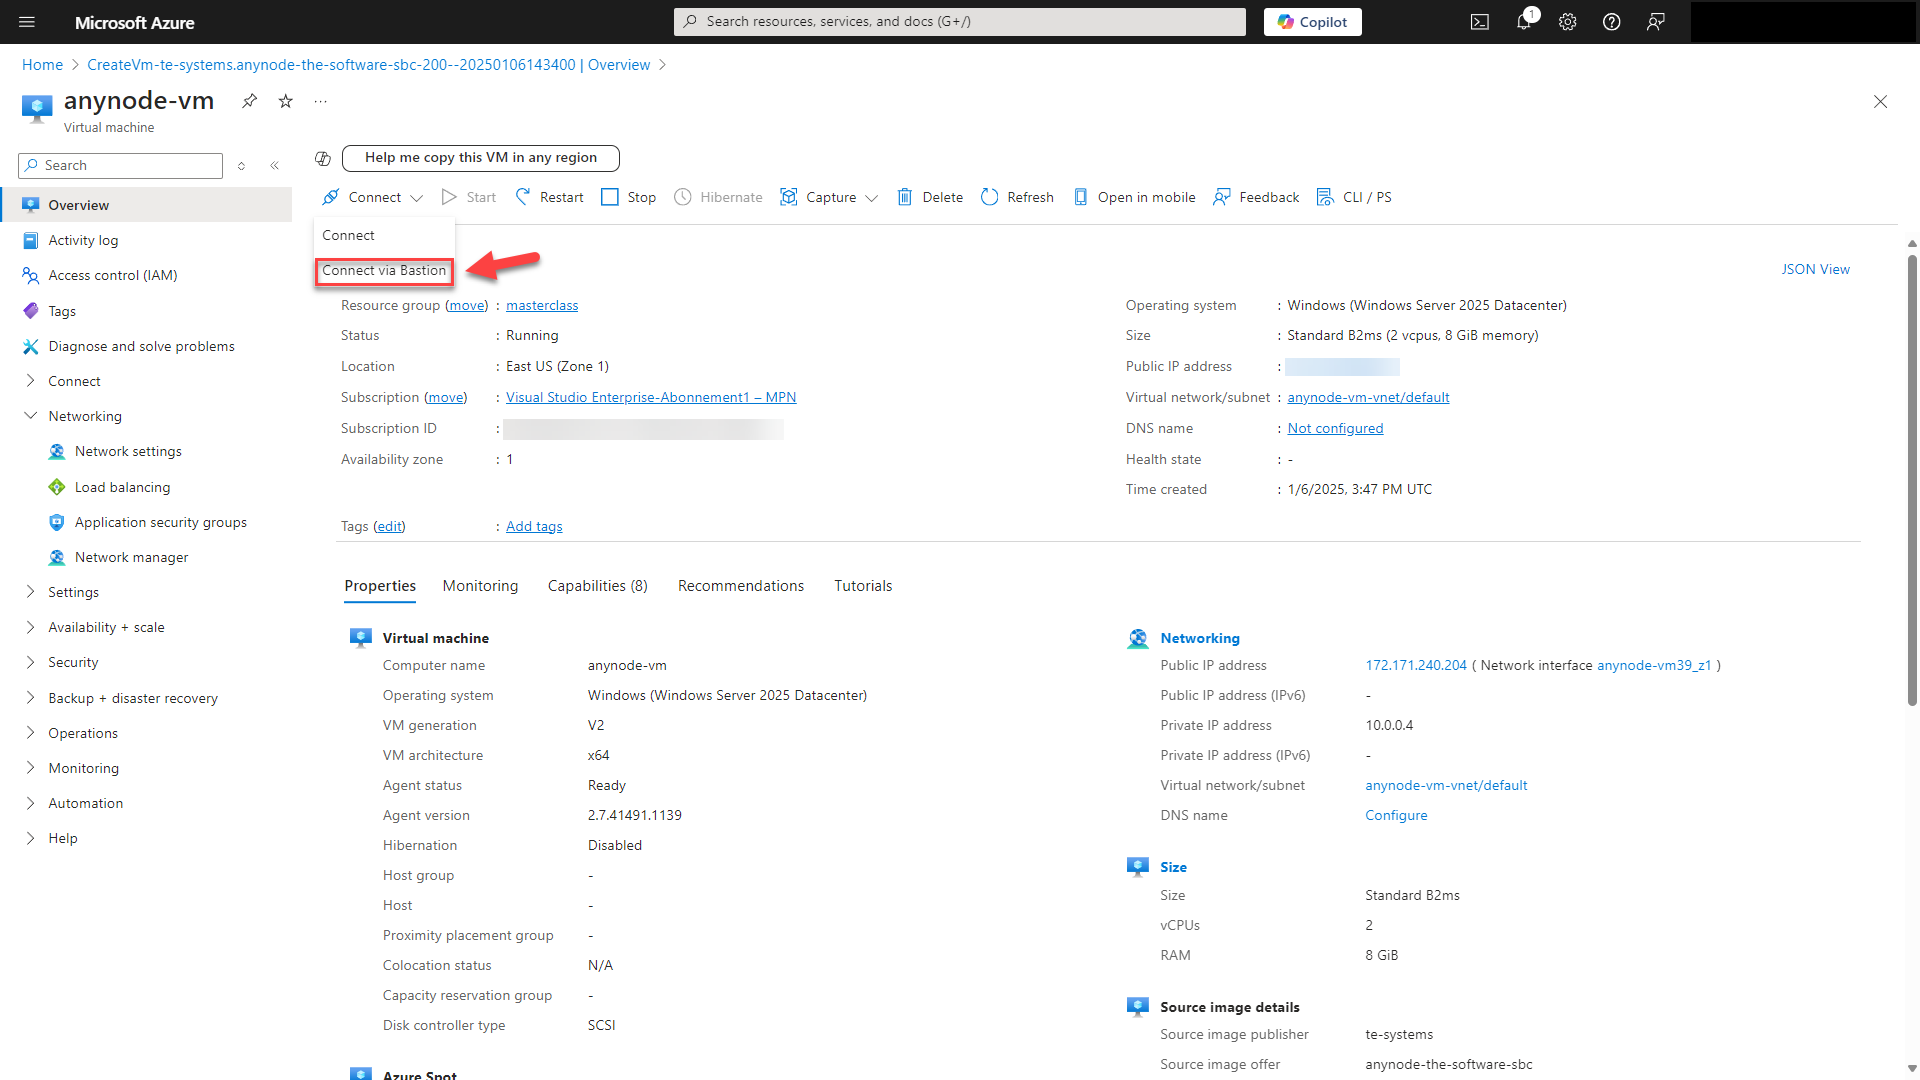
Click on and click on your newly created virtual machine.

The easiest way to access the virtual machine with anynode is the following: Use the button in the upper menu and choose Connect via Bastion.
Wait a few minutes for the creation of Azure Bastion.
Click on .
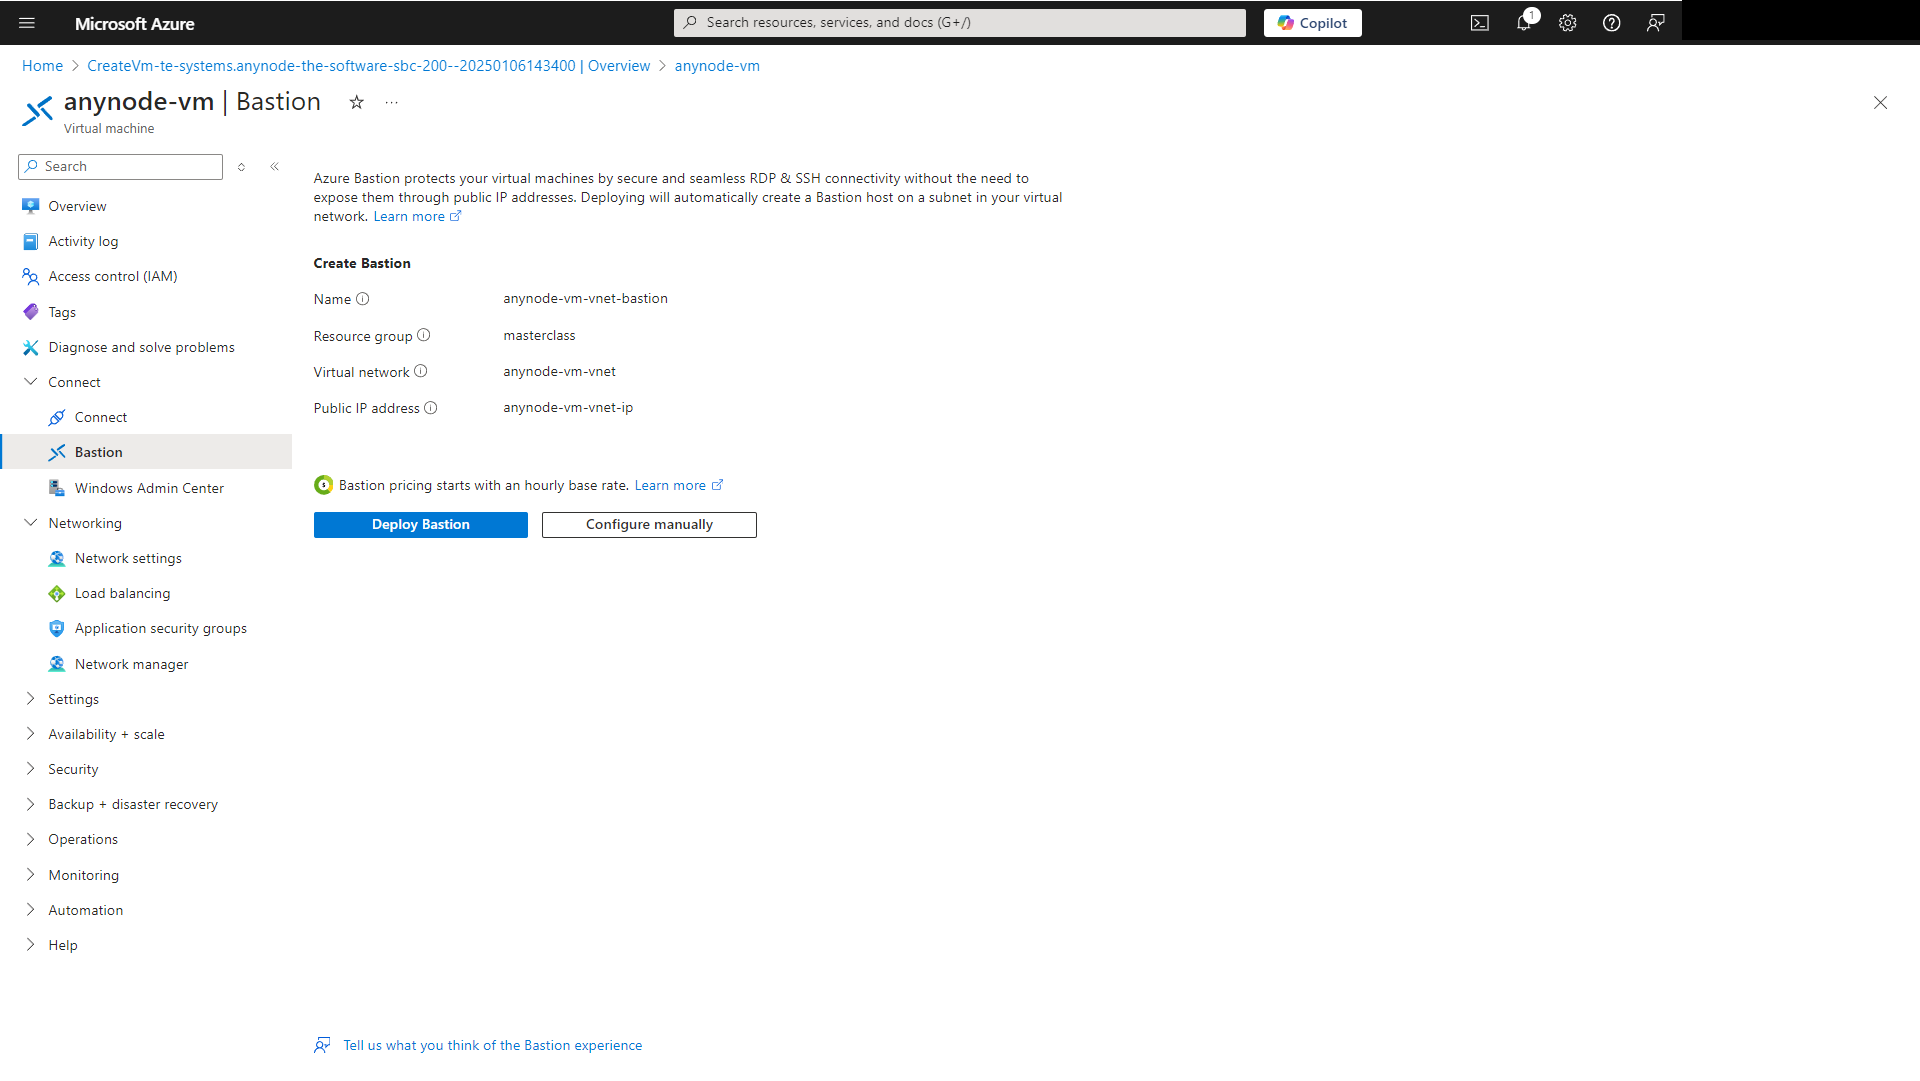
Deploying will automatically create a Bastion host on a subnet in your virtual network.
Wait a few minutes until the provisioning state shows: Succeeded.
Select the keyboard language of the VM.
Under Authentication Type, choose VM Password.
Utilize the credentials you assigned earlier in the instance details.
Click on the Connect button.
You now have access to your VM with anynode already installed. Simply use the pre-configured shortcut on the desktop to open the anynode frontend in Microsoft Edge. For more guidance on getting started with the anynode frontend, check out our video tutorial, First Steps.
Option 3: Use the VM Edition in Microsoft Azure with Debian
As mentioned before, if you like to work with Linux and a Debian operating system, you should consider using the VM Edition.
Choose anynode - The Software SBC (VM Edition).
We recommend starting not with a preset configuration.
Select a software plan with Debian.
Click on .
Select your subscription to manage deployed resources and costs.
An Azure resource group is a logical container into which Azure resources are deployed and managed. You must select a resource group that shares the same lifecycle, permissions, and policies. Select an existing resource group or create a new one. For test purposes you should create a new resource group. This simplifies the complete deletion afterwards. In our example, we are using an existing resource group named masterclass.
Virtual machines in Azure have two distinct names: A virtual machine name used as the Azure resource identifier, and a guest host name. When you create a VM in the portal, the same name is used for both the virtual machine name and the host name. The virtual machine name cannot be changed after the VM is created. You can change the host name when you log into the virtual machine.
Create a name for your virtual machine.
Choose the Azure region that's right for you and your customers. Not all VM sizes are available in all regions.
Azure offers a range of options for managing availability and resiliency for your applications. Architect your solution to use replicated VMs in Availability Zones or Availability Sets to protect your apps and data from datacenter outages and maintenance events.
At Size, click on See all sizes. You can select the size of the virtual machines here. This will affect how much money you pay for your VM monthly. Depending on your region selection, you have multiple options available. Please note: Not all models are available in all regions. Also, pricing for the same model may vary in the different areas.
We recommend B-series VMs for test purposes and F-series for production systems. You can switch between the models later.
The F-series are optimized VM sizes that have a high CPU-to-memory ratio. If you have a busy contact center and you need the entire number of concurrent calls all day, the F-series is suitable because it guarantees power consistently.
For our deployment example, we have chosen the B-series for anynode.
Click on the button.
Choose whether the Administrator account will use the username password or SSH keys for authentication. In the interests of simplification, we select password authentication at Authentication type.
With these user credentials, you can later access the VM.
Click on .

You can choose between Azure managed disc types to support your workload or scenario.
With a session border controller there is normally no intensive drive access. The standard type is suitable for most deployments.
With a click on the button, Azure will make a final validation.

Click on the Create button to finalize your deployment.

Wait a couple of minutes before you get some details about the progress. Finally, you are ready to go when you see the completion of the deployment. Here we go! You have successfully deployed anynode in Azure!
Click on the button.
Network Hardening VM Edition with Debian (Firewall rules)
It is recommended to prevent all unnecessary external access to the VM. If this is not possible, for example, if anynode is the only machine in the network, access to the anynode frontend should only be allowed from the configurator's IP address. We generally recommend accessing via Azure Bastion rather than using an SSH client like Putty.
In our example, this deployment comes with pre-configured inbound port rules for HTTPS and SSH.
Deleting SSH and HTTPS access for your Debian VM with anynode in Azure should be considered as part of a comprehensive security strategy to protect your resources from unauthorized access and potential security threats. If you do not need external access via SSH and HTTPS to the VM, Azure provides alternative access methods such as Azure Bastion, which offers secure, browser-based access to VMs without exposing RDP ports to the public Internet.
Please note that there is a difference between deny and delete. Deny means that traffic is explicitly blocked. If a rule is set to deny, any traffic that matches the conditions of that rule will be rejected or blocked. On the other hand, delete means that the rule is removed and no longer active. When a rule is deleted, it has no further effect on the traffic flowing through the firewall.
In the overview of your resource group, click on your newly created virtual machine.
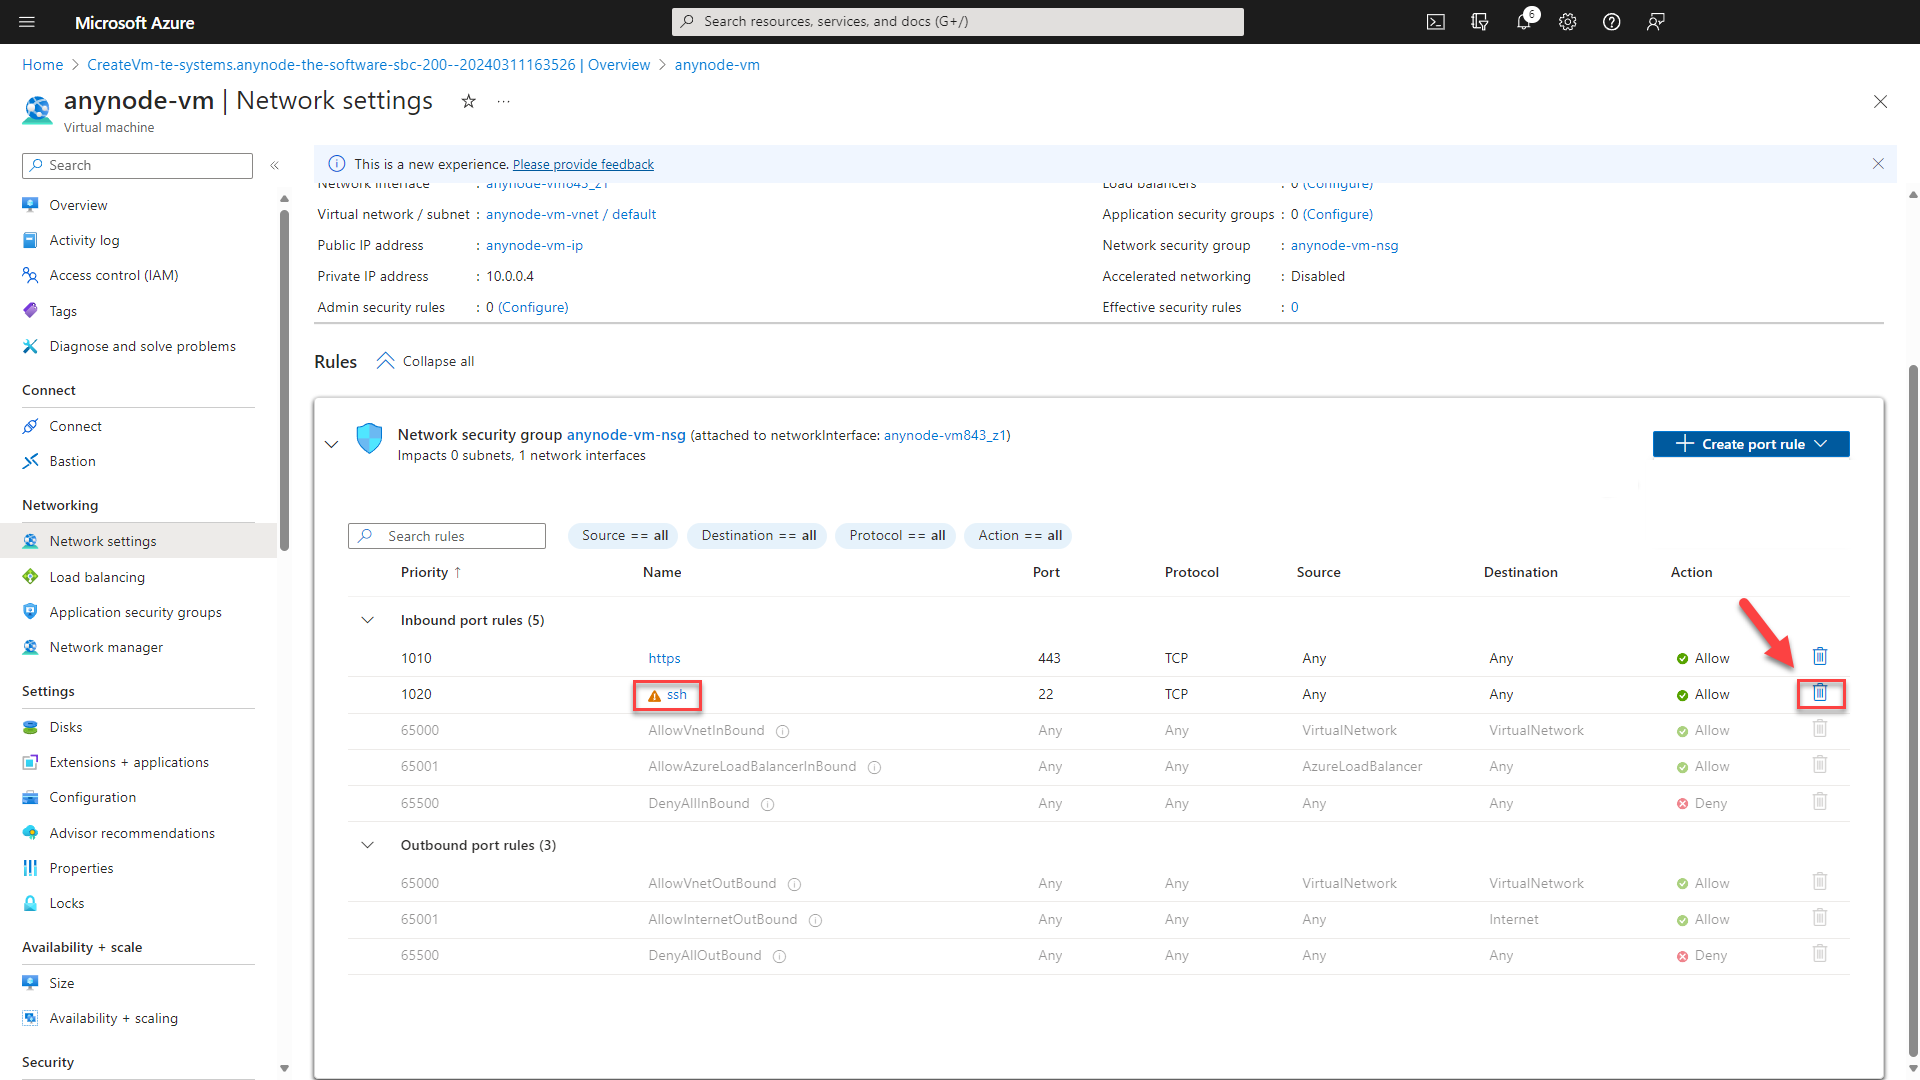
Navigate to your Network settings in the left menu.
Navigate to the SSH inbound port rule.
Click on the trash bin icon to delete the SSH rule.
Confirm with the button.
Repeat the steps for the HTTPS rule.
To use a Certificate Issuance Provider like "Let's Encrypt" in anynode, external access to anynode is necessary. In such a scenario, it's essential to grant the provider access to the VM through port 80.
By enabling HTTP traffic from the Internet, you enable vital communication from the certificate issuance provider to the anynode instance.
This ensures the successful issuance, renewal, and validation of SSL/TLS certificates for your deployment. Certificate issuance providers employ various validation methods to verify control over a domain before issuing an SSL/TLS certificate. One common validation method is the HTTP-01 Challenge:
The certificate authority (CA) prompts the applicant to place a specific file or code on the domain's webserver. The CA then attempts to access this resource via HTTP to complete domain validation.
The HTTP-01 challenge requires port 80 to be open in your firewall, allowing the certificate issuance provider to reach your system when needed. Port 80 should not be used by any other program on the anynode machine with the selected interface IP address. The port will only be opened when a challenge is initiated for certificate renewal or new certificate issuance. Afterward, the port will be closed again.
When deploying a virtual machine (VM) in Microsoft Azure, a new Network Security Group is automatically created by default. An NSG serves as a virtual firewall, controlling inbound and outbound network traffic for resources in Azure.
Click on your newly created VM.
Navigate to Networking in the left menu of your VM and click on Network settings.
Click on the button and choose Inbound port rule.
In the right menu, navigate to Service and choose HTTP.
Click on the button.
The following rules are only needed for users of Microsoft Teams Direct Routing. If you don't use Microsoft Teams, continue with the next sub chapter "Access to the anynode Frontend (VM Edition with Debian)".
We will now add the rule Teams_SIP. This rule is specifically designed to allow SIP (Session Initiation Protocol) traffic for Microsoft Teams. This rule typically allows inbound traffic on TLS port 5067, which is commonly used for SIP signaling in Microsoft Teams for activities such as establishing and managing calls.
Microsoft typically provides documentation outlining the network requirements for services like Teams. You can check the official Microsoft Teams documentation. Look for information regarding the IP addresses or ranges used by Microsoft Teams. Make sure to keep the rules updated in case Microsoft changes or adds new IP addresses or ranges for Teams traffic.
Repeat the steps to add the Teams_SIP inbound rule.
At Source, choose IP Addresses.
At Source IP addresses/CIDR ranges, use 52.112.0.0/14,52.120.0.0/14
At Source port ranges, use 1024-65535.
At Destination, use IP Addresses.
At Destination IP addresses/CIDR ranges, use 10.0.0.4
At Service, choose Custom.
At Destination port ranges, use 5067-5077.
At Protocol, choose Any.
At Action, choose Allow
Accept the default value for the Priority.
At Name, use Teams_SIP.
Click on the button to continue.
The inbound port rule TEAMS_RTP in Microsoft Azure refers to a specific rule that allows inbound traffic on the Real-Time Transport Protocol (RTP) port used by Microsoft Teams for audio and video communications.
Repeat the steps to add the Teams_RTP inbound rule.
At Source, choose IP Addresses.
At Source IP addresses/CIDR ranges, use 52.112.0.0/14,52.120.0.0/14
At Source port ranges, use 1024-65535.
At Destination, use IP Addresses.
At Destination IP addresses/CIDR ranges, use 10.0.0.4
At Service, choose Custom.
At Destination port ranges, use 10000-13000.
At Protocol, choose UDP.
At Action, choose Allow
Accept the default value for the Priority.
At Name, use TEAMS_RTP.
Click on the button to continue.
The outbound rule TO_TEAMS_RTP would likely permit outbound traffic from your Azure resources to Microsoft Teams RTP endpoints, ensuring that communication for Teams meetings and calls can occur without obstruction. This rule is essential for ensuring that Teams functions properly within your Azure environment.
Repeat the steps to add the TO_TEAMS_RTP outbound rule. Choose Outbound port rule.
At Source, choose Any.
At Source port ranges, use 49152-53247.
At Destination, use IP Addresses.
At Destination IP addresses/CIDR ranges, use 52.112.0.0/14,52.120.0.0/14
At Service, choose Custom.
At Destination port ranges, use 49152-53247.
At Protocol, choose UDP.
At Action, choose Allow
Accept the default value for the Priority.
At Name, use TO_TEAMS_RTP.
Click on the button to continue.
To configure firewall rules for using other services with anynode in Microsoft Azure, you need to allow inbound port rules from specific ports. Please refer to our specific guides for Zoom Phone, Cisco Webex, and Google Voice, as they contain detailed information about the ports used for each service.
Access to the anynode Frontend (VM Edition with Debian)
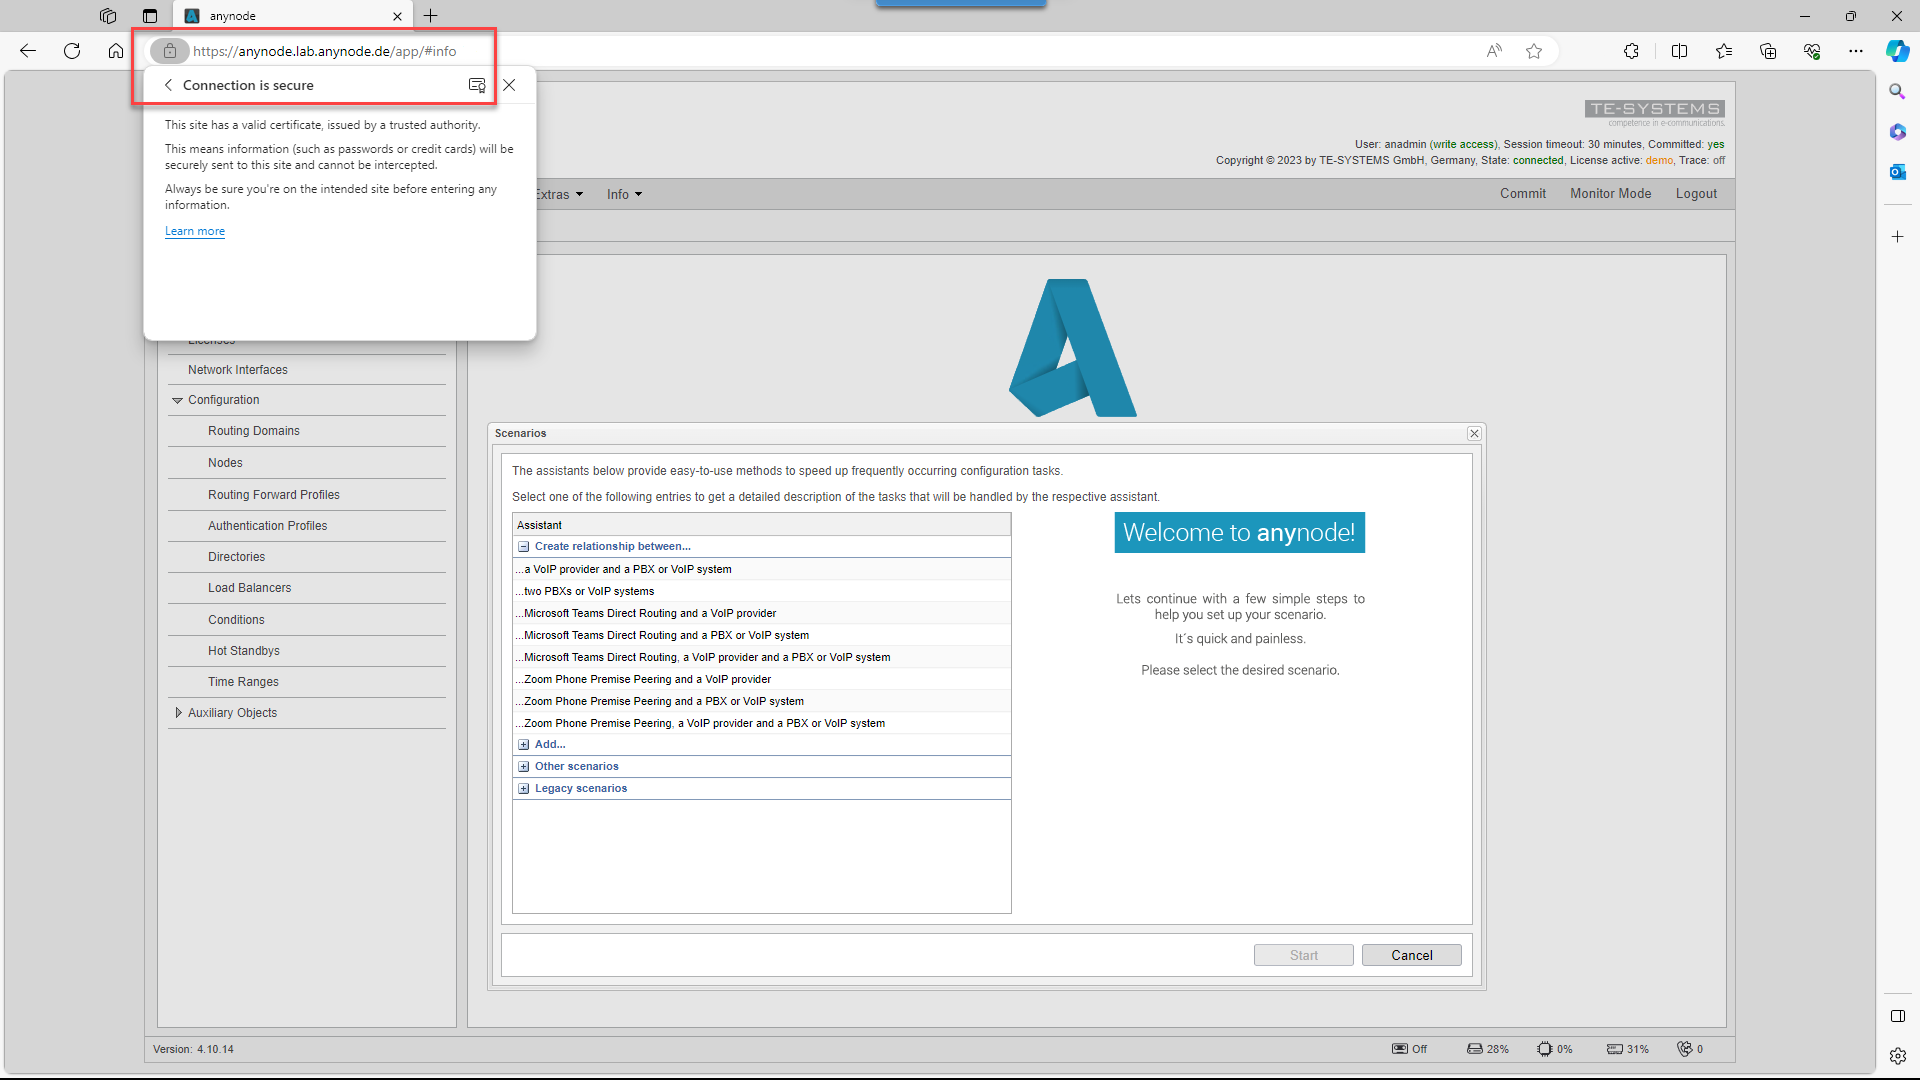
You can now access the anynode frontend via the internal IP address. The device you wish to access the anynode frontend from must be within the internal network. If the device is not within the internal network, you can also access it via the external IP address. However, this must be allowed in the firewall rules and should only be permitted for specific IP addresses. In our example, we will show the access via the external IP address.
To access your created Debian VM, click on Go to resource. Copy and paste the public IP address
into your browser and add an https://
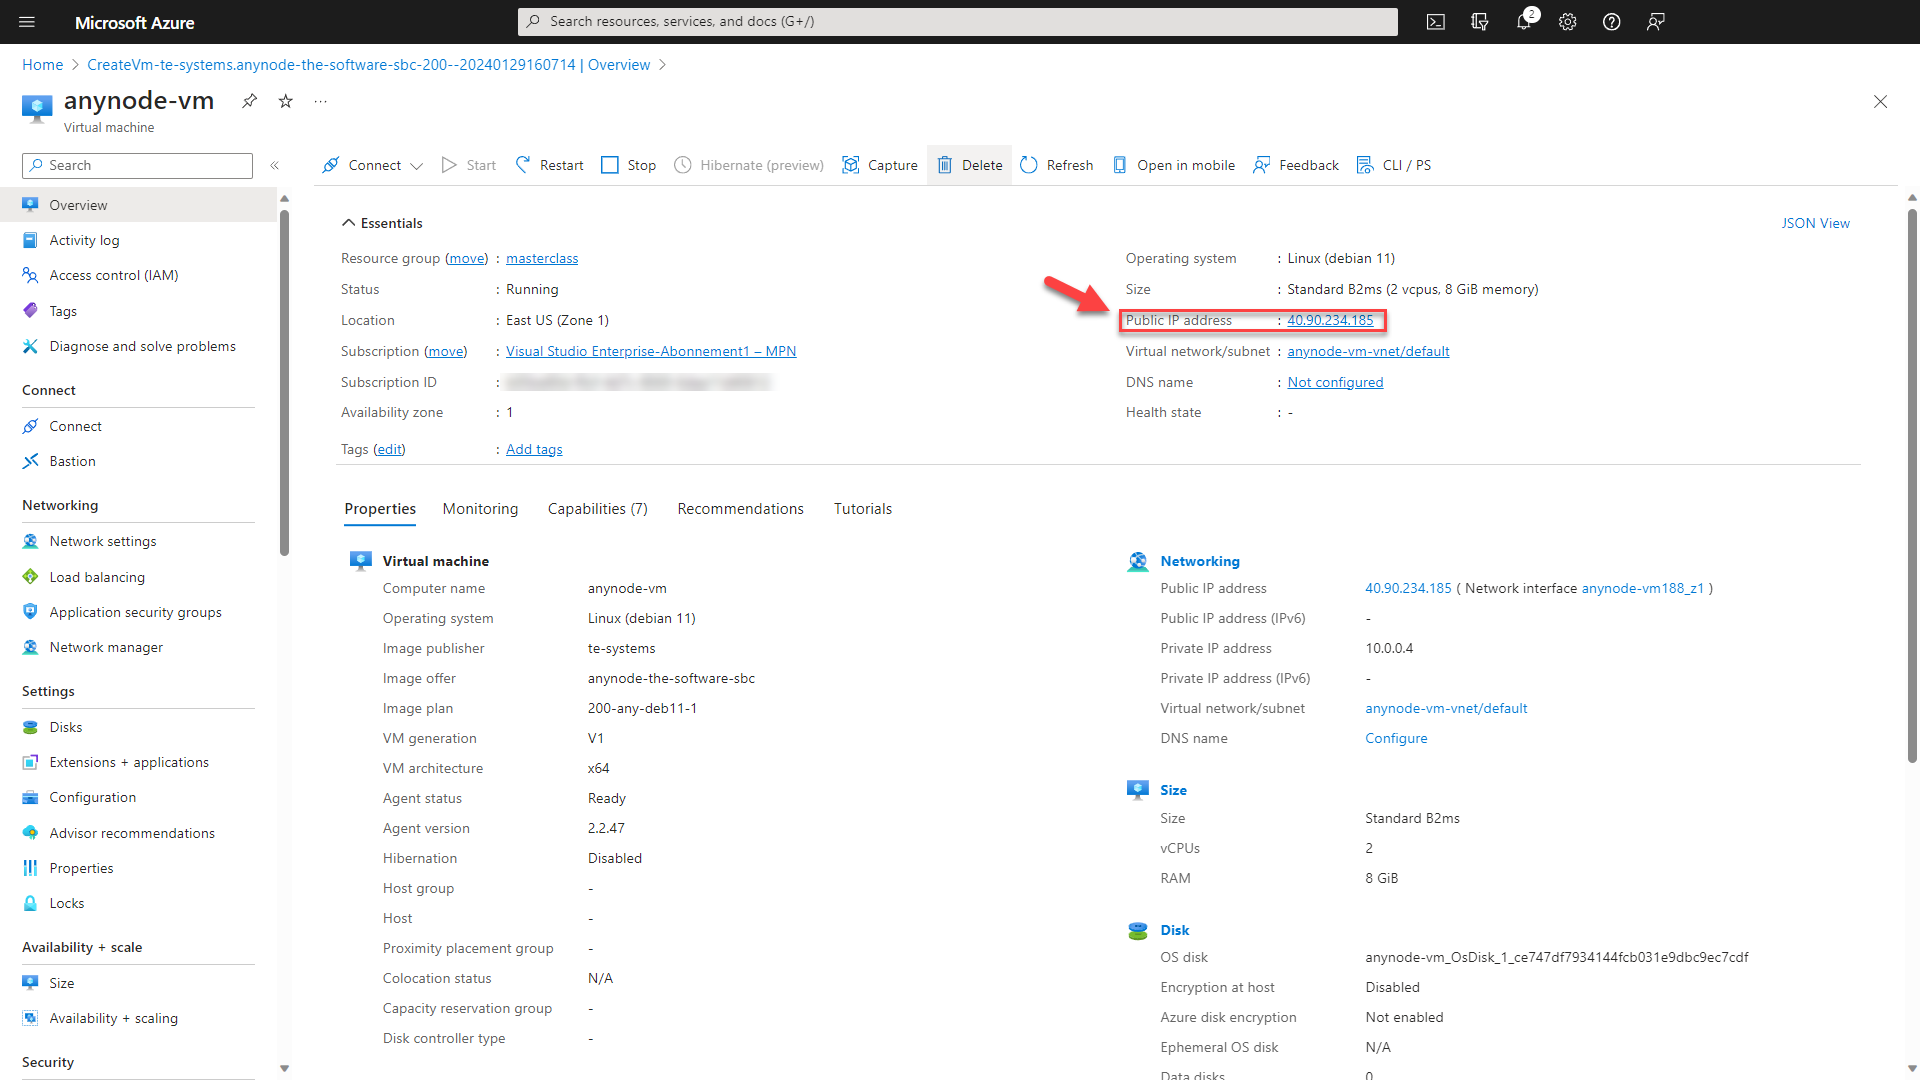
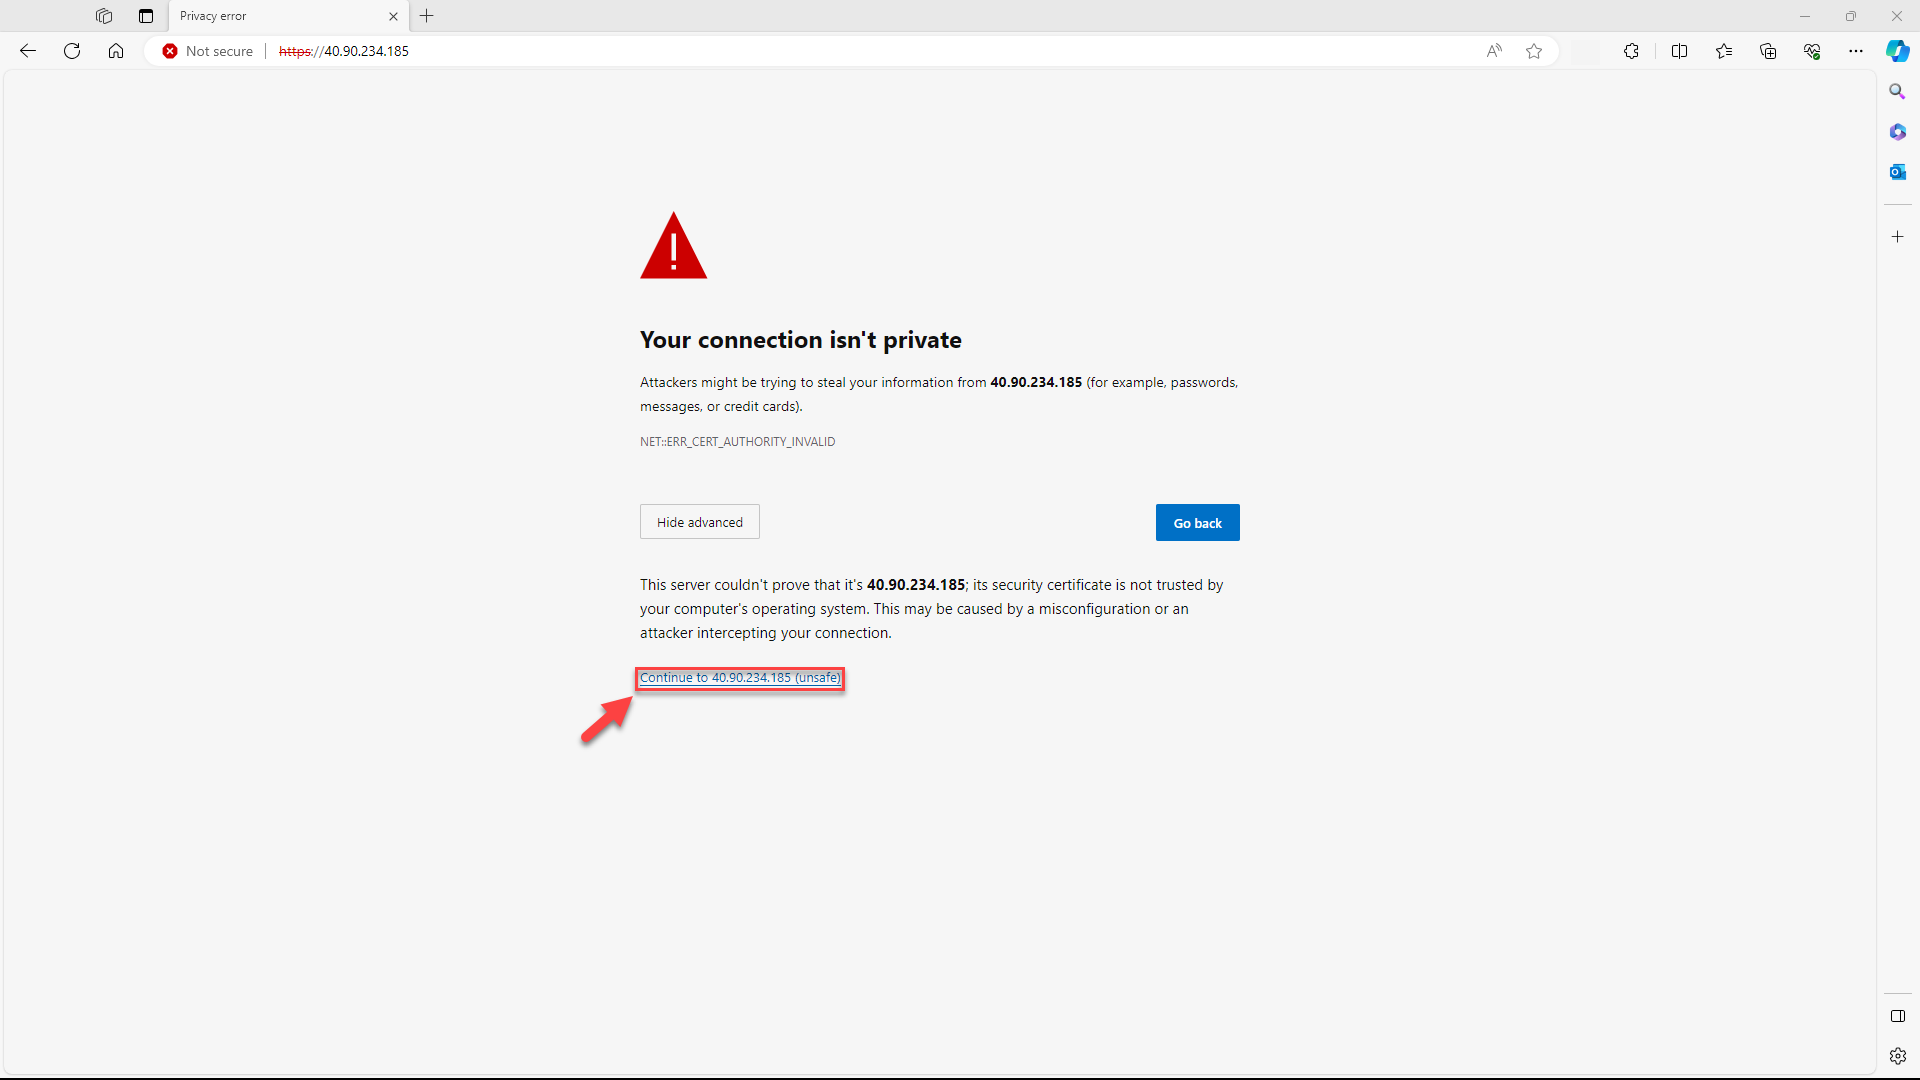
Upon the initial launch of anynode in the browser after deployment, you will encounter a message with the HTTPS crossed out. This happens because the common self-signed certificate in anynode does not match the IP you are visiting. Despite the crossed-out HTTPS, the connection remains secure. This persistent message is due to the browser not trusting the self-signed certificate from anynode. Ignore these messages initially and proceed to set up the password for accessing the anynode frontend. We will address this issue shortly. Depending on your browser, click on the button.
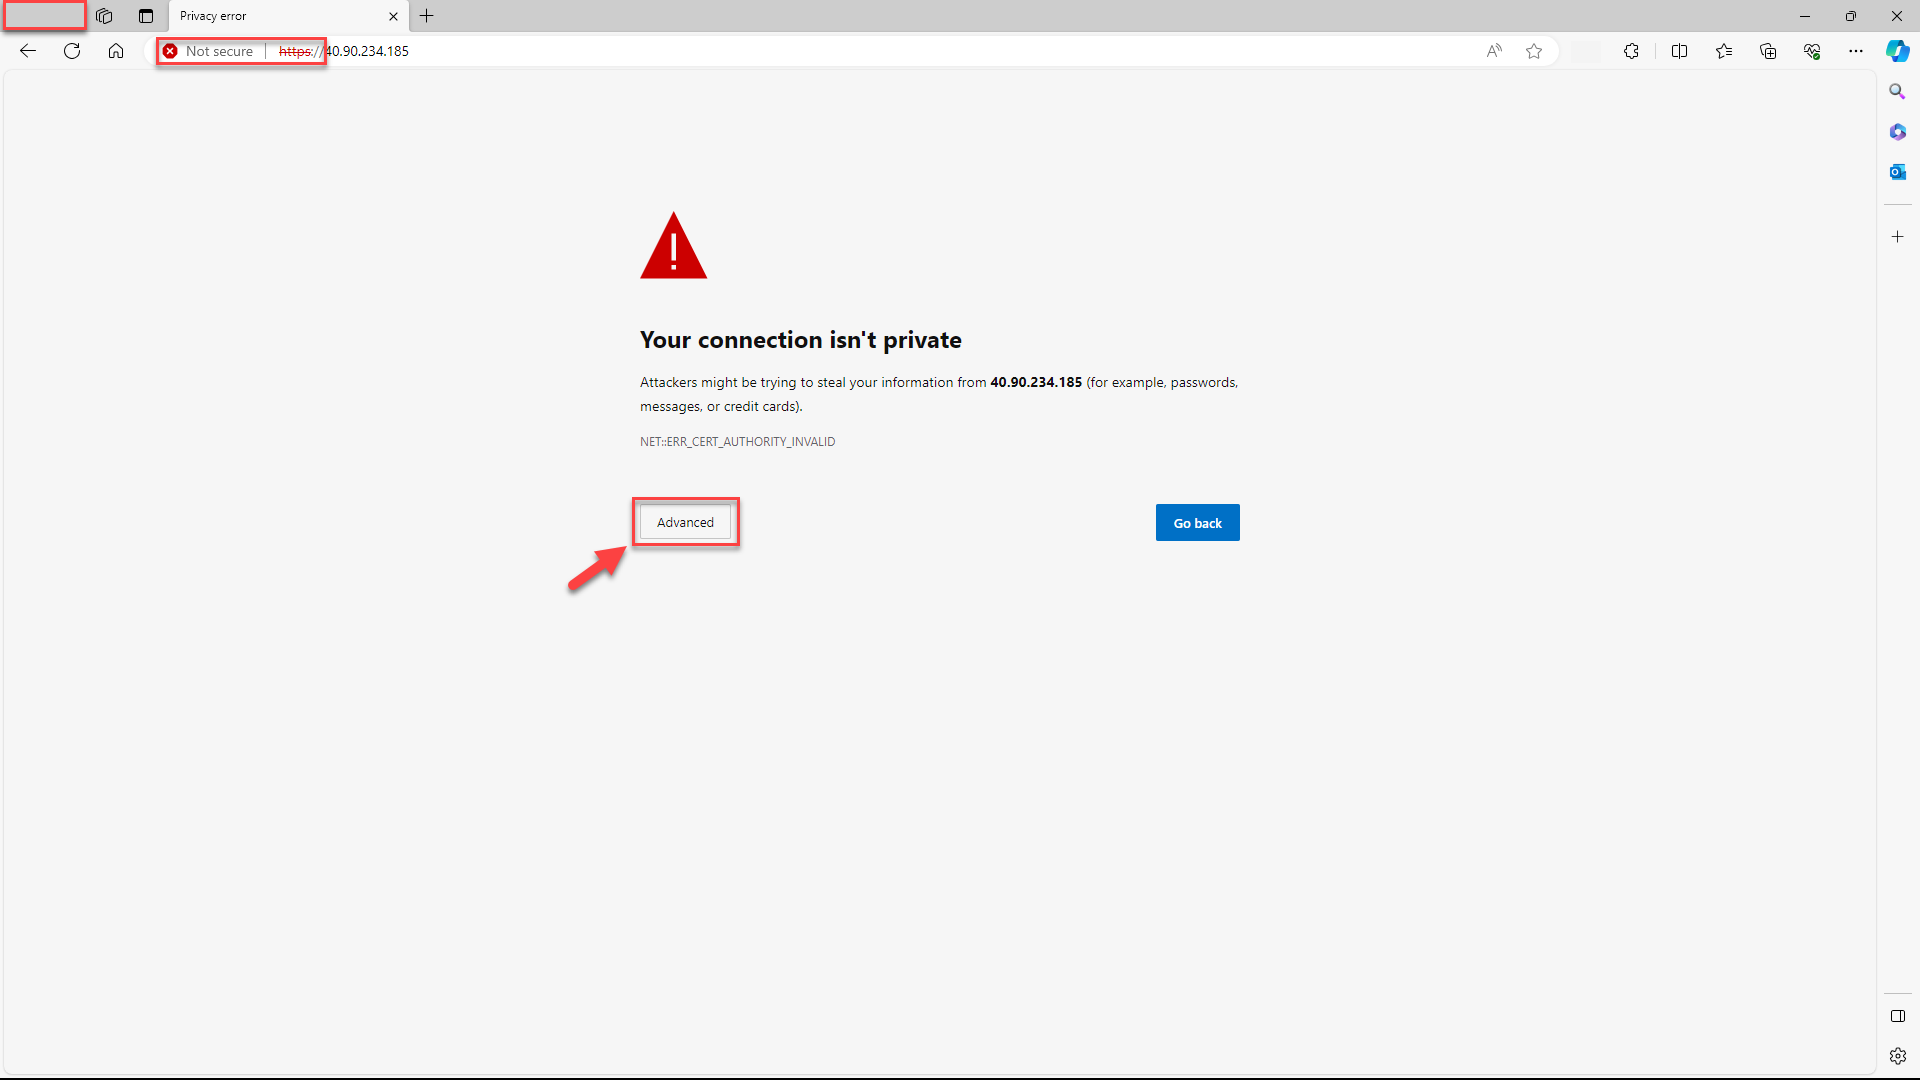
Click .
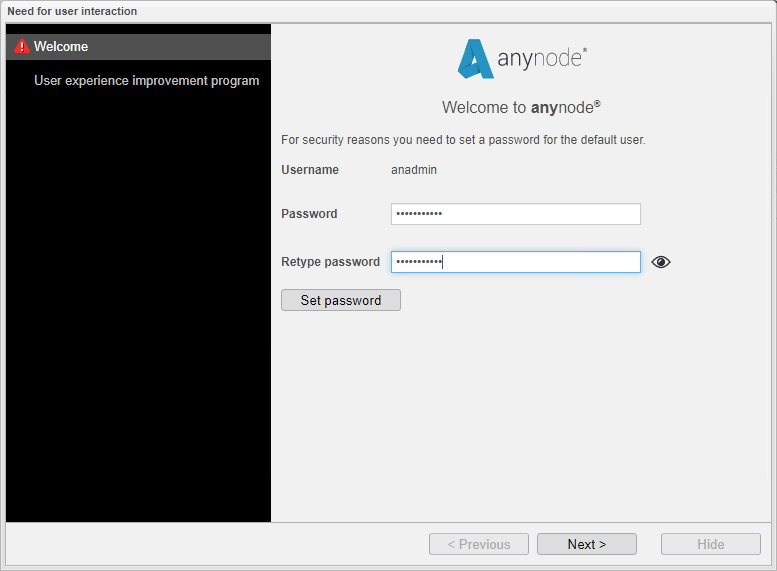
When you start anynode for the first time after installation, you must set up an initial password for the default administrator account.
The default username for the administrator account in the anynode frontend is always anadmin
The initial password must contain a minimum of 8 characters and should not include number sequences like 1234 for security reasons. The wizard will inform you during input whether the password is valid.
Click .
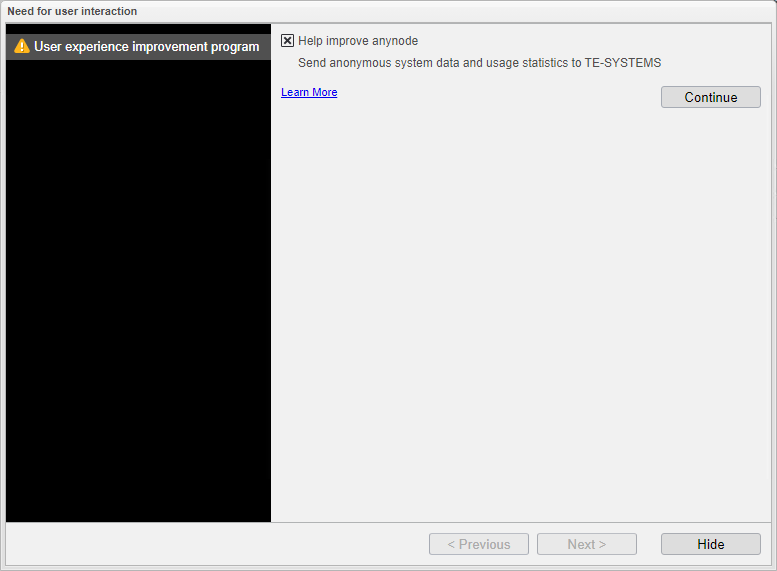
By agreeing to participate in our user experience improvement program, you can help us improve our product or service! Your feedback will enable us to enhance the overall usability and functionality, making it easier and more enjoyable.
Experience Improvement Program: you can help us learn from you!
Once you have made your decision, select to proceed to the next step.
You can now replace the certificate of the pre-configured HTTPS connector with your own certificate or request a certificate through the ACME functionality in anynode from a certificate issuance provider such as Let's Encrypt or ZeroSSL. For further steps, refer to our guide on 'Let's Encrypt & Co. with ACME and anynode – The Software SBC."
Please note that a certificate cannot be issued for the public IPv4 DNS name from Azure, as this DNS name is owned by Azure. You need to provide your own fully qualified domain name (FQDN) in this case.
Subsequently, check the secure connection to your anynode frontend. In our example, the new DNS name assigned is
Please note that you need to bring in and install your license for your anynode on Microsoft Azure. Our sales team will be happy to assist you.
There is also a Licensing video tutorial available.
If you want to test anynode with a trial without obligation, the free anynode demo license is automatically available with each anynode installation. The demo license is limited to four sessions and plays a sporadic voice announcement, also the functions "Media Pass Through" and "Internal Pass Replacement" are not available.
Access to the VM with Debian via Azure Bastion
Azure Bastion safeguards your virtual machines by offering lightweight, browser-based connectivity, eliminating the necessity to expose them via public IP addresses. This reduces the attack surface and mitigates the risk of unauthorized access. Upon deployment, a Bastion host is automatically generated on a subnet within your virtual network.
Click on and click on your newly created virtual machine.
The easiest way to access the virtual machine with anynode is the following: Use the button in the upper menu and choose Connect via Bastion.

To create a Bastion host on a subnet within your virtual network, simply click Deploy Bastion.

Select the Keyboard Language of the VM.
Under Authentication Type, choose VM Password.
Utilize the credentials you assigned earlier in the instance details.
Click on the button.
You are connected to your VM now.
It's important to note that when using Azure Bastion, you don't need superuser permissions to connect to the VM. Once you've established a successful SSH connection, you can execute superuser commands using the sudo command if needed.
If you wish to stop and restart the anynode frontend,
You can check the operational status using the following command:

Change the VM Size
You can typically change the VM size in Microsoft Azure, the available options may be restricted by factors such as regional availability and specific VM size constraints. Always check the Microsoft documentation and the sizes available in your chosen region to determine the options for resizing your VM.
Changing the size of a VM hosting anynode in Azure can potentially disrupt ongoing calls and communications
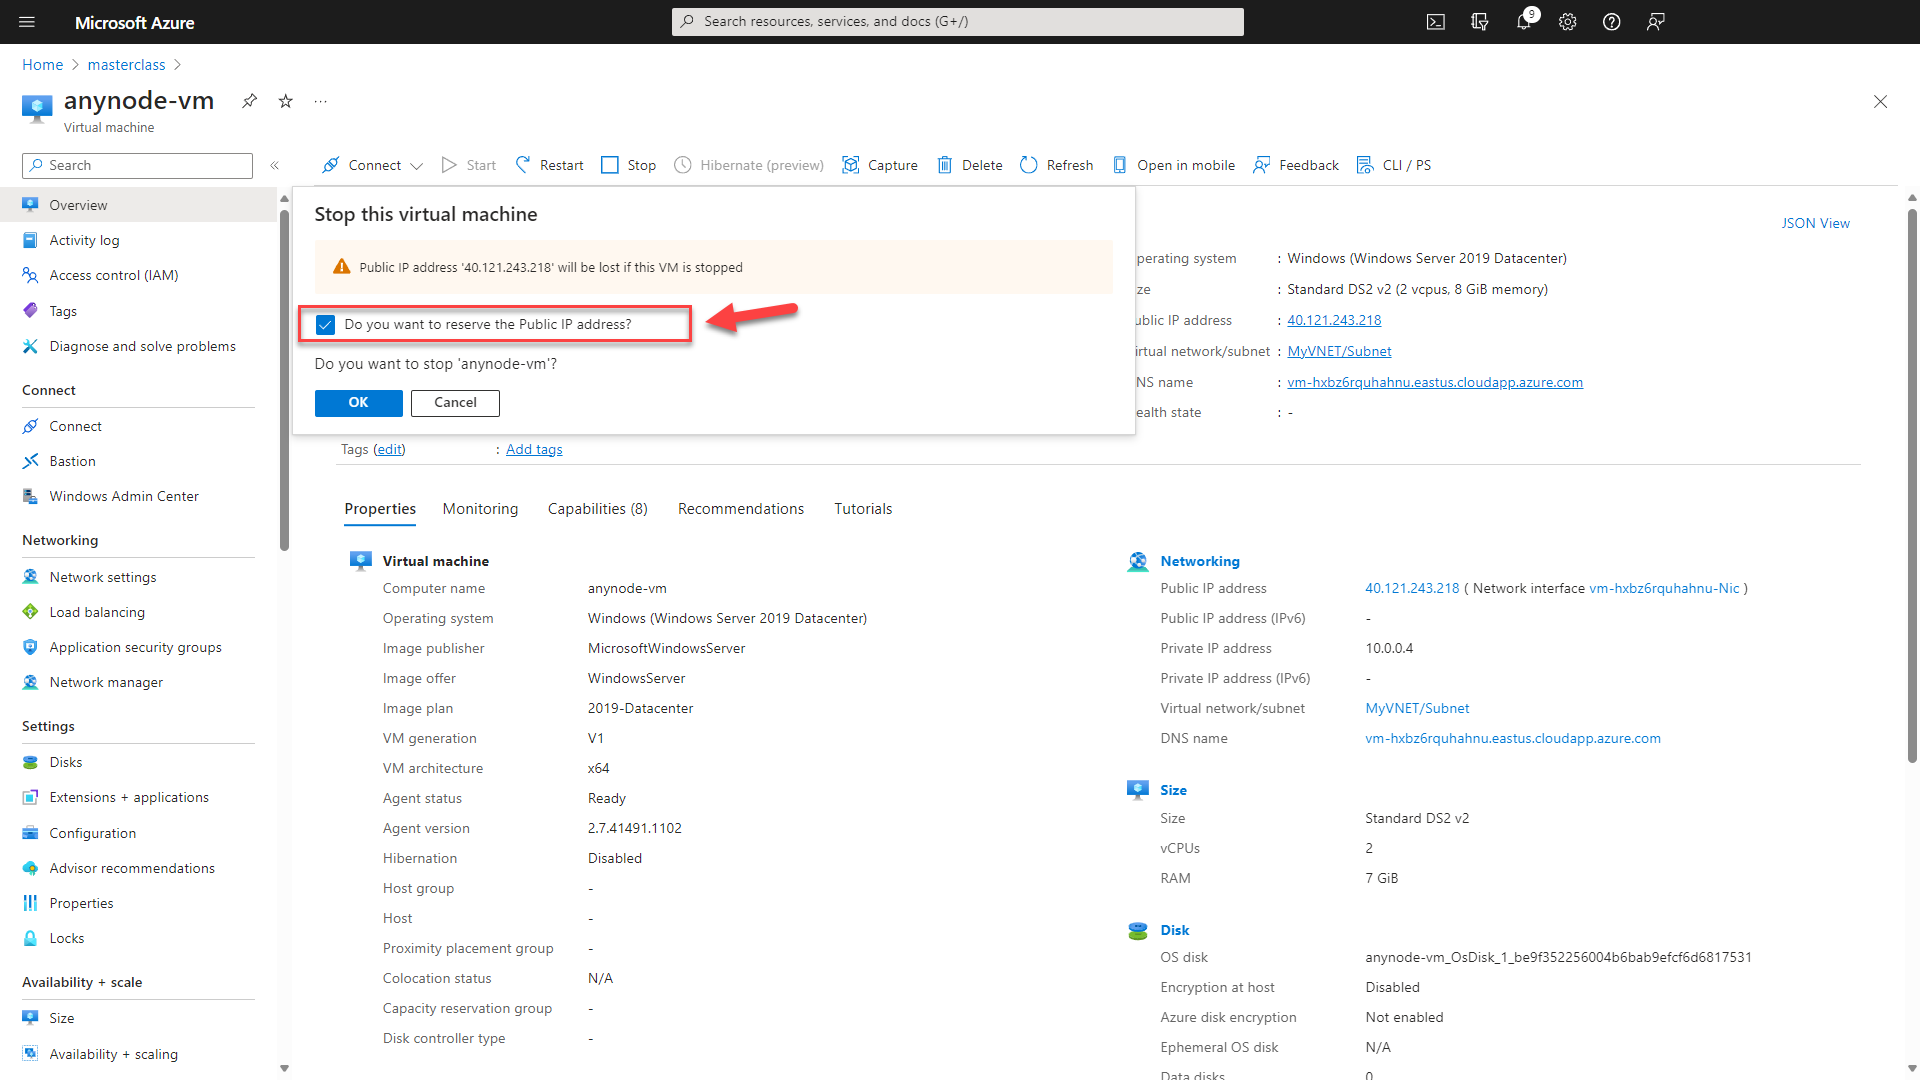
After creating a virtual machine (VM), you have the option to scale the VM up or down by adjusting its size. However, in certain cases, you may need to deallocate the VM first. Deallocation becomes necessary when the desired size isn't available on the current hardware cluster hosting the VM.
In the upper menu of your virtual machine, click on the Button to deallocate your anynode VM."Do you want to reserve the public IP address" and click on the button. With this option, the public and private IP addresses assigned to the VM will remain the same even after resizing. Azure uses dynamic IP assignment by default, so if you have a dynamic public IP address assigned to the VM, it will remain unchanged after resizing. Similarly, if you have configured a static (reserved) IP address for the VM, it will also persist through the VM size change.
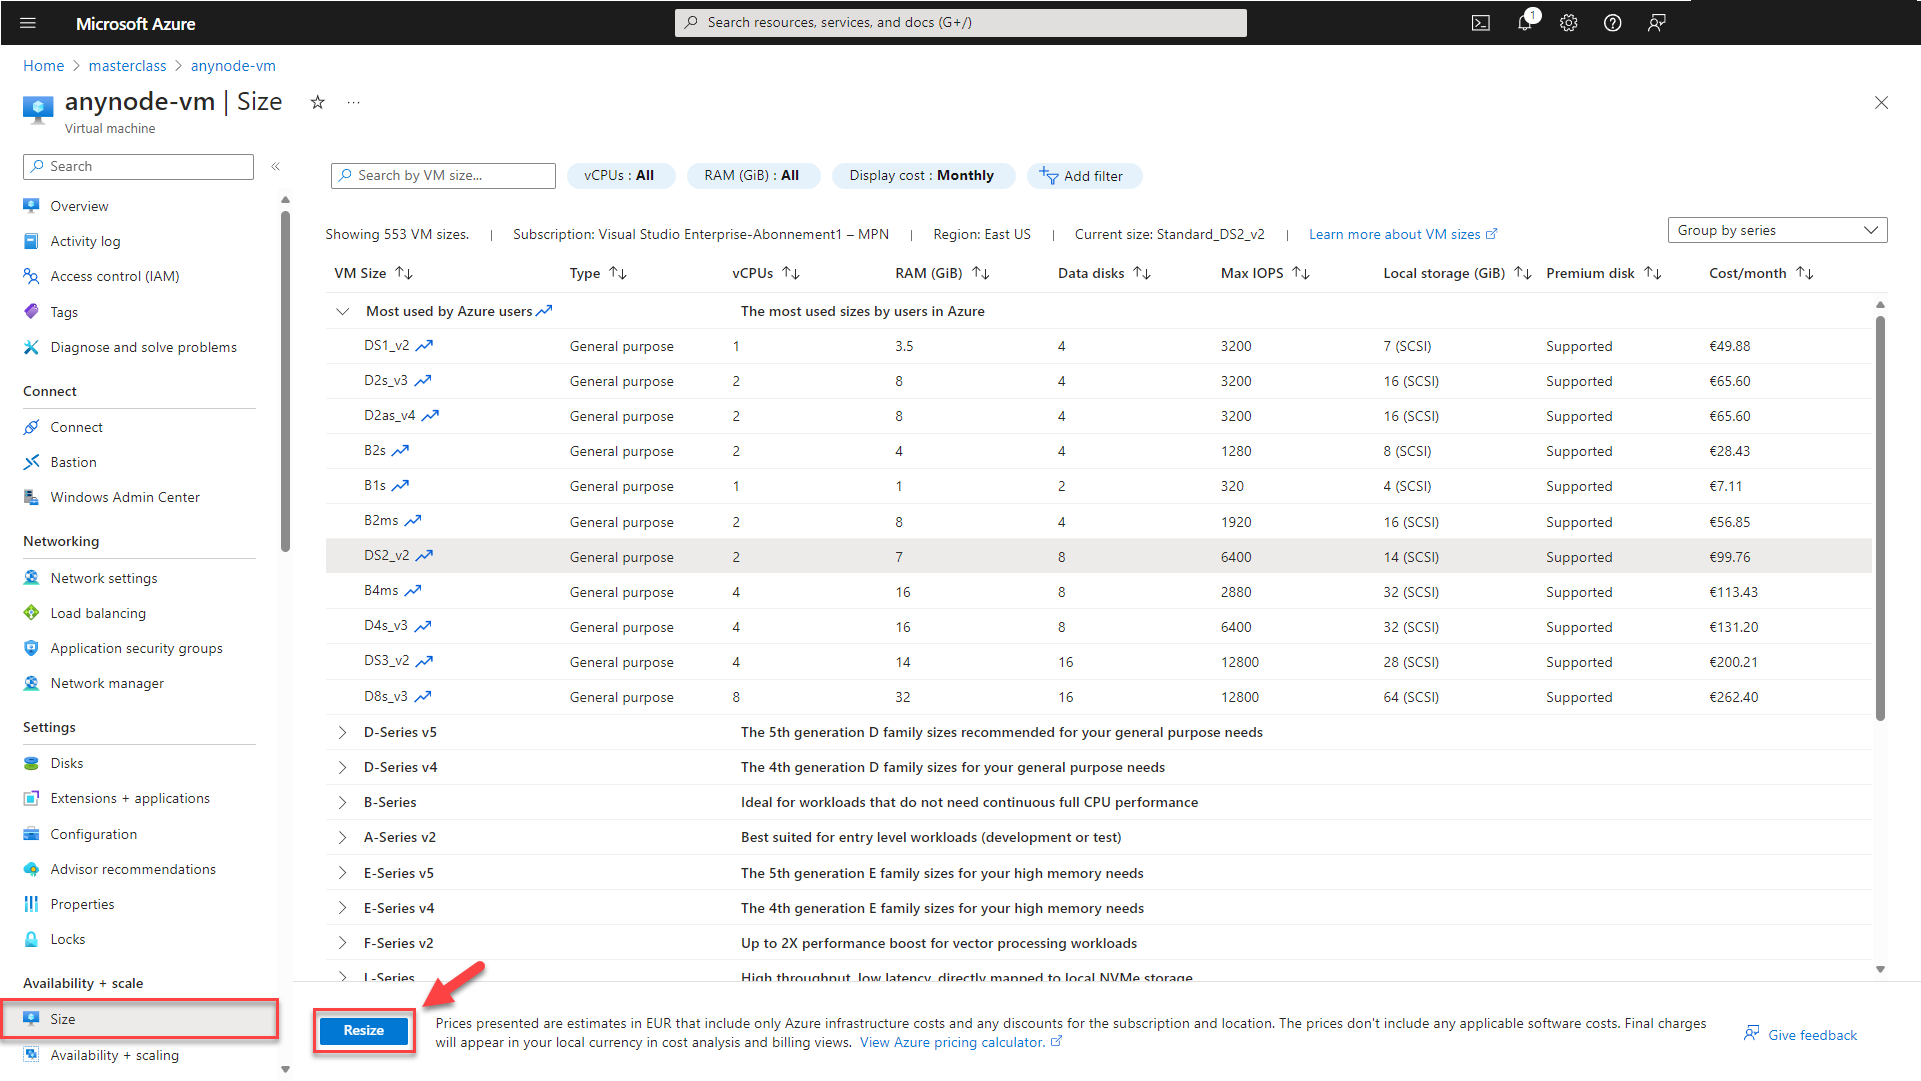
In the left menu of your virtual machine, choose Size. Then, select a new compatible size from the list of available sizes.

Finally, click on the button.
If the anynode virtual machine is currently running, resizing it will trigger a restart.
Click on the button.
Congratulations on reaching the final stages of deploying anynode from the Azure Marketplace. Get ready to elevate your communication capabilities and empower your team.