Create Backup
In this segment, you will gain comprehensive insights into the seamless generation of a backup file, with the added convenience of automation via REST API integration.
The default user anadmin has all rights for creating a backup, with one exception: the backup of media recordings can only be performed by a new user with administrator and media recorder roles.
To secure recorded sessions, create a new user with administrator and media recorder roles through anynode's user management
Please note that the file size can increase when many recordings are included in the backup.
Then, initiate the backup function with this newly created user.
Click on Extras, User Management and Users, Roles & Policies in the upper menu. At this point, we won't describe the individual steps in the anynode user management. However, you can typically use the default values there.
Now let's consider the individual steps for creating a successful backup.
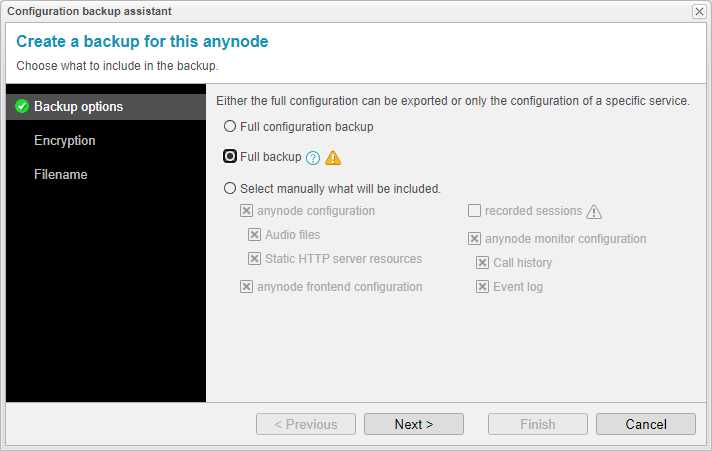
Click on Configuration and Backup in the upper menu. Choose what to include in the backup. Either the complete configuration can be exported, or only the configuration of a specific service.
The first option, Full Configuration Backup, encompasses the anynode configuration along with audio files and static HTTP server resources. It includes the anynode frontend configuration and the anynode monitor configuration, excluding the call history and event log.
The second option Full backup allows for maximum data backup. In our example, we will opt for the second option.
Normally, this option would encompass recorded sessions. However, in our example, we have the default anadmin user as the current user. The default user anadmin lacks permission to access the recordings, so the recordings will be excluded. To secure recorded sessions, create a new user with administrator and media recorder roles through anynode's user management.
The third option Select manually what will be included enables individual selection.
Click on the button to continue.
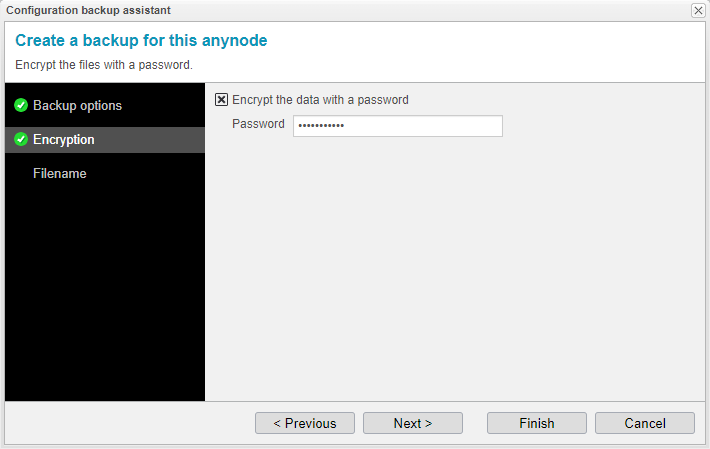
You have the option to protect the downloaded backup files with a password.
This is the default setting. Activate Encrypt the data with a password.
Your password should have a minimum of eight characters. Number sequences are not allowed. It is recommended to use a combination of upper- and lowercase letters, numbers, and symbols. Avoid using words or names of people, characters, organizations, products, or anything else that can be easily guessed or associated with you.
Click the button to proceed.

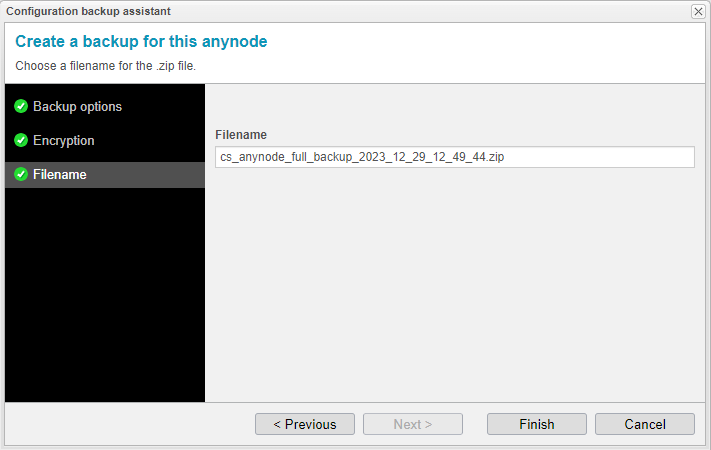
The assistant suggests a file name with date and time, but you can also freely choose your own.
Click on .

anynode will gather all the necessary data and save it as a ZIP file. The compilation of the required data is done in the background, allowing you to continue working in the frontend during this process. An additional status window will keep you informed about progress. Please ensure the download is complete before using the ZIP file.
Click on the button.

Afterward, a zipped file will be downloaded to your system's download folder. Depending on the chosen backup type and media recorder rules, you will find a folder structure with recordings.

Create Configuration Backup via REST API and Windows PowerShell
The anynode REST API support and Windows PowerShell allow you to automate the backup process, enabling you to schedule regular backups without manual intervention. This ensures that critical configurations and data are consistently backed up at specified intervals. We would like to point out that the following commands only work for Windows PowerShell users.
To utilize the REST API, you can either use the existing default connector or create a new one.
It's crucial to enable the REST service explicitly on the connector intended for API access. Please note that the previously mentioned rights for administration and media recorder are also necessary in this context. You need at least anynode version 4.12 or later.
Refer to our REST API documentation for more details: In the upper anynode frontend menu, navigate to Info and REST API Documentation (read chapter 1 General).
The default connector for the anynode frontend at http://127.0.0.1 already has activated rights for access via REST API. To check if your connector has REST API rights, navigate to the top menu,
go to Extras, Web Server, Connectors. Choose a connector and click on the button. The Web Server Connector Assistant will open.
Click on the button.
Under Services, check if REST API is enabled.
Then, click on the button.
In our example, we will use the default connector at http://127.0.0.1 and the Windows PowerShell Integrated Scripting Environment (ISE).
Open Windows PowerShell ISE.
Before you can use the API, the anynode PowerShell module needs to be imported. Depending on the operating system, the module file can be found here:
Windows: C:\Program Files\TE-SYSTEMS\anynode frontend\res\powershell
Linux: /opt/tesystems/anynodefe/res/powershell
When importing a module in PowerShell, you might encounter the need to change the execution policy with:
Click on the button to change the execution policy.
Execute the command to import the anynode PowerShell module:
If needed, verify the path and filename of the module.
Click on the button to run the script.
In our example, we are using the default connector for the anynode frontend without a certificate. This command disables certificate checks for the rest of the PowerShell session:
If you are using a self-signed certificate for the connection, you can temporarily trust the certificate with the following command:
Now execute the command to create the backup file. In our example, we demonstrate the creation of a full configuration backup. If you only want to secure individual components, you must use request parameters for included data.
Here, we are using the default address and port of the anynode frontend, along with the standard user anadmin. Adjust these values if you are using a different connector or user.
For a full backup, use the following request parameters for included data:
MEDIA_FILES refers to the audio files configured in the node under "Tones and announcements". To include recordings, you would need to add RECORDINGS to the list. Remember that you need a user with administrator and media recorder roles to access the recordings.
Subsequently, enter your password for accessing anynode in the Windows PowerShell credential request.
Click on the button.
Enter a filename for the backup file. The file format is .zip and should be included in the filename.
Subsequently, the compressed backup file will be generated, downloaded, and saved in the specified path.
Create Configuration Backup via REST API on Linux with Shell Script
For Linux users not using PowerShell, we provide an included shell script that only needs minimal editing of the parameters. anynode provides the corresponding shell script with every Linux installation. The path to the script is:
To utilize the REST API, you can either use the existing default connector or create a new one.
It's crucial to enable the REST service explicitly on the connector intended for API access. Please note that the previously mentioned rights for Administration and Media Recorder are also necessary in this context. You need at least anynode version 4.12 or later.
Refer to our REST API documentation for more details in the following steps in the web server connector assistant. Our REST API documentation can be accessed directly through the anynode frontend: In the upper anynode frontend menu, navigate to Info and REST API Documentation, and read chapter General.
To check if your connector has REST API rights, navigate to the top menu, go to Extras, Web Server, Connectors. Choose a connector and click on the button.
The Web Server Connector Assistant will open.
Click on the button.
Under Services, check if REST API is enabled.
Then, click on the button.
Open your terminal or shell application on your anynode server or connect over SSH.
We recommend not executing the script in the same directory but rather in the folder where you intend to store the backup file afterward. Here is an example where the script is copied from its original location to the directory /home/anadmin/:
Now, you must input the IP address under which the anynode frontend is accessible, as well as the authentication credentials of the user from the anynode installation with the necessary permissions, into the script.
The command nano ./backup.sh opens the Nano text editor, allowing you to edit the content of the "backup.sh" file.
Navigate to anynode='127.0.0.1 and enter the address and port of the anynode frontend.
In our example, this is 172.18.0.149:443
Navigate to path= and specify the path where the backup file should be saved.
In our example, we use the ./ command to execute a program or script in the current directory.
Navigate to cred='anadmin:password' and enter the credentials of an anynode user with configuration write
access and REST access.
Go to backupParameter and modify the backup parameters to your needs.
The default script creates a full backup excluding recordings.
To include recordings, you would need to add RECORDINGS to the list. Remember that you need a user with administrator and media recorder roles to access the recordings.
Save the script with Control + O
Close the script with Control + X
Make the script executable afterward by executing:
In the context of performing a backup command via REST API, curl is employed to send HTTP requests to the REST API endpoint responsible for initiating the backup process. Install curl with the following command, if necessary:
Execute the script:
Use dir or ls to display the contents of the current directory.
The backup file is generated and saved. The ZIP file is timestamped in the filename, facilitating control over a current backup.
Backup with a Hot Standby System
With the anynode hot standby feature, you define important rules so that a secondary anynode system can take over in an emergency as part of a high availability configuration. Via the graphical user interface of this feature, all conditions for a switchover to the secondary standby system and back can be individually set. If you intend to perform a backup and restore using a hot standby system, there are several crucial considerations to keep in mind:
Backup primary system: Create a backup as described previously. Ensure that the backup includes at least the frontend configuration.
Backup secondary system: Do not use the combo box in the top right menu to switch to the secondary system. You must physically access the frontend of the secondary system.
Create a backup here as described previously, ensuring that it includes at least the frontend configuration.
Performing Backup When Call History and Events Are Stored in an External Database
For external call history and event databases, backup and restore operations are not conducted; these processes are exclusive to the internal (SQLite) database. Only the access to the external database is backed up and restored.
For the external database, utilize a full backup including the anynode monitor configuration under the backup options. The anynode monitor configuration always includes the setup for accessing the external database.


